FAQs

My Account

1. On the Top Menu, select Account/Login.

2. From the dropdown Menu, select My Account.

3. Complete the Register Form on the right:
– Add the email address where you wish to receive your communications from Townzie.
– Select the User Type:
– If you will make use of the website to plan your next trip, you will select “Customer”.
– If you would like to add a Listing and be able to manage the listing, then you will select “Vendor”. Once you select this option, more form fields will open that you will need to complete.

4. Tick the “Terms and Conditions” box after you have read through them.

5. Click on the Register button at the bottom of the form.
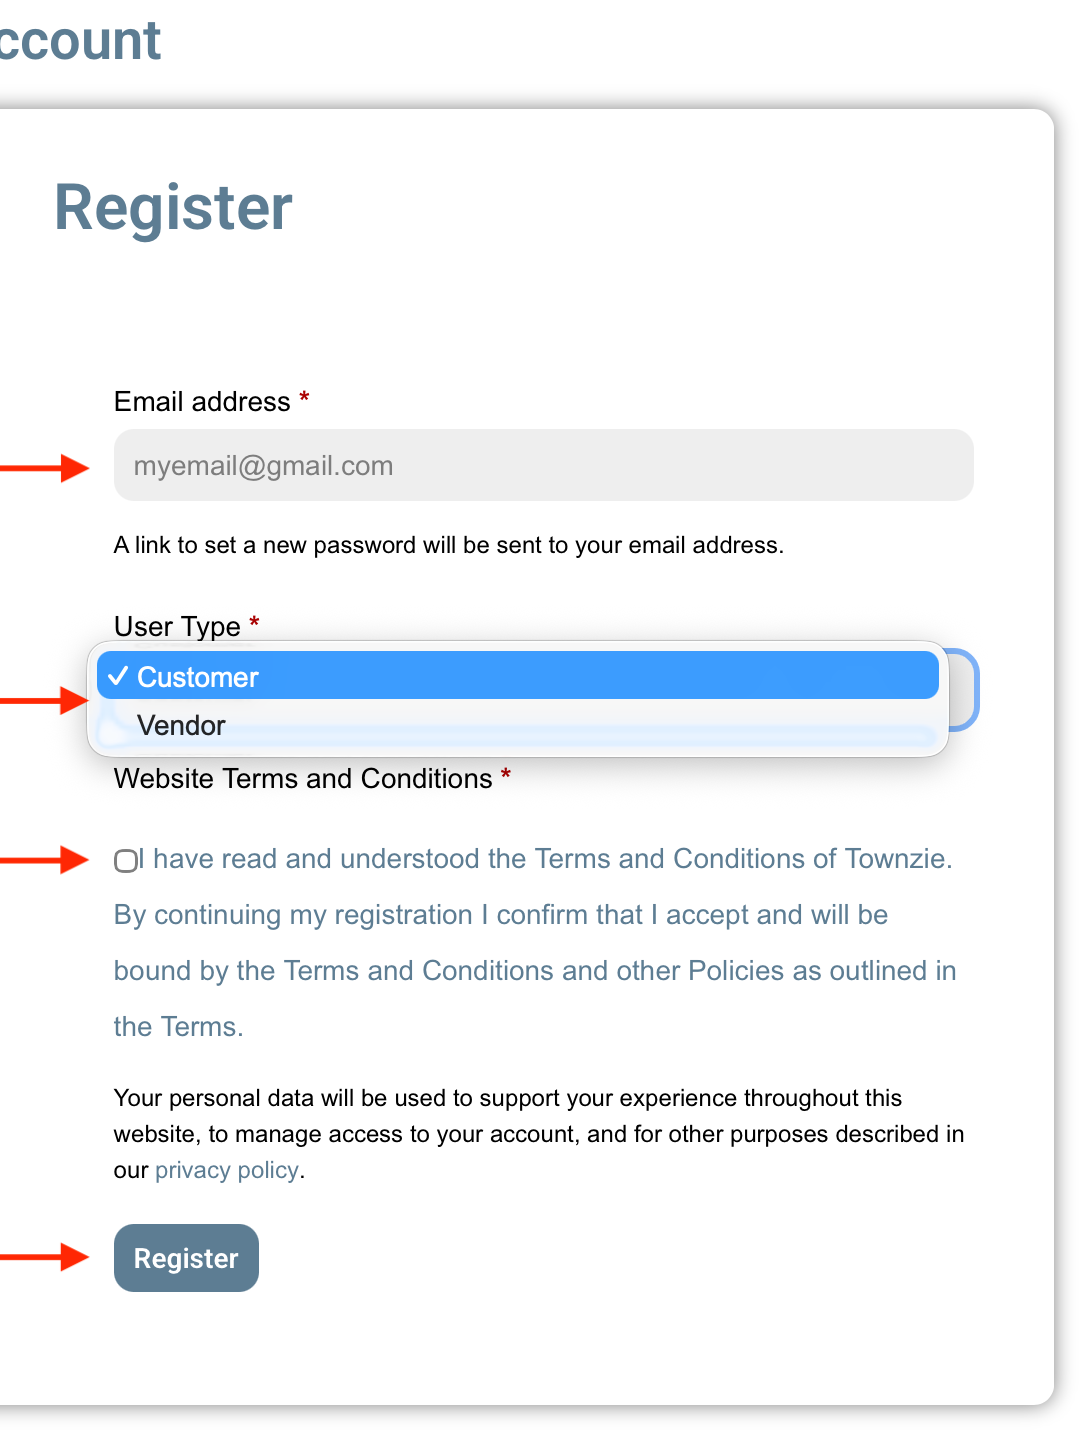
6. Your account should now be open, and you will be redirected to the My Account page.

If you registered as a Customer:

1. You should have received an email straight after you completed the registration form. Locate this email, and click on “Set your new password.”
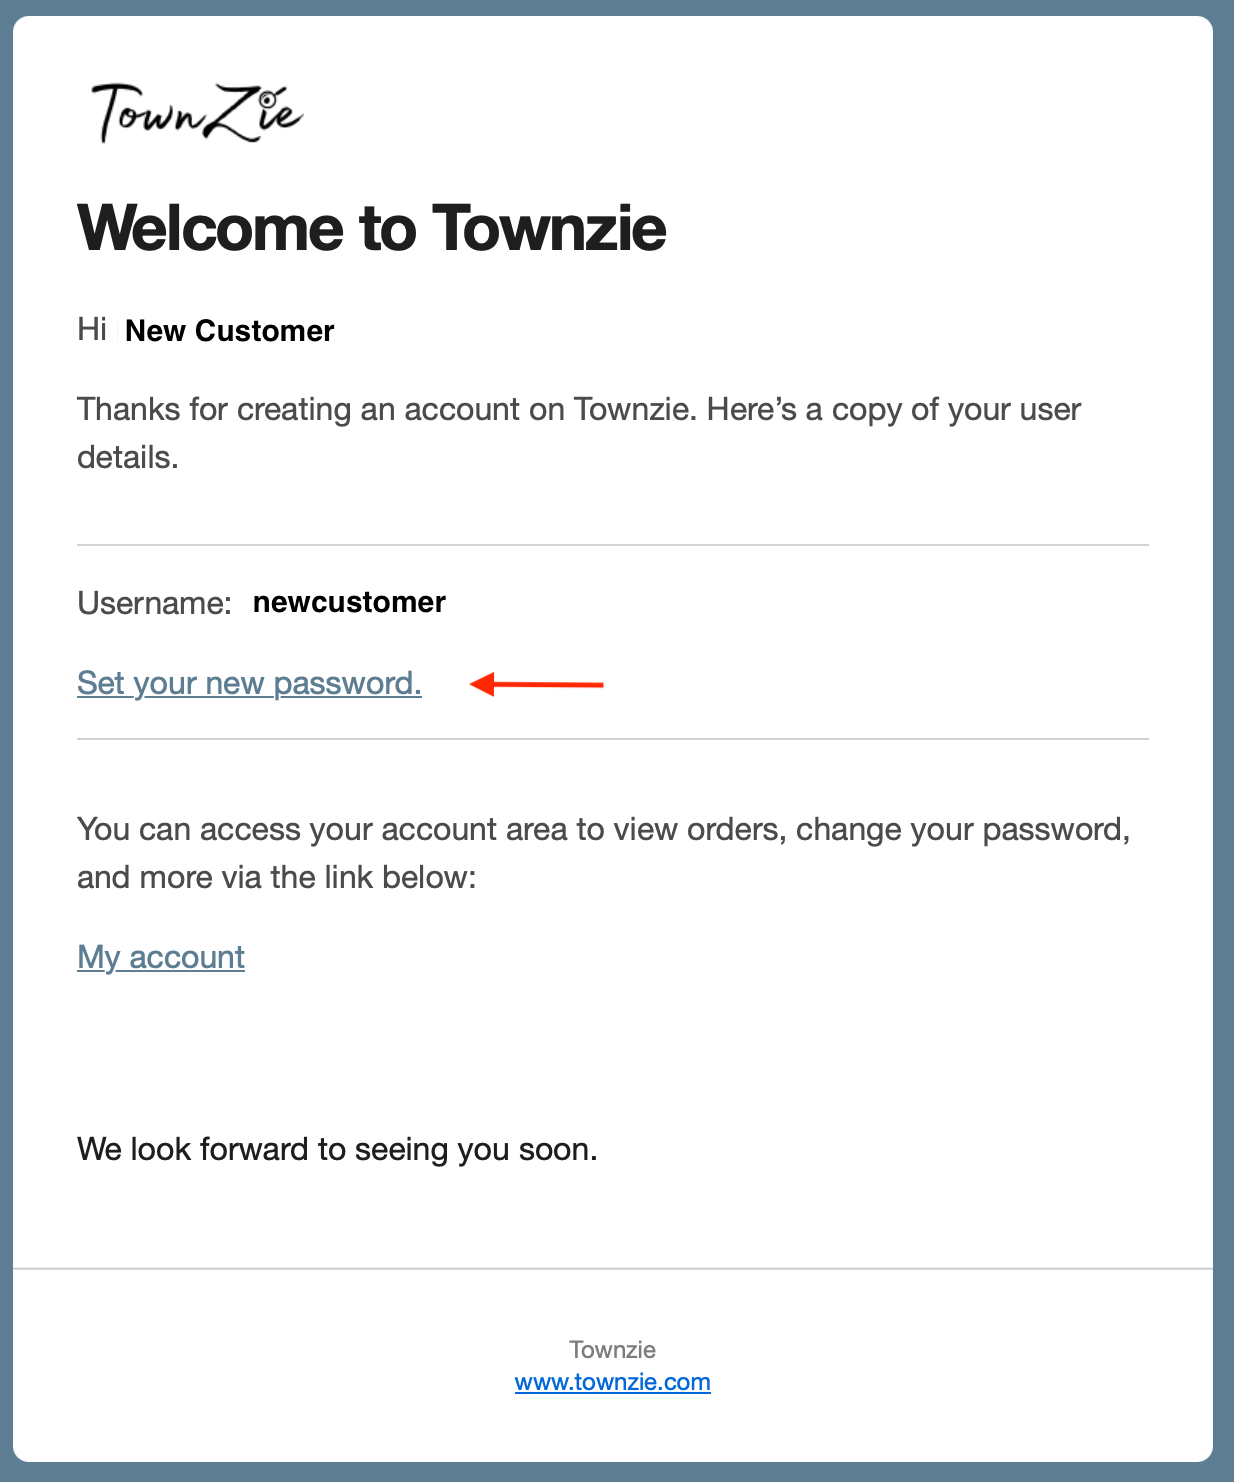
2. You will be redirected to a webpage where you may now enter your new password. Once completed, click on Save.
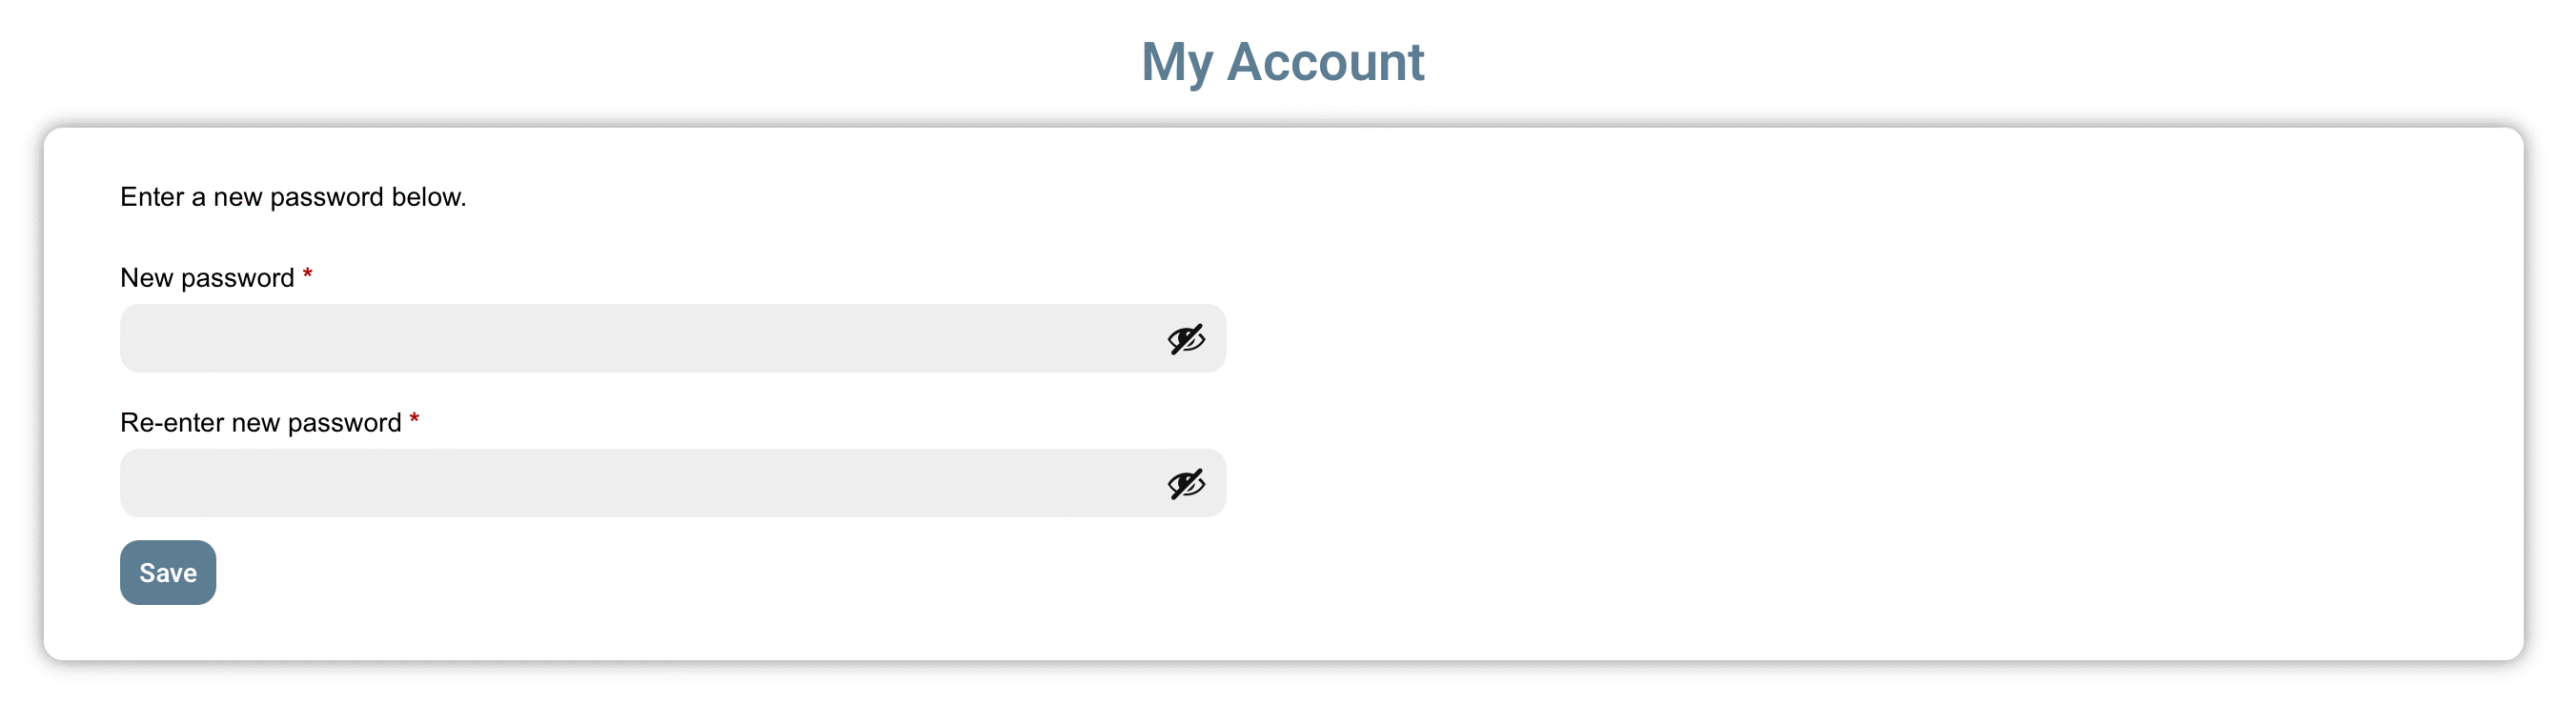
3. You will be redirected to the My Account web page.

If you registered as a Vendor:

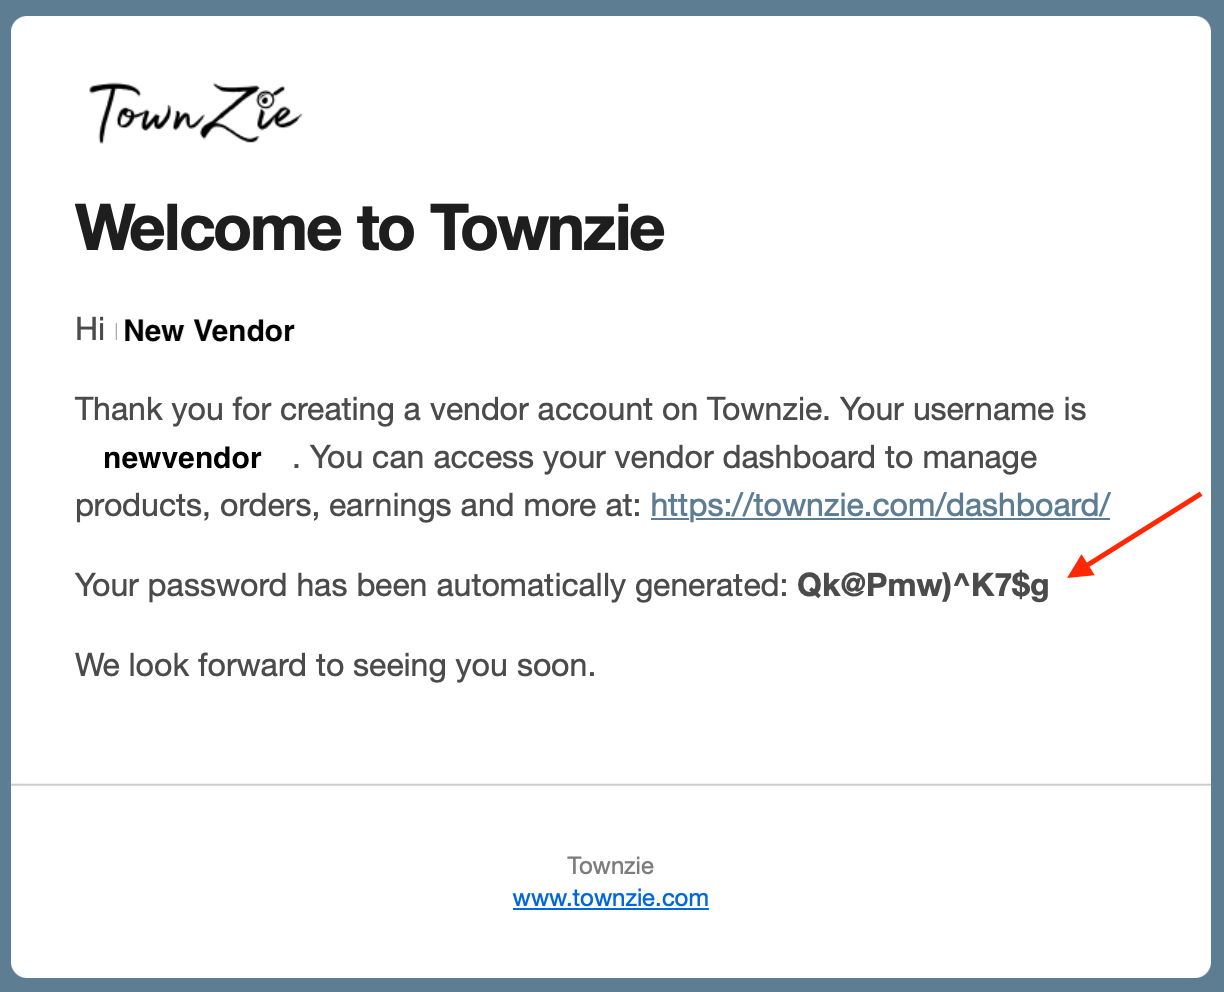
1. You should have received an email straight after you completed the registration form. Locate this email, and copy the temporary password received.
2. Return to the Townzie website, and on the Top Menu, select Account/Login.

3. From the dropdown Menu, select My Account.

4. On the Login form, enter your Username or Email, and then use the password you copied from the email in the Password field. Click on Log in. You will be redirected to the My Account page.

5. On the dashboard, select the Account Details tab. Change your password now in the fields provided. The “current password” will be the password you received in the email.
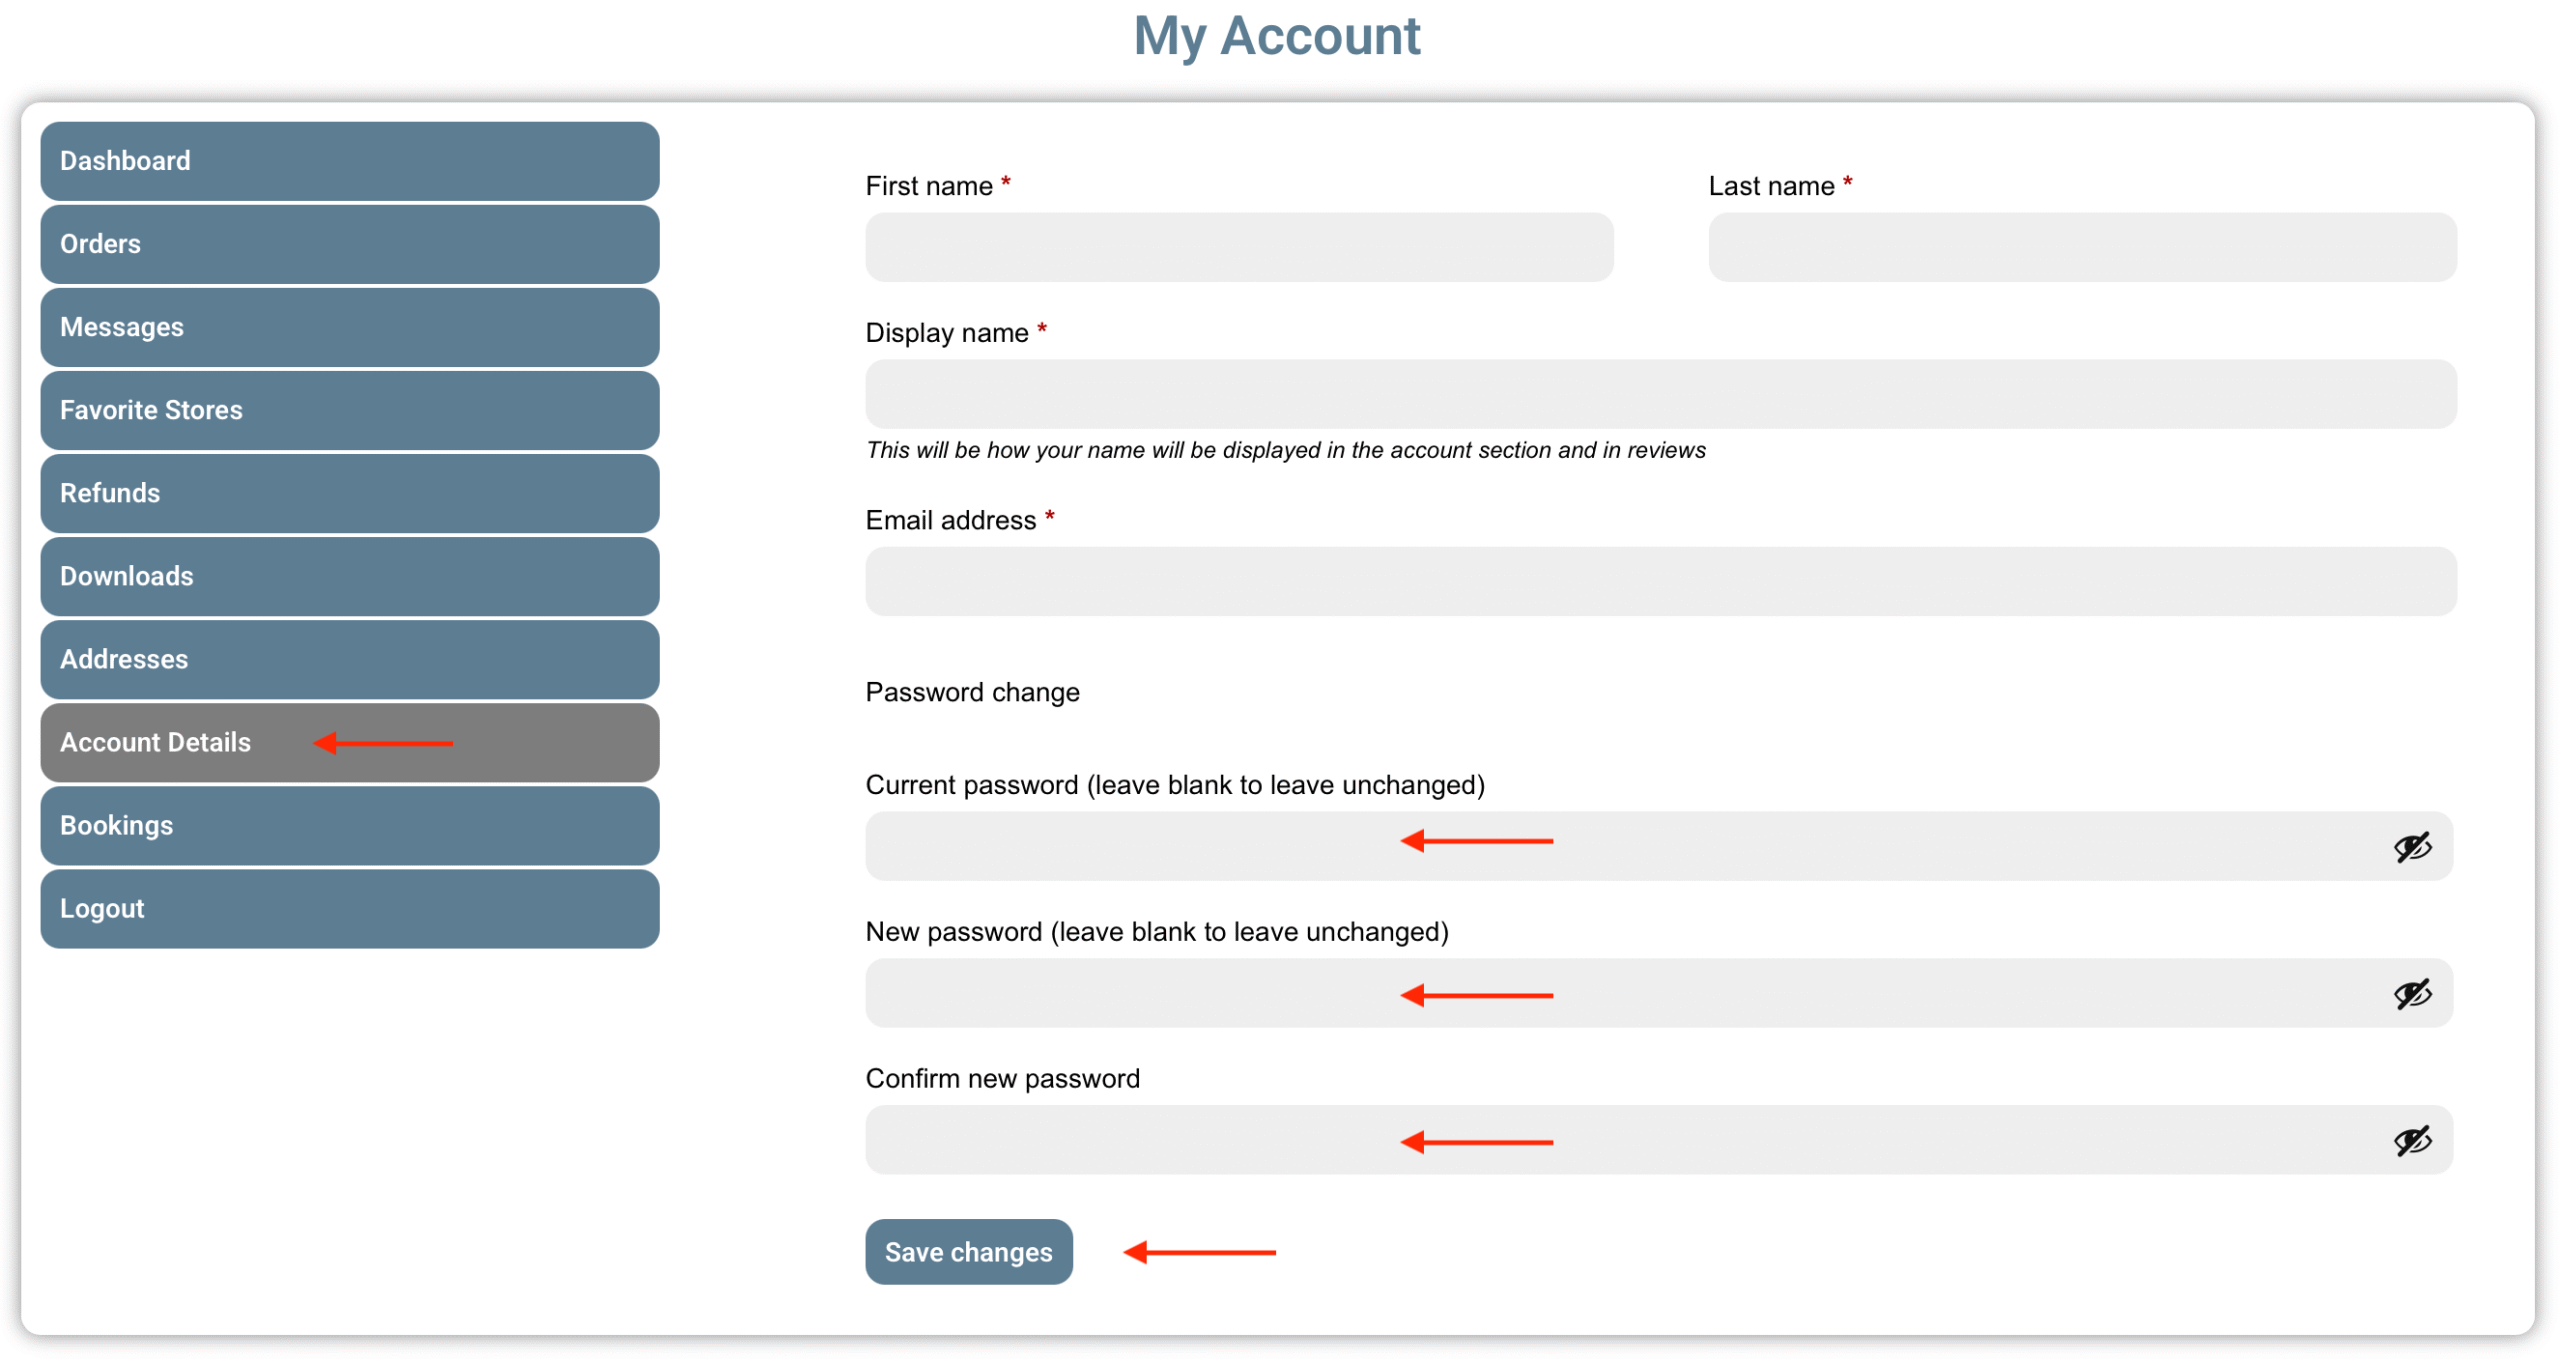
6. Once completed, simply click on Save.

Alternatively:

Simply follow the instructions as per “I have forgotten my Password” below.

1. On the Top Menu, select Account/Login.

2. From the dropdown Menu, select My Account.

3. Complete the Login form on the left:
– Add the Email address that you used when you registered with Townzie.
– Add the Password you chose for the Townzie account.

4. Click the Log in button.

5. You have now logged in and will be redirected to the My Account page.

1. On the Top Menu, select Account/Login.

2. From the dropdown Menu, select My Account.

3. On the Login form on the left, you will see “Lost your password?” under the login button. Click on this link.
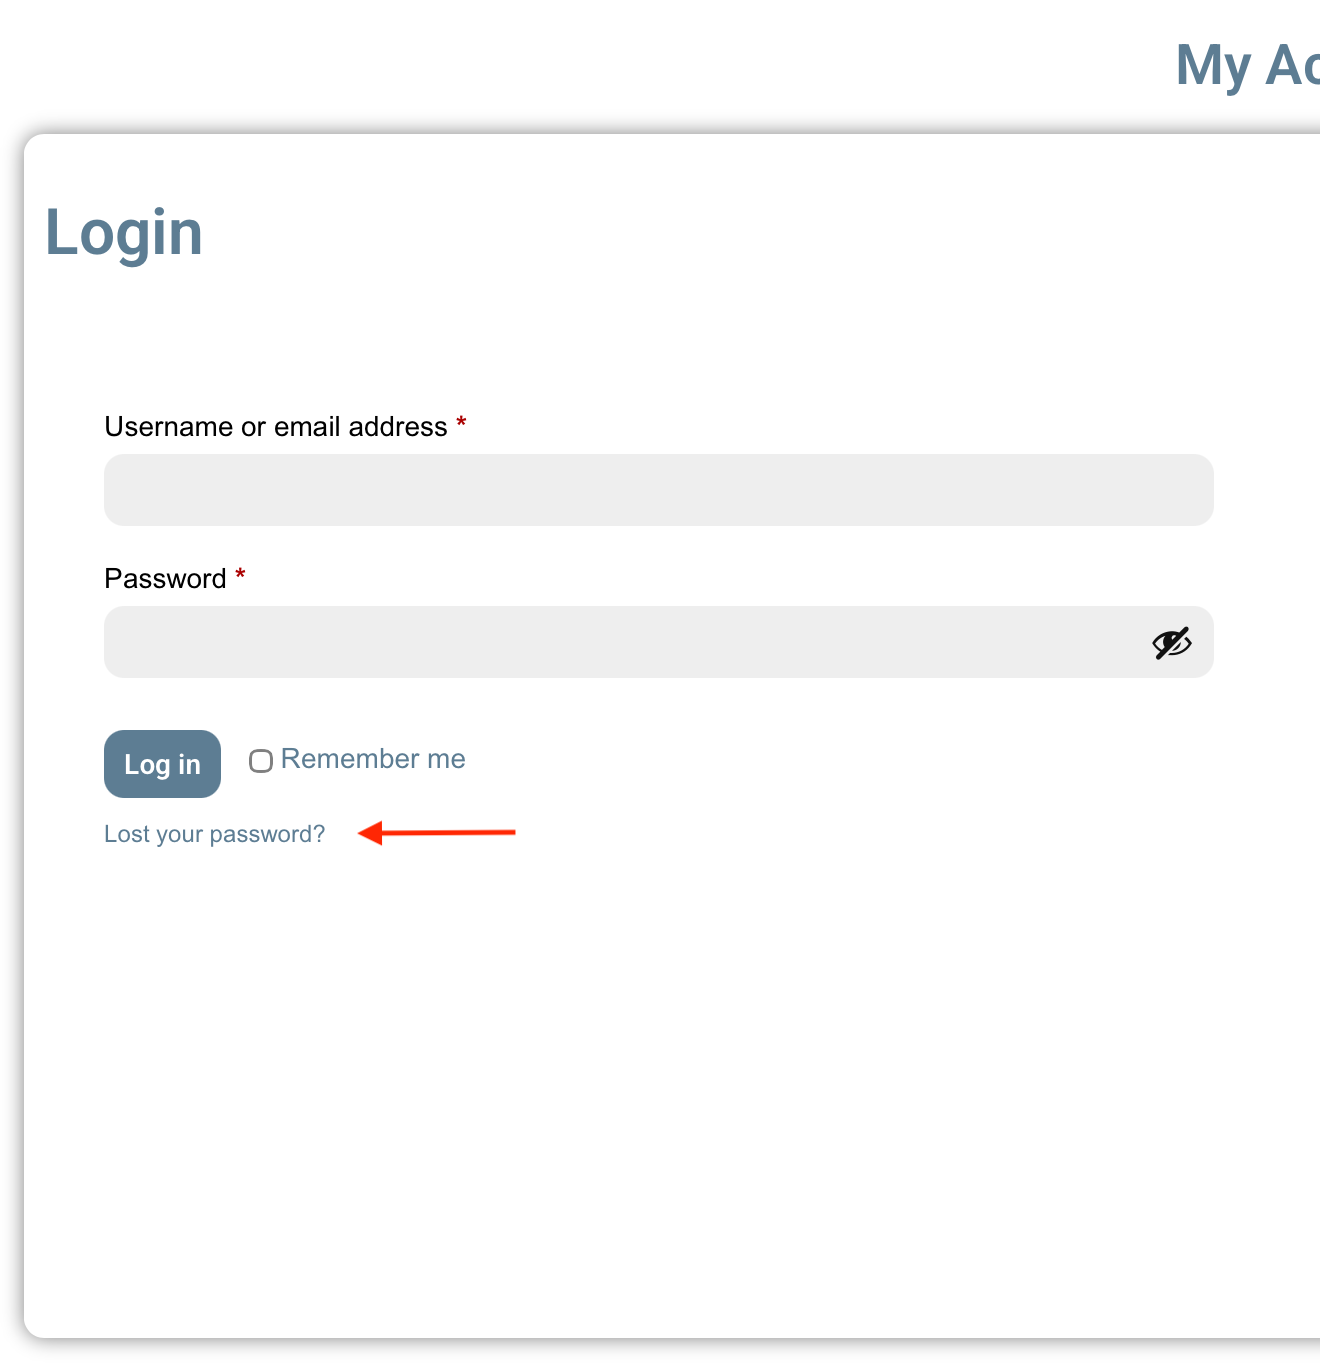
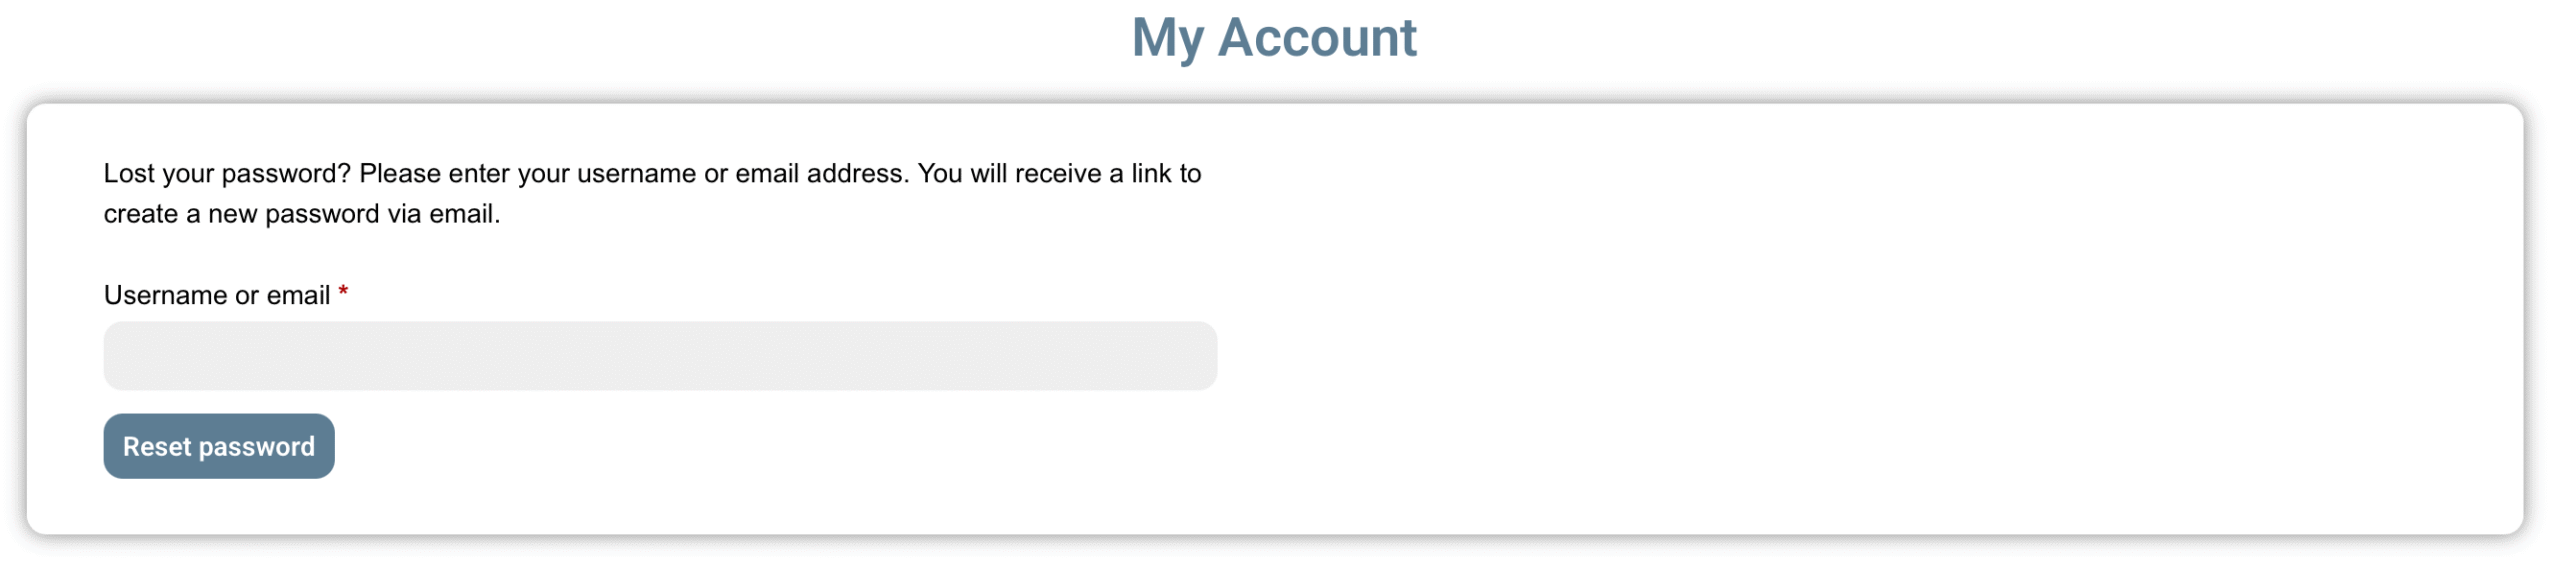
4. You will be redirected to a page where you will add either your Username or the Email that you use with your Townzie account. Enter either into the space provided and click on the button “Reset Password”.
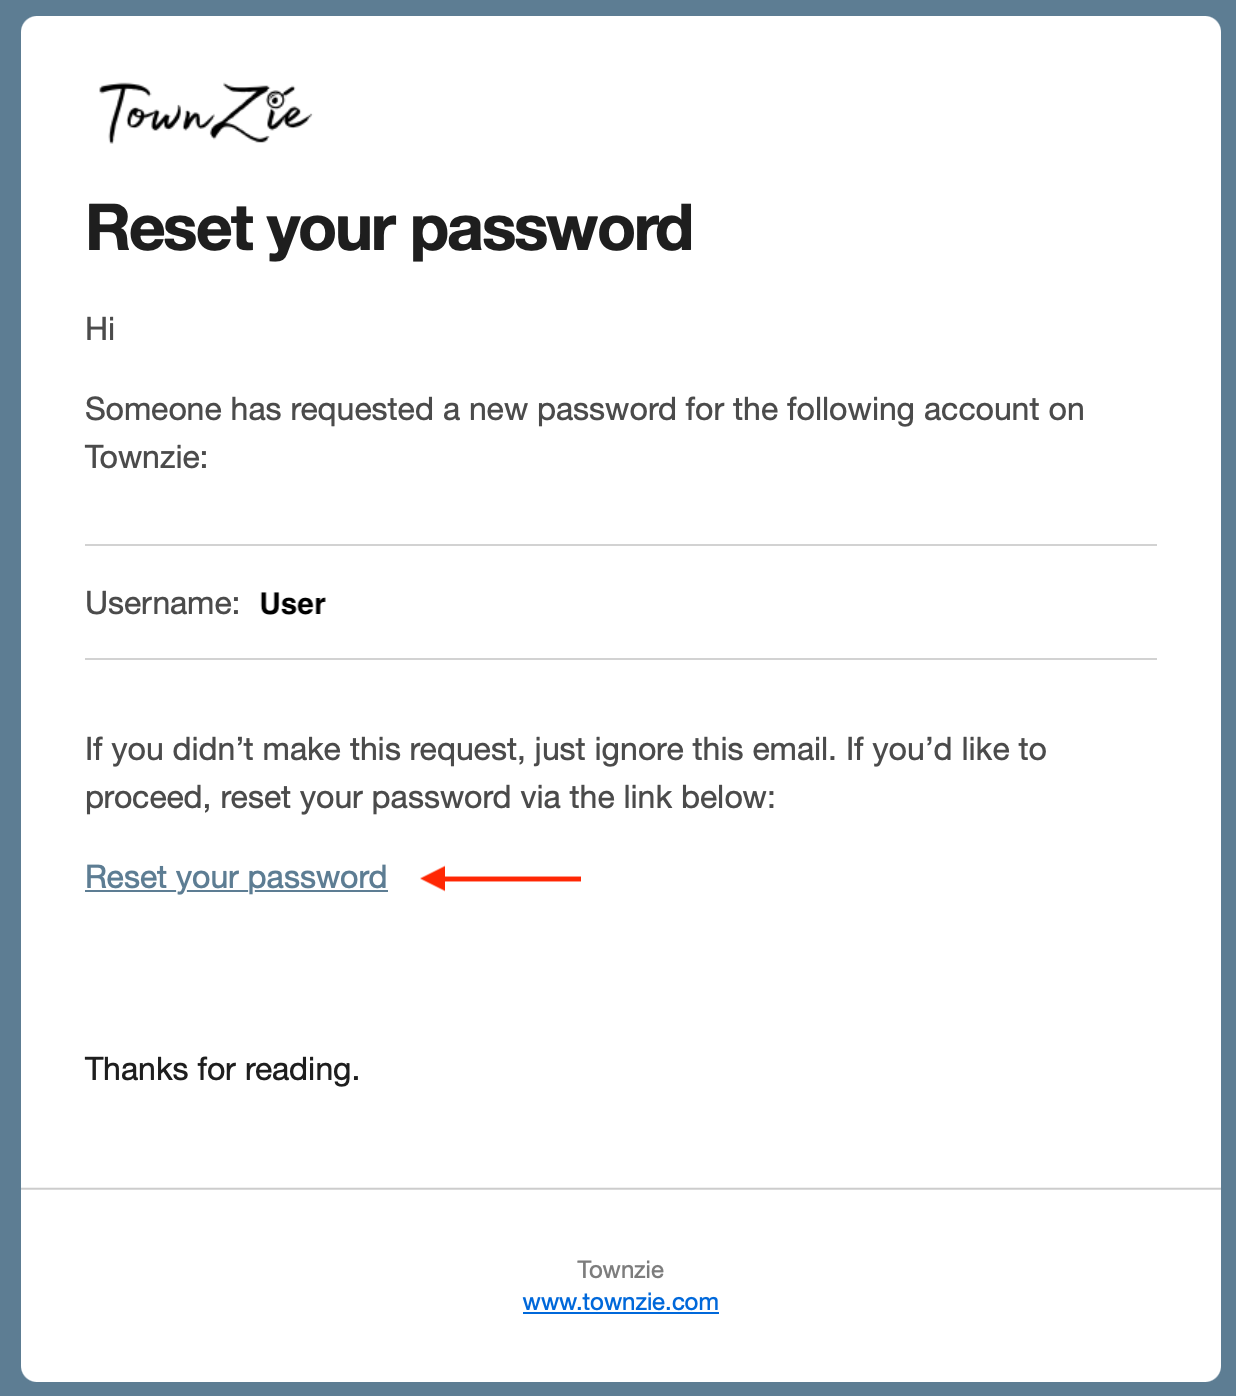
5. You will receive an email. In the email, click on the “Reset your Password” link.
6. You will be redirected to a webpage where you will be asked to enter your new password.

7. Once completed, you should now be able to log in to your account using the new password created. 

1. On the Top Menu, select Account/Login.

2. From the dropdown Menu, select My Account.

3. Log in to your account if not already.

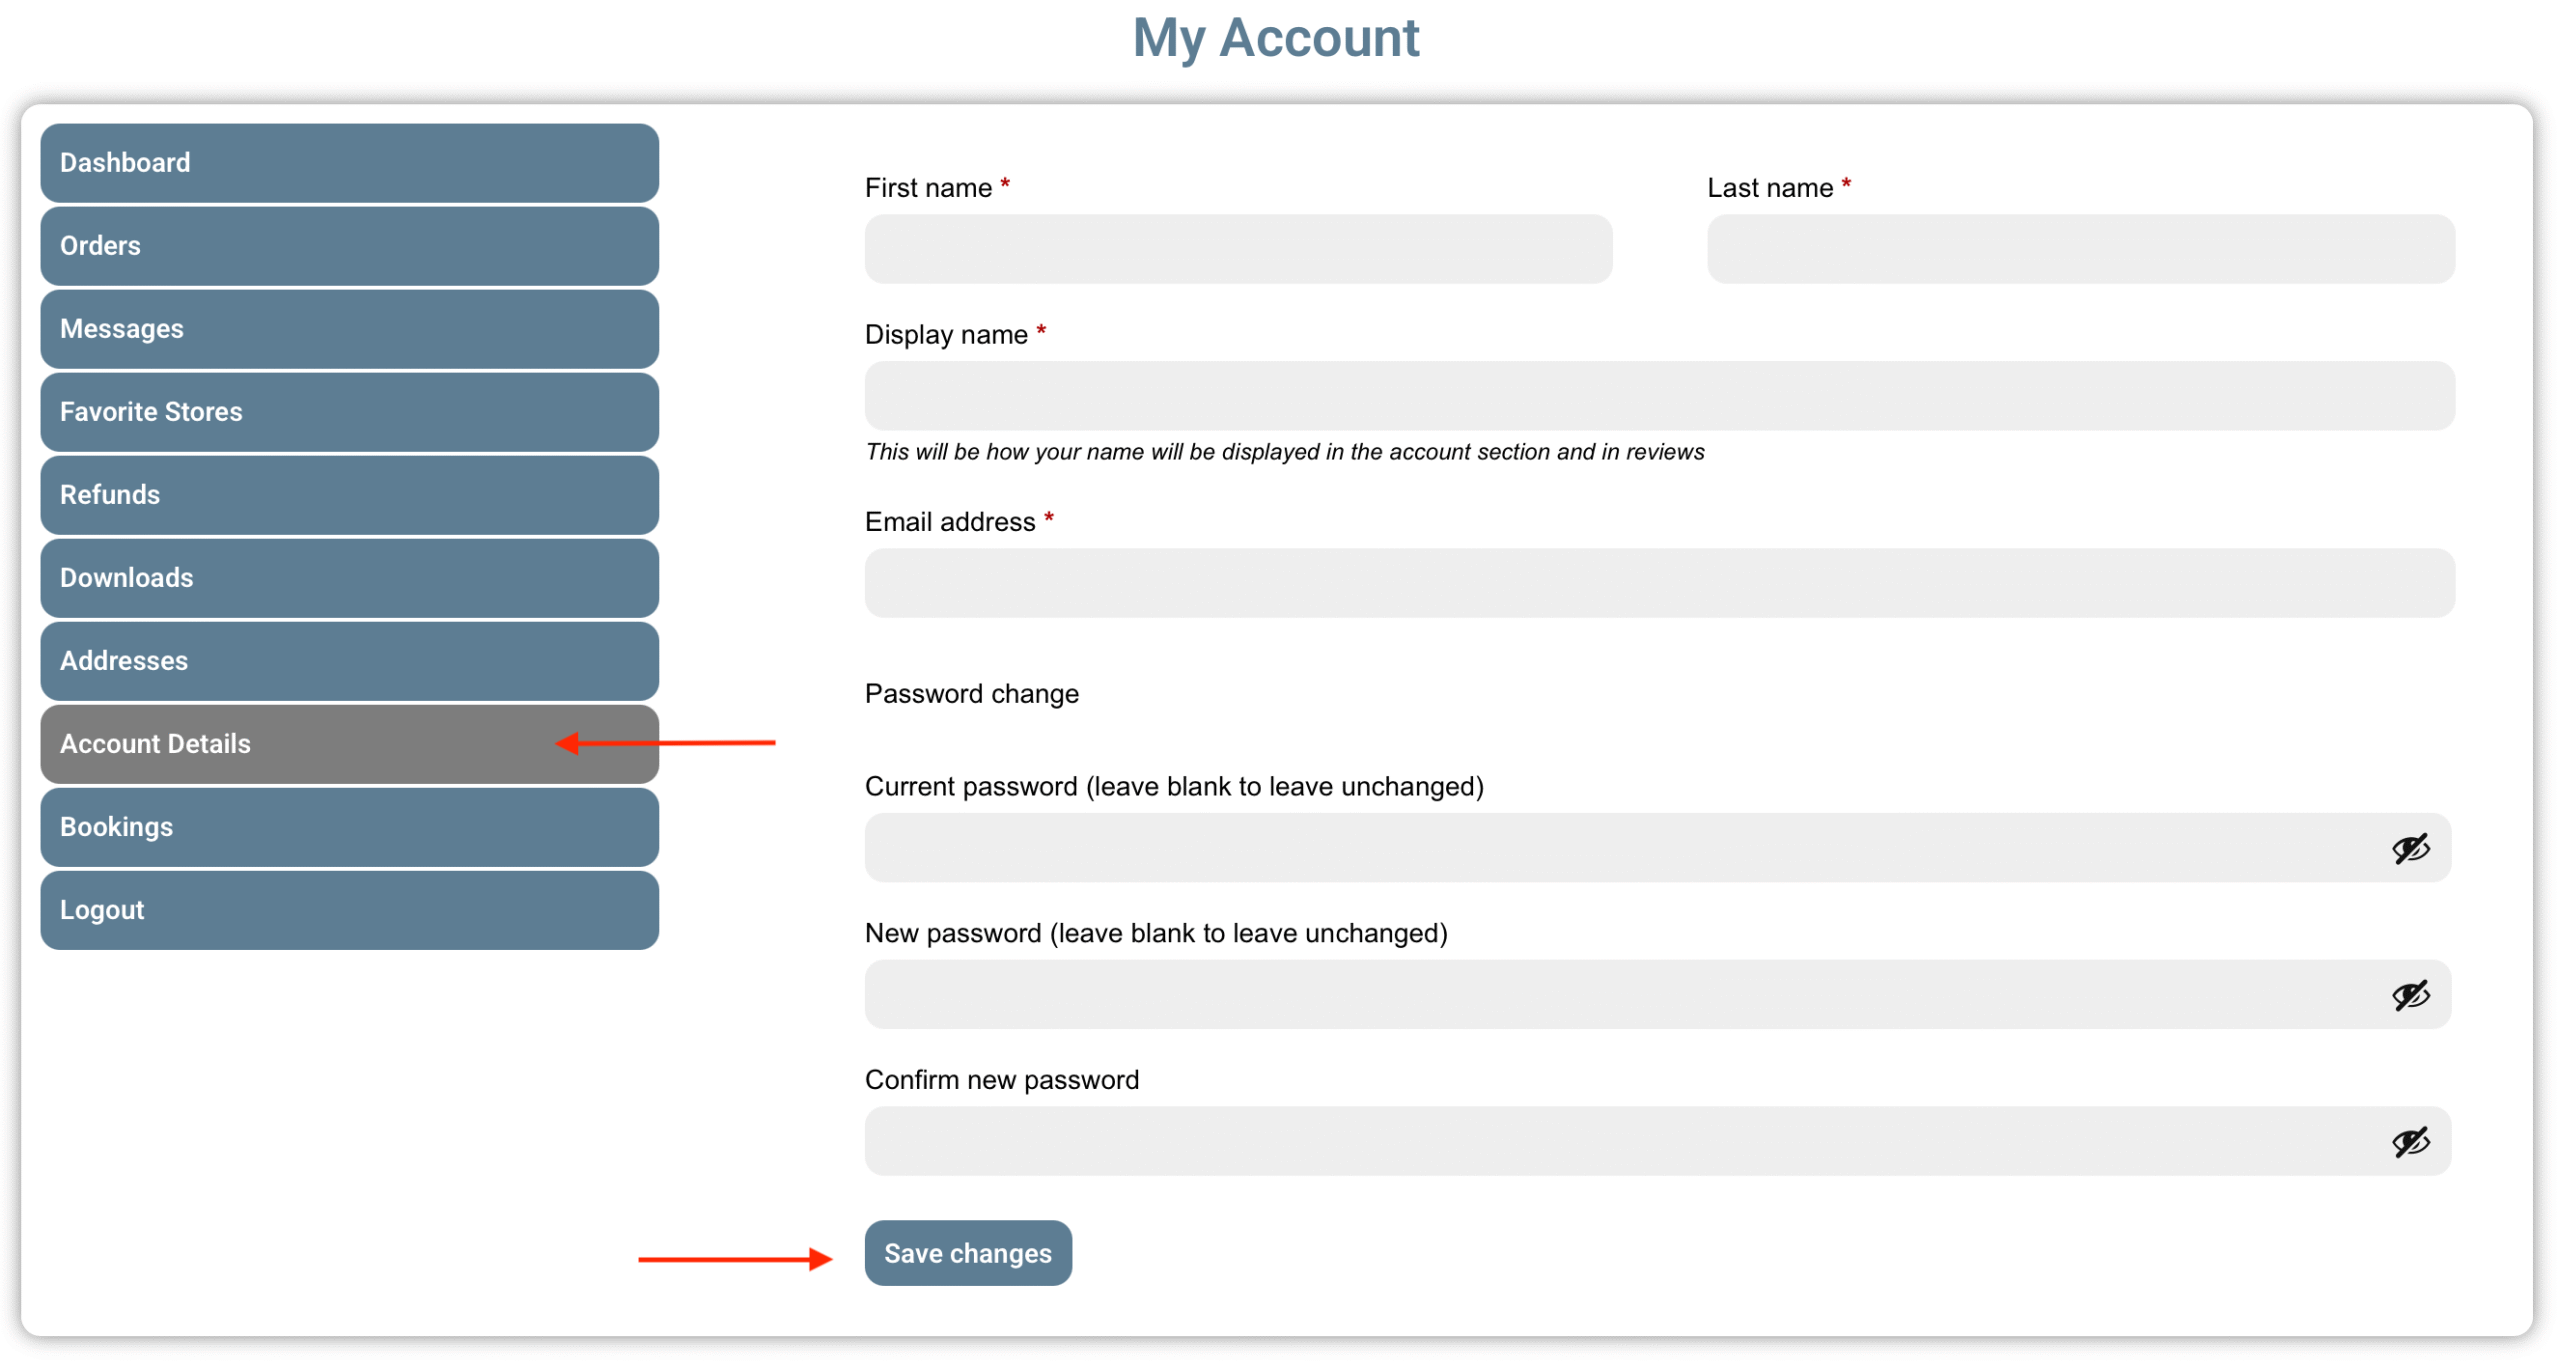
4. On the Dashboard, select the “Account Details” tab on the left. 

5. On the right, you will now be able to edit any account details you wish to change.

6. Once done with your changes, click on the “Save changes” button.
Vendors

1. On the Top Menu, select Account/Login.

2. From the dropdown Menu, select My Account.

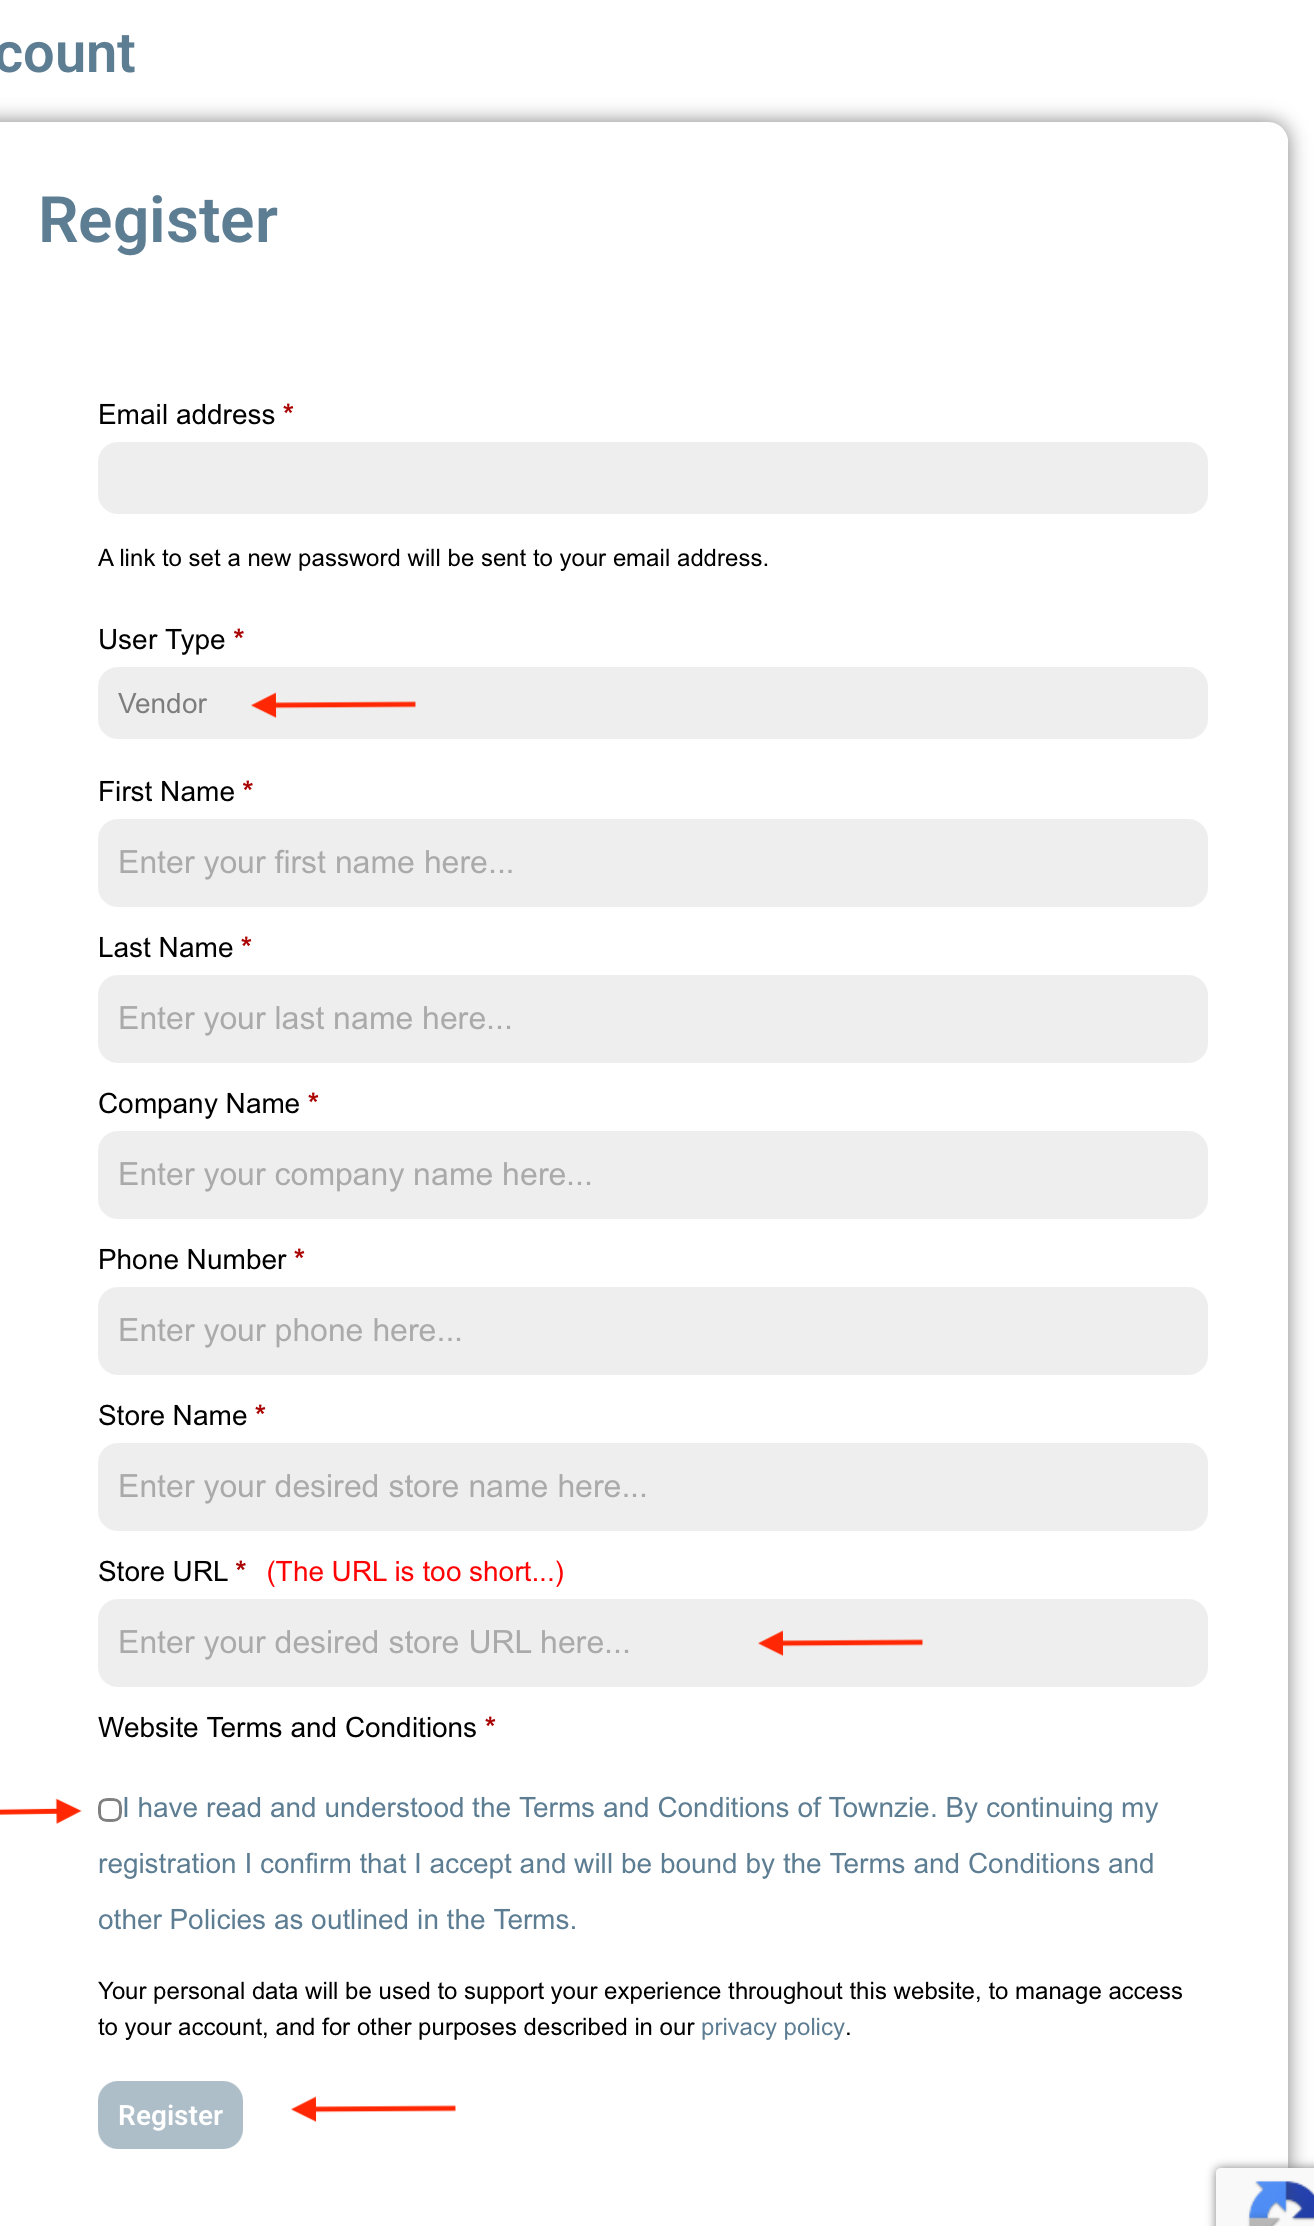
3. Complete the Register Form on the right:
– Add the email address where you wish to receive your communications from Townzie.
– Select the User Type “Vendor”. Once you select this option, more form fields will open that you will need to complete.
– When asked for your Store URL it is advised to keep it short as this is what will be used as part of the www.townzie/my_store/.com URL, and will be the unique identifier for your store (listing) pages.

4. Tick the “Terms and Conditions” box after you have read through them.

5. Click on the Register button at the bottom of the form.
6. Once completed, you will be redirected to the My Account page.

7. You will receive an email that will contain your temporary password. Should you wish to change your password, please follow the “How to set my Account Password” directions given above.

After registration, it is advised to complete all your store information.

1. On the Top Menu, select Account/Login.

2. From the dropdown Menu, select Listing Dashboard.

3. On the bottom left of the Dashboard, select Settings.
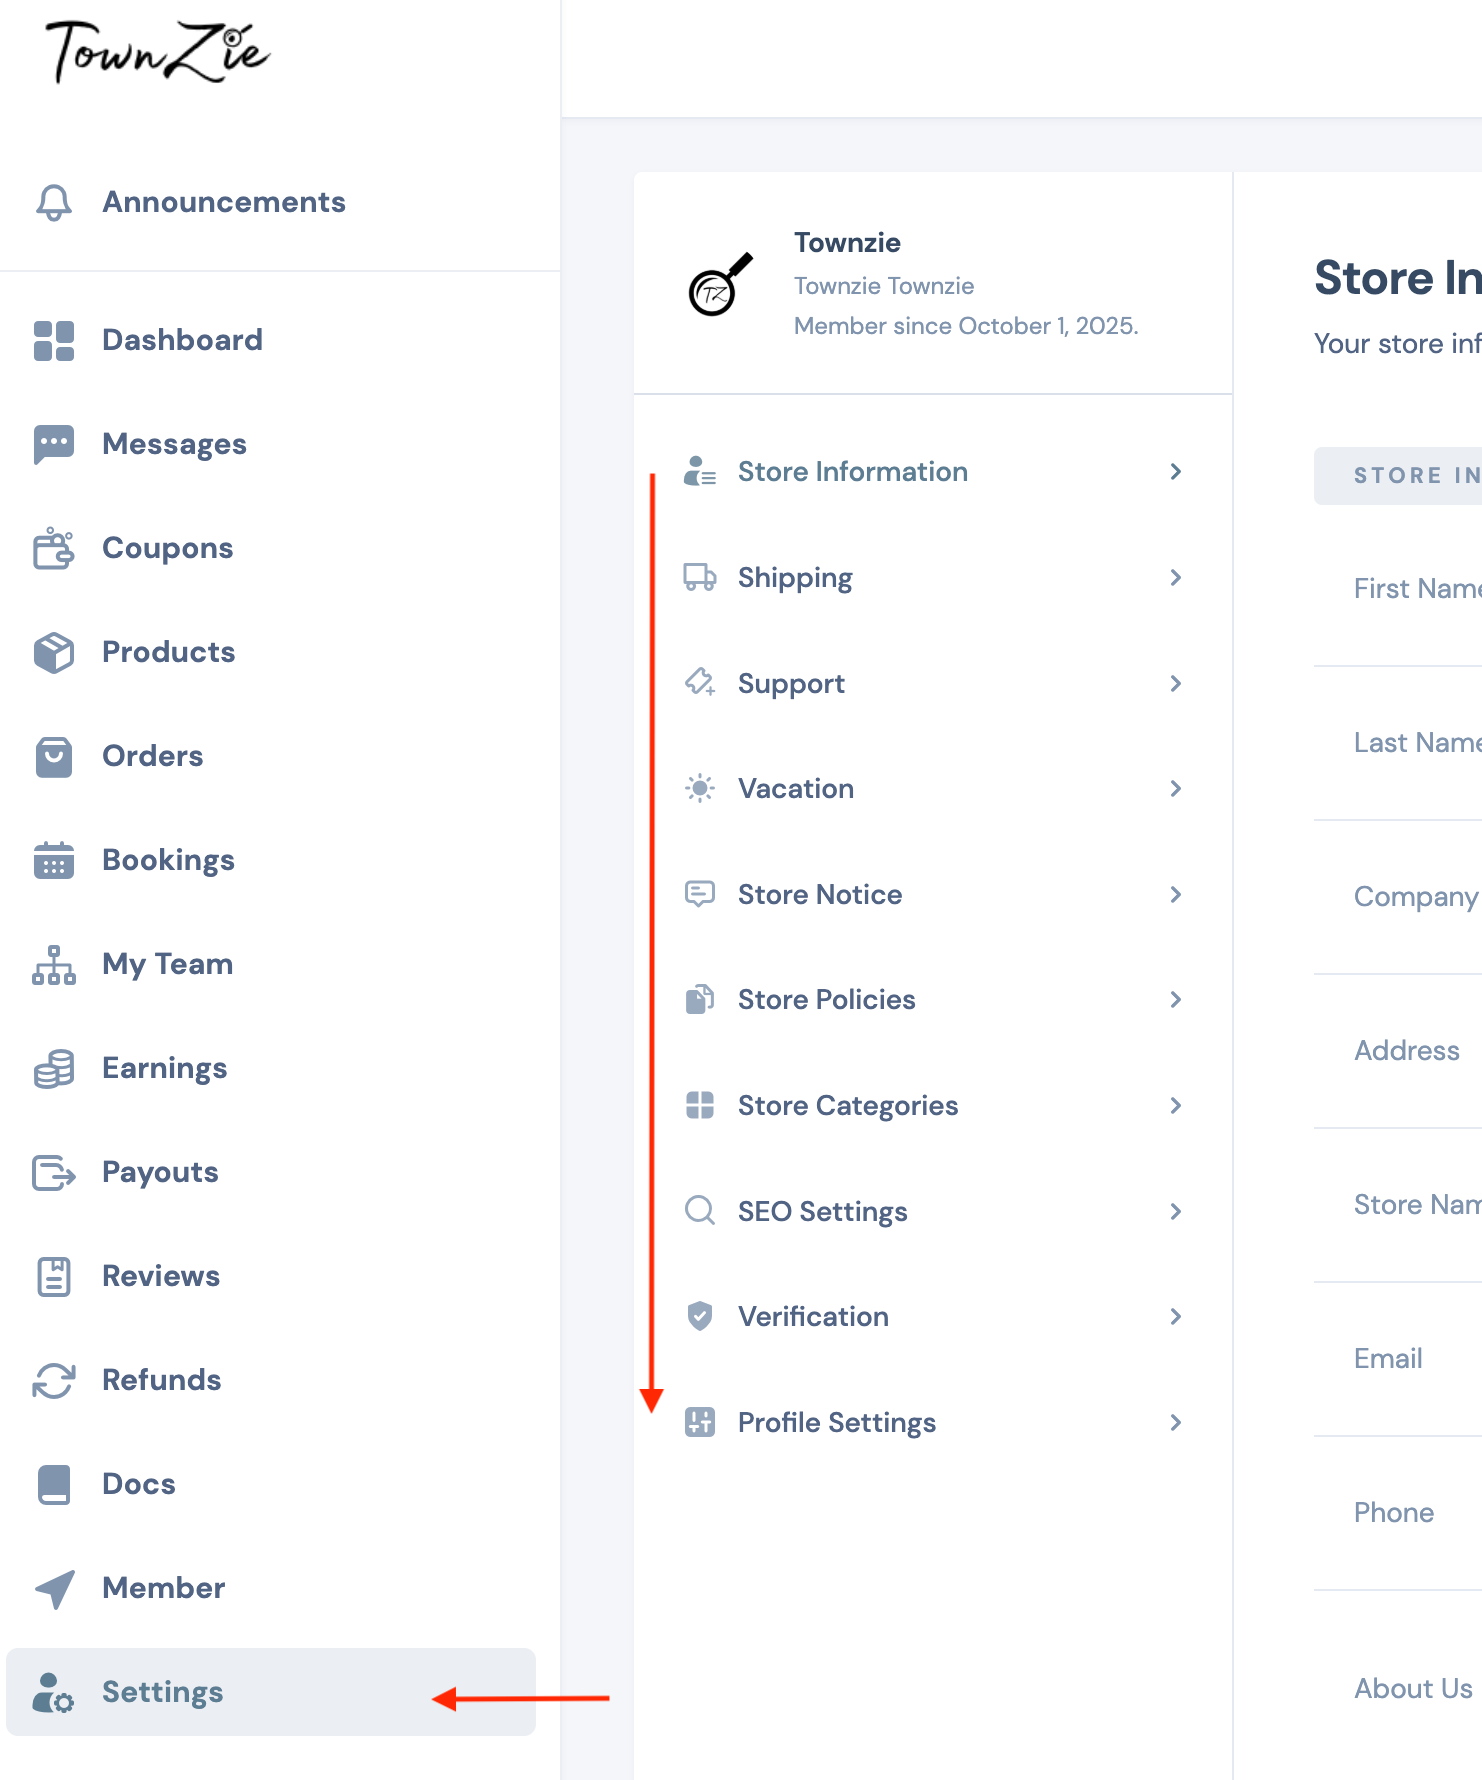
4. Here you will be able to change:

  • Store Information: Basic information about your store/business
  • Shipping: If you sell any products where delivery or shipping/courier services are required, you can stipulate what you offer here.
  • Support: Change settings for the support you will offer your customers.
  • Vacation: Should you need to close your store/business, you may set the dates here. This will ensure that all your listings become unavailable during this time.
  • Store Notice: Add a store notice if desired
    – Store Policies: If you have any Terms and Conditions that your customers need to be aware of, you may add them here.
  • Store Categories: Select the Categories that your store/business will be operating in on the Townzie website. So if you are adding an Accommodation Listing and a Local Product Listing, you will add both these Categories for your store.
  • SEO Settings: SEO stands for “Search Engine Optimization”. For your Townzie Listings to rank higher on a Google Search (or other search engines), it is wise to add some SEO information.
  • Verification: No payments due will be paid to any Vendor (Listing Owner) unless that Vendor has submitted their Verification Documents. This is a precaution to not only protect your clients but also to protect you from “False Vendors” pretending to be you and claiming your earnings.
  • Profile Settings: Here you can set not only your communications (emails you will receive) but also other important information.


Always remember to click SAVE between information being saved and before moving to the next section/tab.

1. Go to your Listing Dashboard. Select the Settings tab on the left menu.

2. The new tabs that open on the right you will choose the Shipping tab.

3. Under shipping you will click on the Zone Name where you need to add a shipping option for your customers.
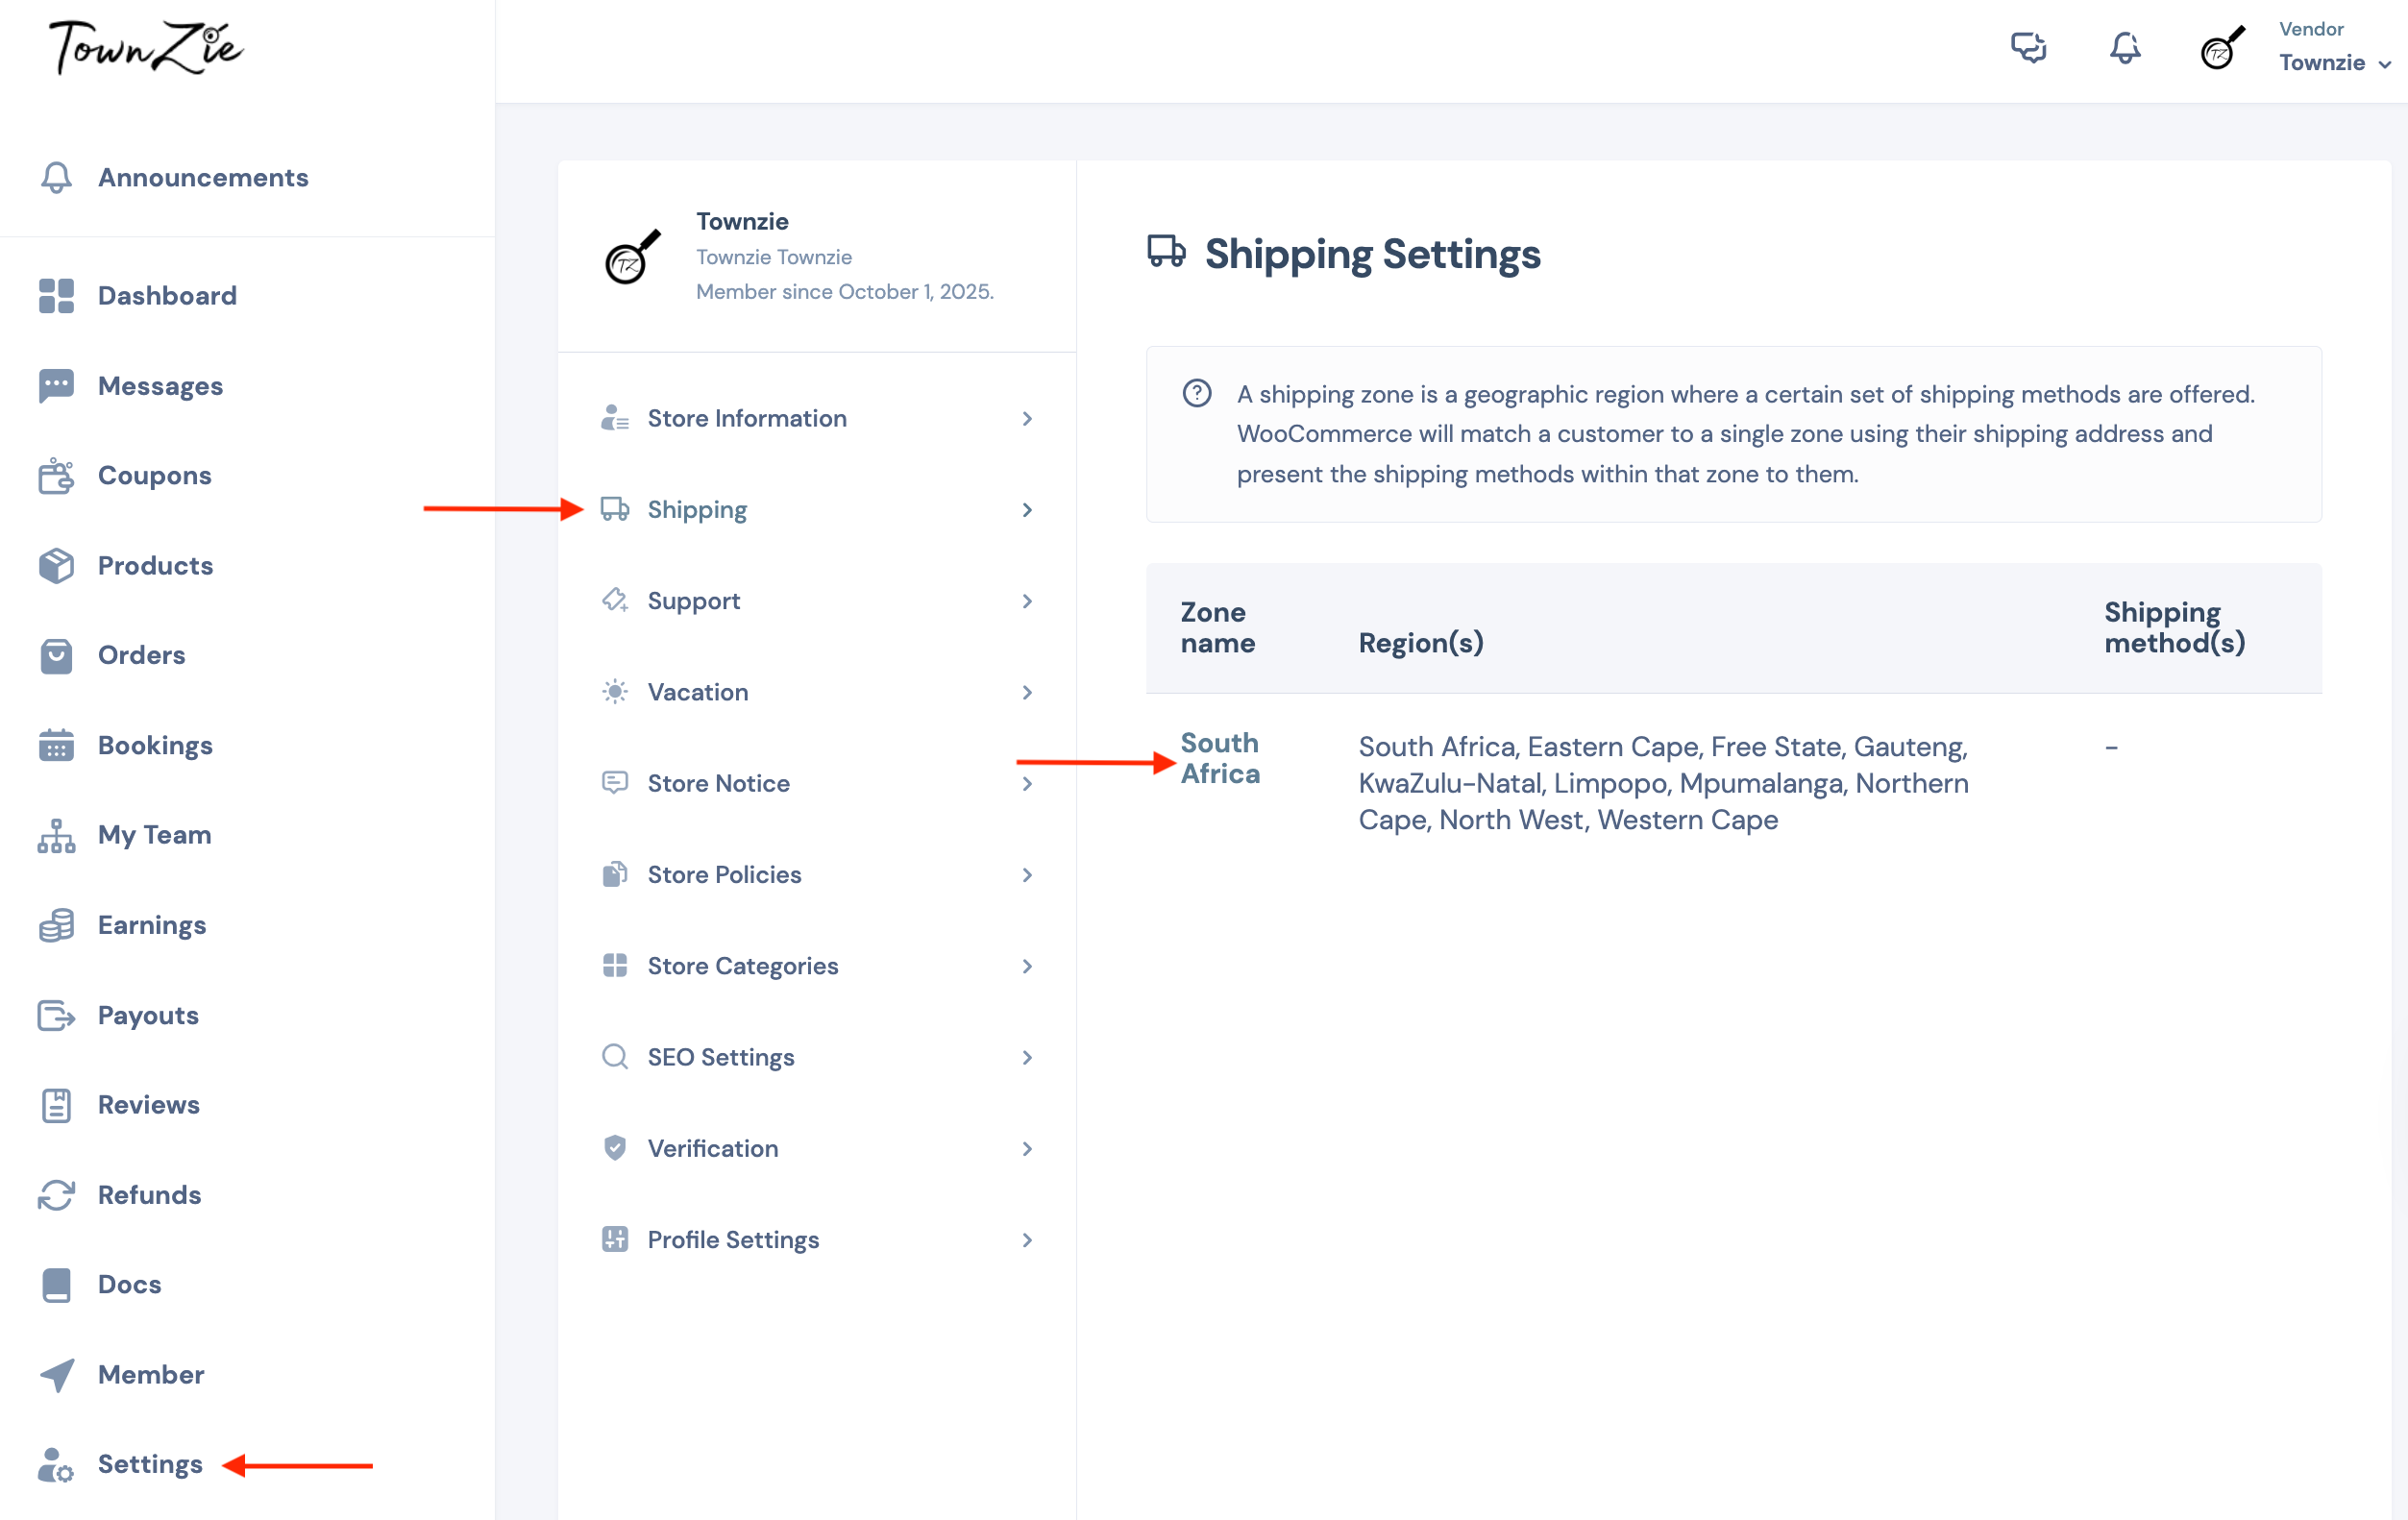


4. Once the Shipping method selected opend you will click on “Add Shipping Method”.

5. A new popup will open where you will select the type of Shipping Option you would like to add. Then click “Add Shipping method”. You can add all the shipping options relevant to your store. 
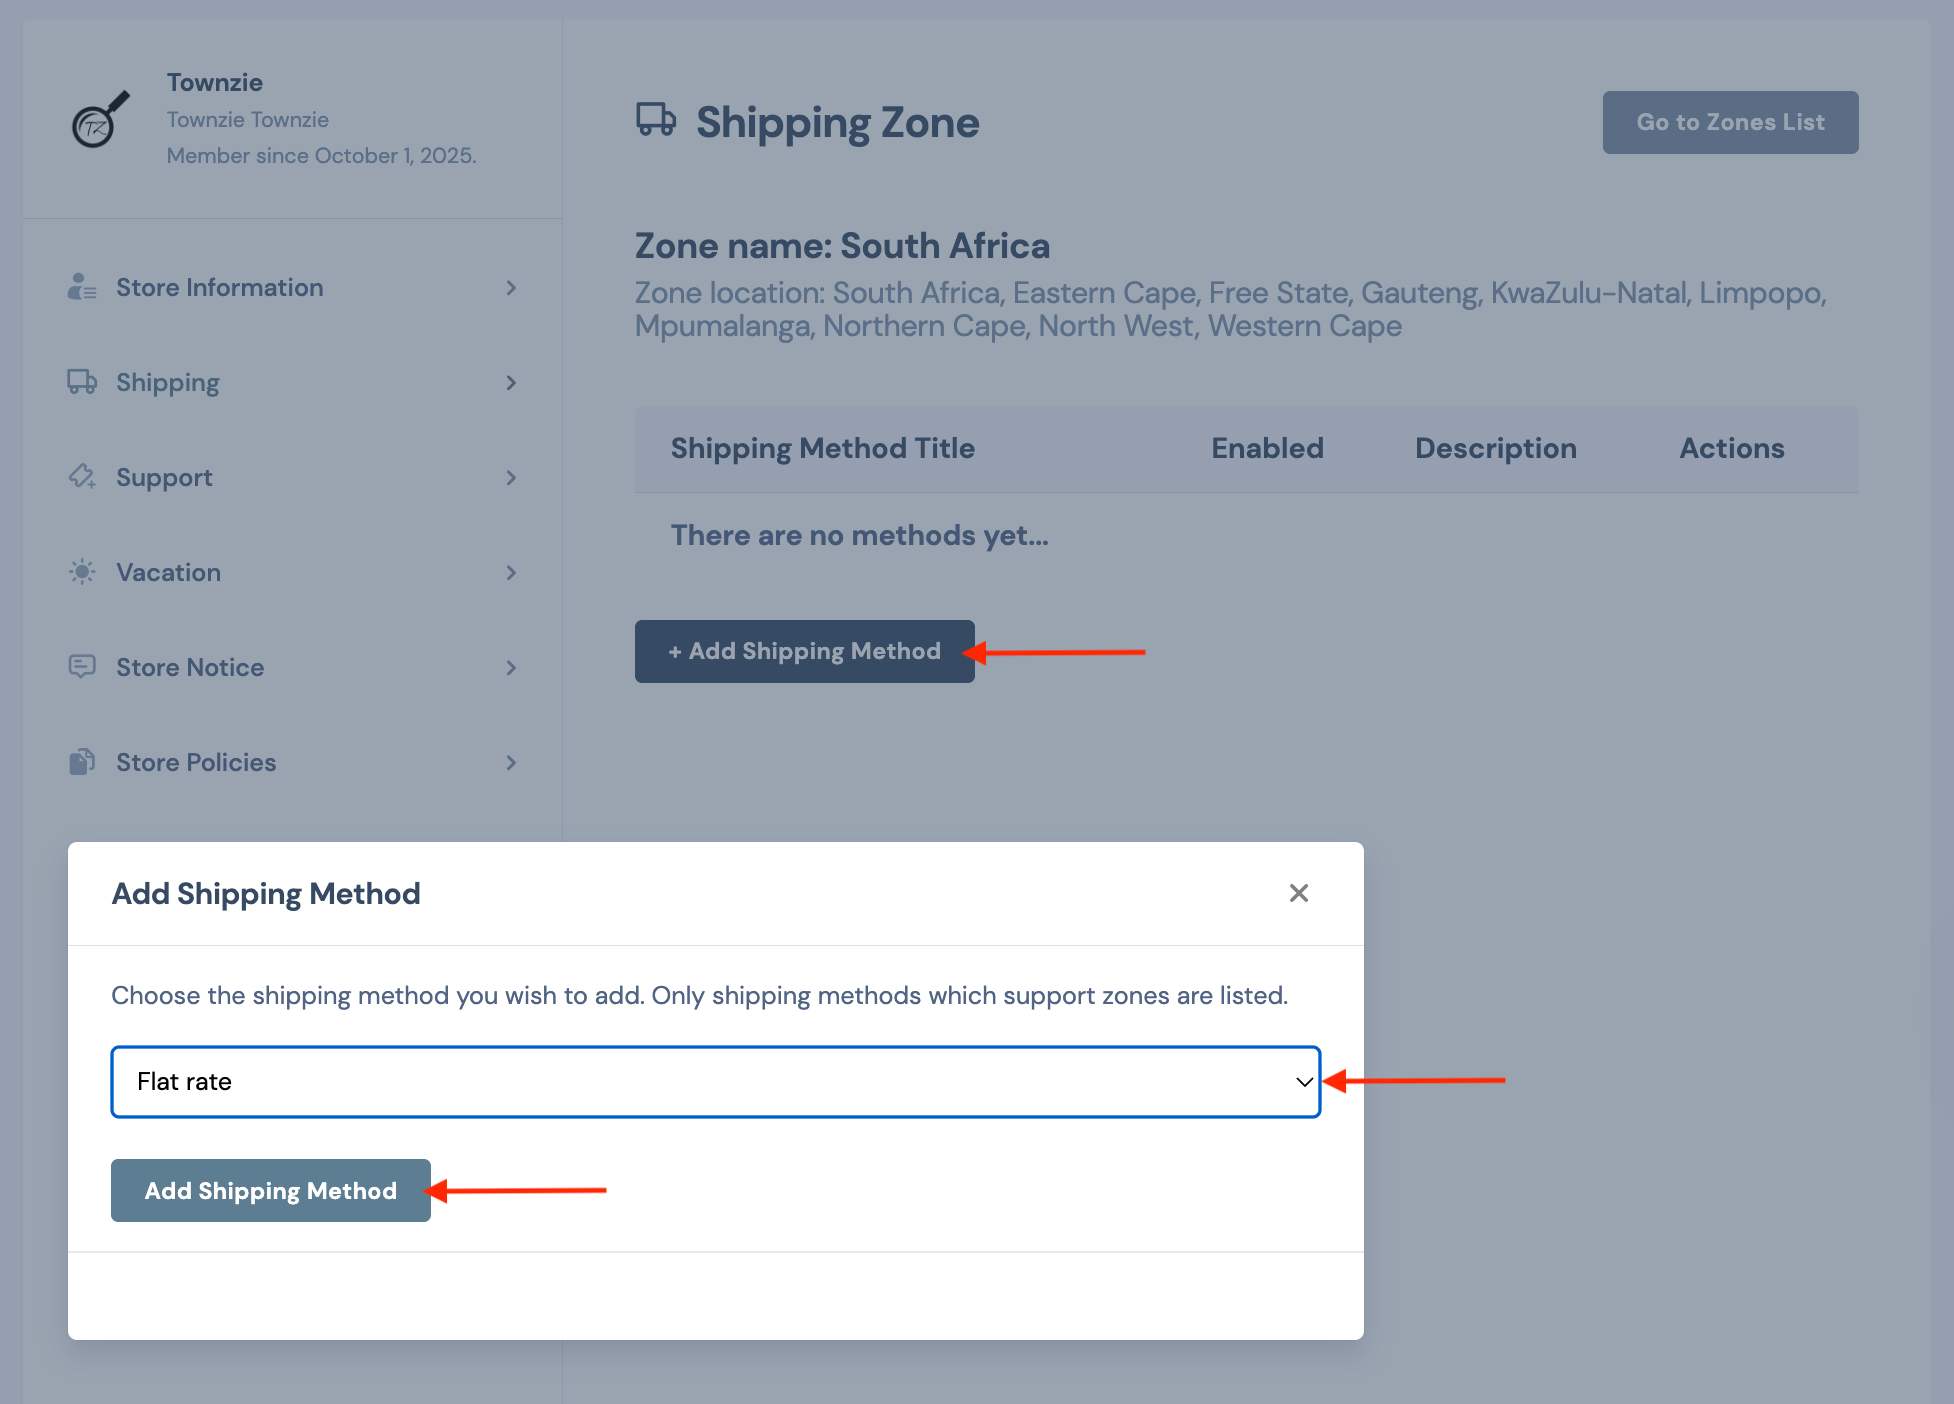


6. Once you have added these shipping methods they should be available on your “Add Product Form”.

Listings

1. Before you can add your own listing, you will have to register as a Vendor first. Please follow the steps outlined in “How to register to become a Vendor?” and “What to do after Registration?” as explained above. 

2. If you have already created a Vendor Account, log in to your account. After logging in, you will go to the Listing Dashboard. On the Top Menu, select Account/Login. From the dropdown Menu, select Listing Dashboard.

3. Once the listing Dashboard has opened, select the Products tab on the left menu.

4. In the top right corner, you will see a button “Add Product”, click this button.
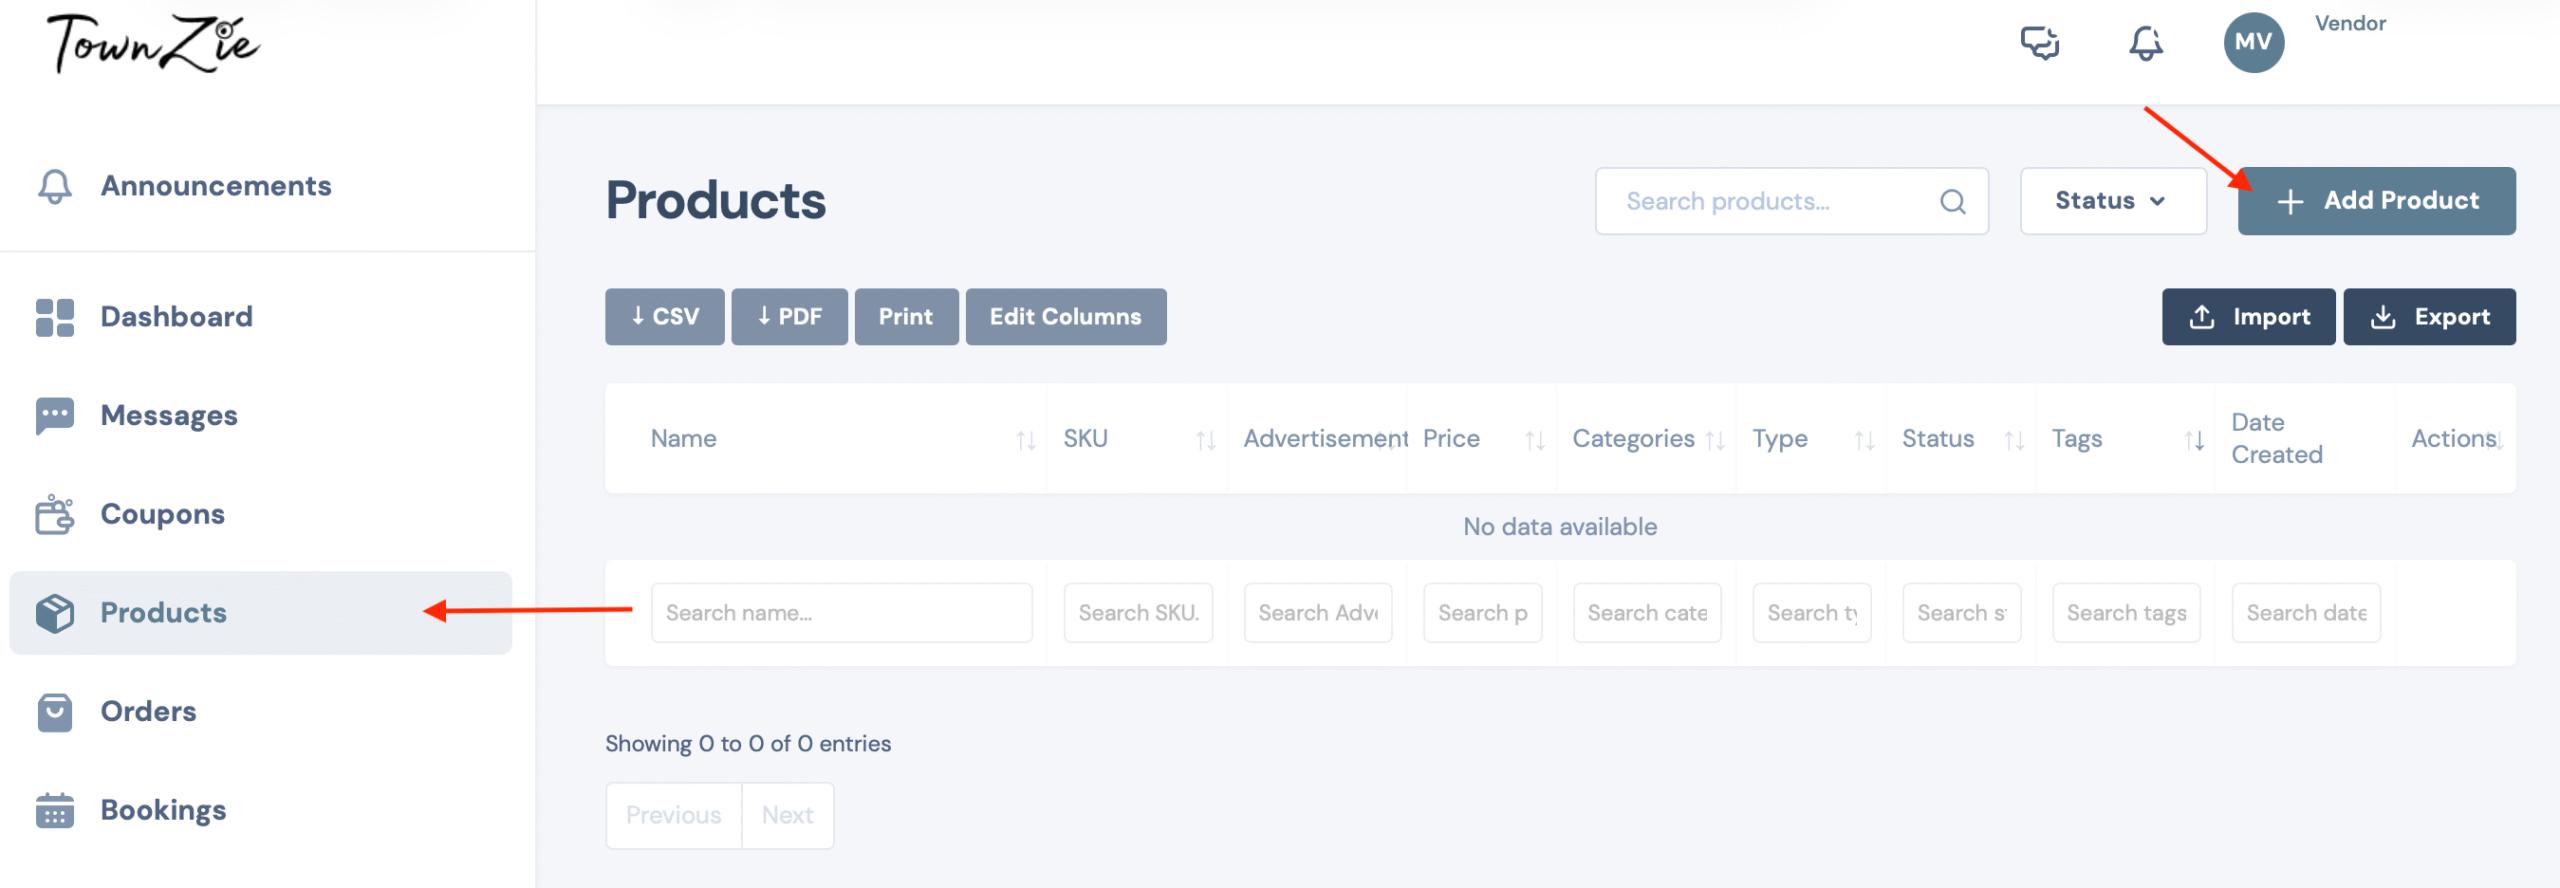
5. The new window that opens will allow you to add all the details about your listing. You will be adding:

  • Product Name
  • Product Data / Product Pricing (For a detailed explanation on how this section works, please see the “How to set your Product Pricing?” topic below. A detailed explanation)
  • Main Product Image (Used on the search, category, and map pages)
  • Product Gallery Images (Images that will be displayed on the actual listing page. It is advised to once again also include the Main Product Image as well)
  • Product Listing Category. (To display your product on the correct category pages of the website).
  • About information (This includes location, features, host/seller, and other relevant information)
  • Product Advertising (Should you like to bump your listing to the top of the category and map pages to be displayed as a featured listing)
  • Description (Used as the description on the Product Listing Page)
  • Short Description (Condensed version of the full Description. A summary in other words about the listing)
 
6. Once completed with the form, scroll back to the top and click on “Send New Product for Review.” The Townzie Team will then review the listing for quality assurance, and if everything is ready, they will activate the listing and make it live on the website. You will be receiving an email from Townzie once your listing has been made live.
 
7. Should you wish to do more edits at a later stage on the listing, and before sending it to the Townzie Team to approve,  you may click on the “Save as Draft” button at the top instead of sending the listing to be reviewed. This will ensure that your listing will be saved in your Dashboard until you are ready to send it for review, and in turn make it live on the website. 


1. Go to your Listing Dashboard. Select the Products tab on the left menu.

2. If you would like to edit an existing Product, you can search for the Product Name or find it in the list shown. To edit the Product, click on the 3 dots (…) on the right-hand side of the Product in question. From the Menu that opens, select “Edit Product”.

3. If you are adding a new Product, you will see a button in the top right corner, “Add Product”. Click this button
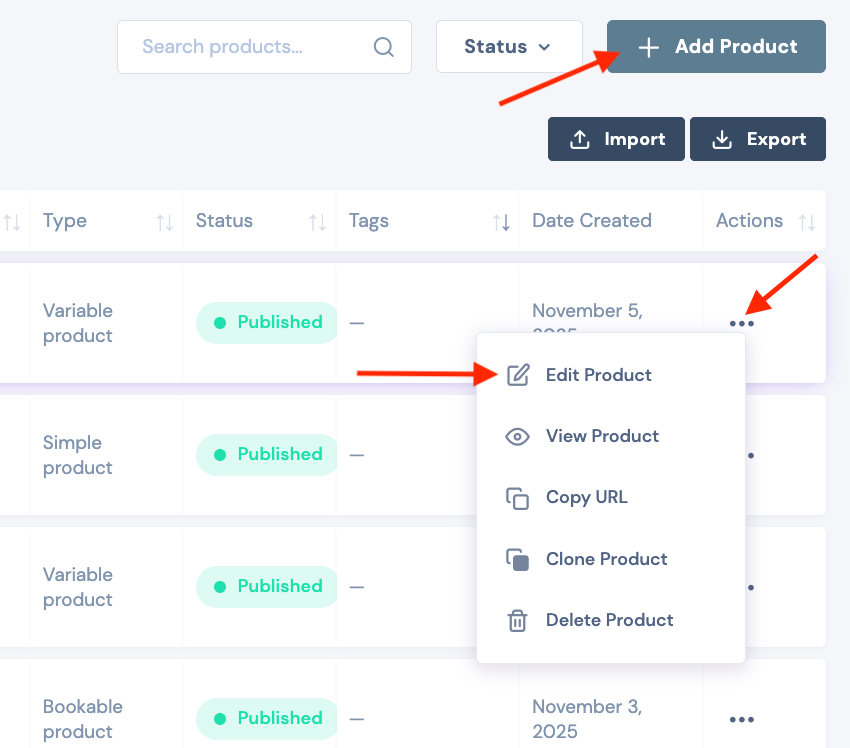
4. On the Product page, we will be working on the “Product Data”. This is where we set the Pricing for the Product/Listing.

5. The first thing we will need to consider is what type of Product we are adding. There are a few options to consider:

  • Simple Product (Local Products, Second Hand Products, and Events with no ticket availability confirmation required)
  • Variable Product (Local Products, Second Hand Products, and Events with no ticket availability confirmation required, all with more than 1 option available per product)
  • Grouped Product (multiple Products grouped together and sold as a bundle)
  • Bookable Product (Activities and Events where the ticket availibility needs to be confirmed before the customer pays for the tickets)
  • Auction Product (Auction Products)
  • Accommodation Product ( Accommodation Products)
 

6. Simple Product – (Local Products, Second Hand Products, or Event Tickets where availability doesn’t need to be confirmed, and customers may purchase the ticket immediately).

6.1. Initial settings:
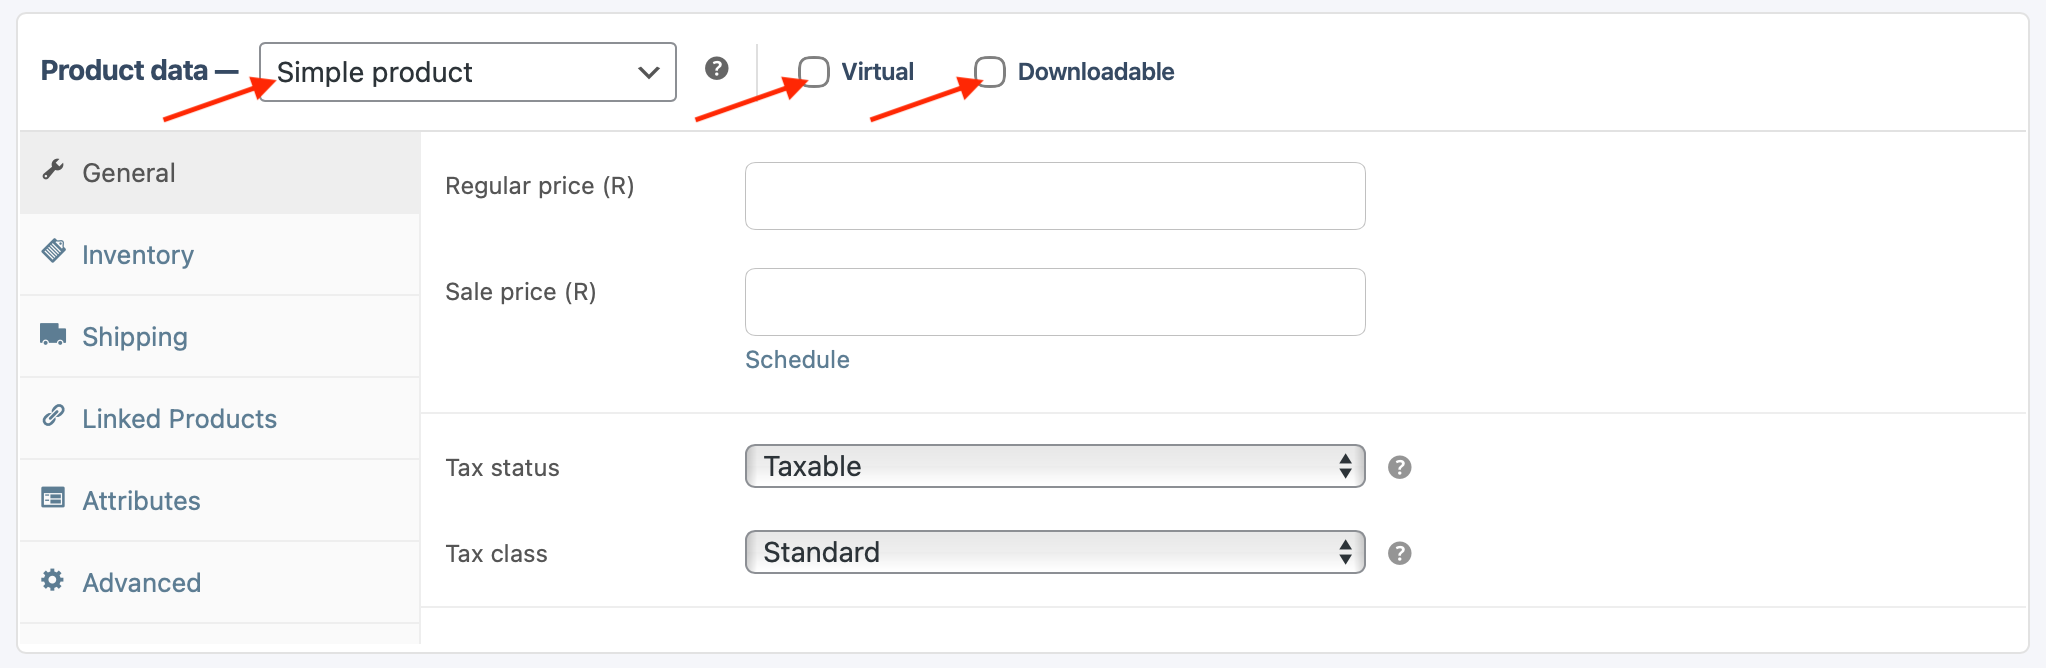
  • Product Data – Select Simple Product.
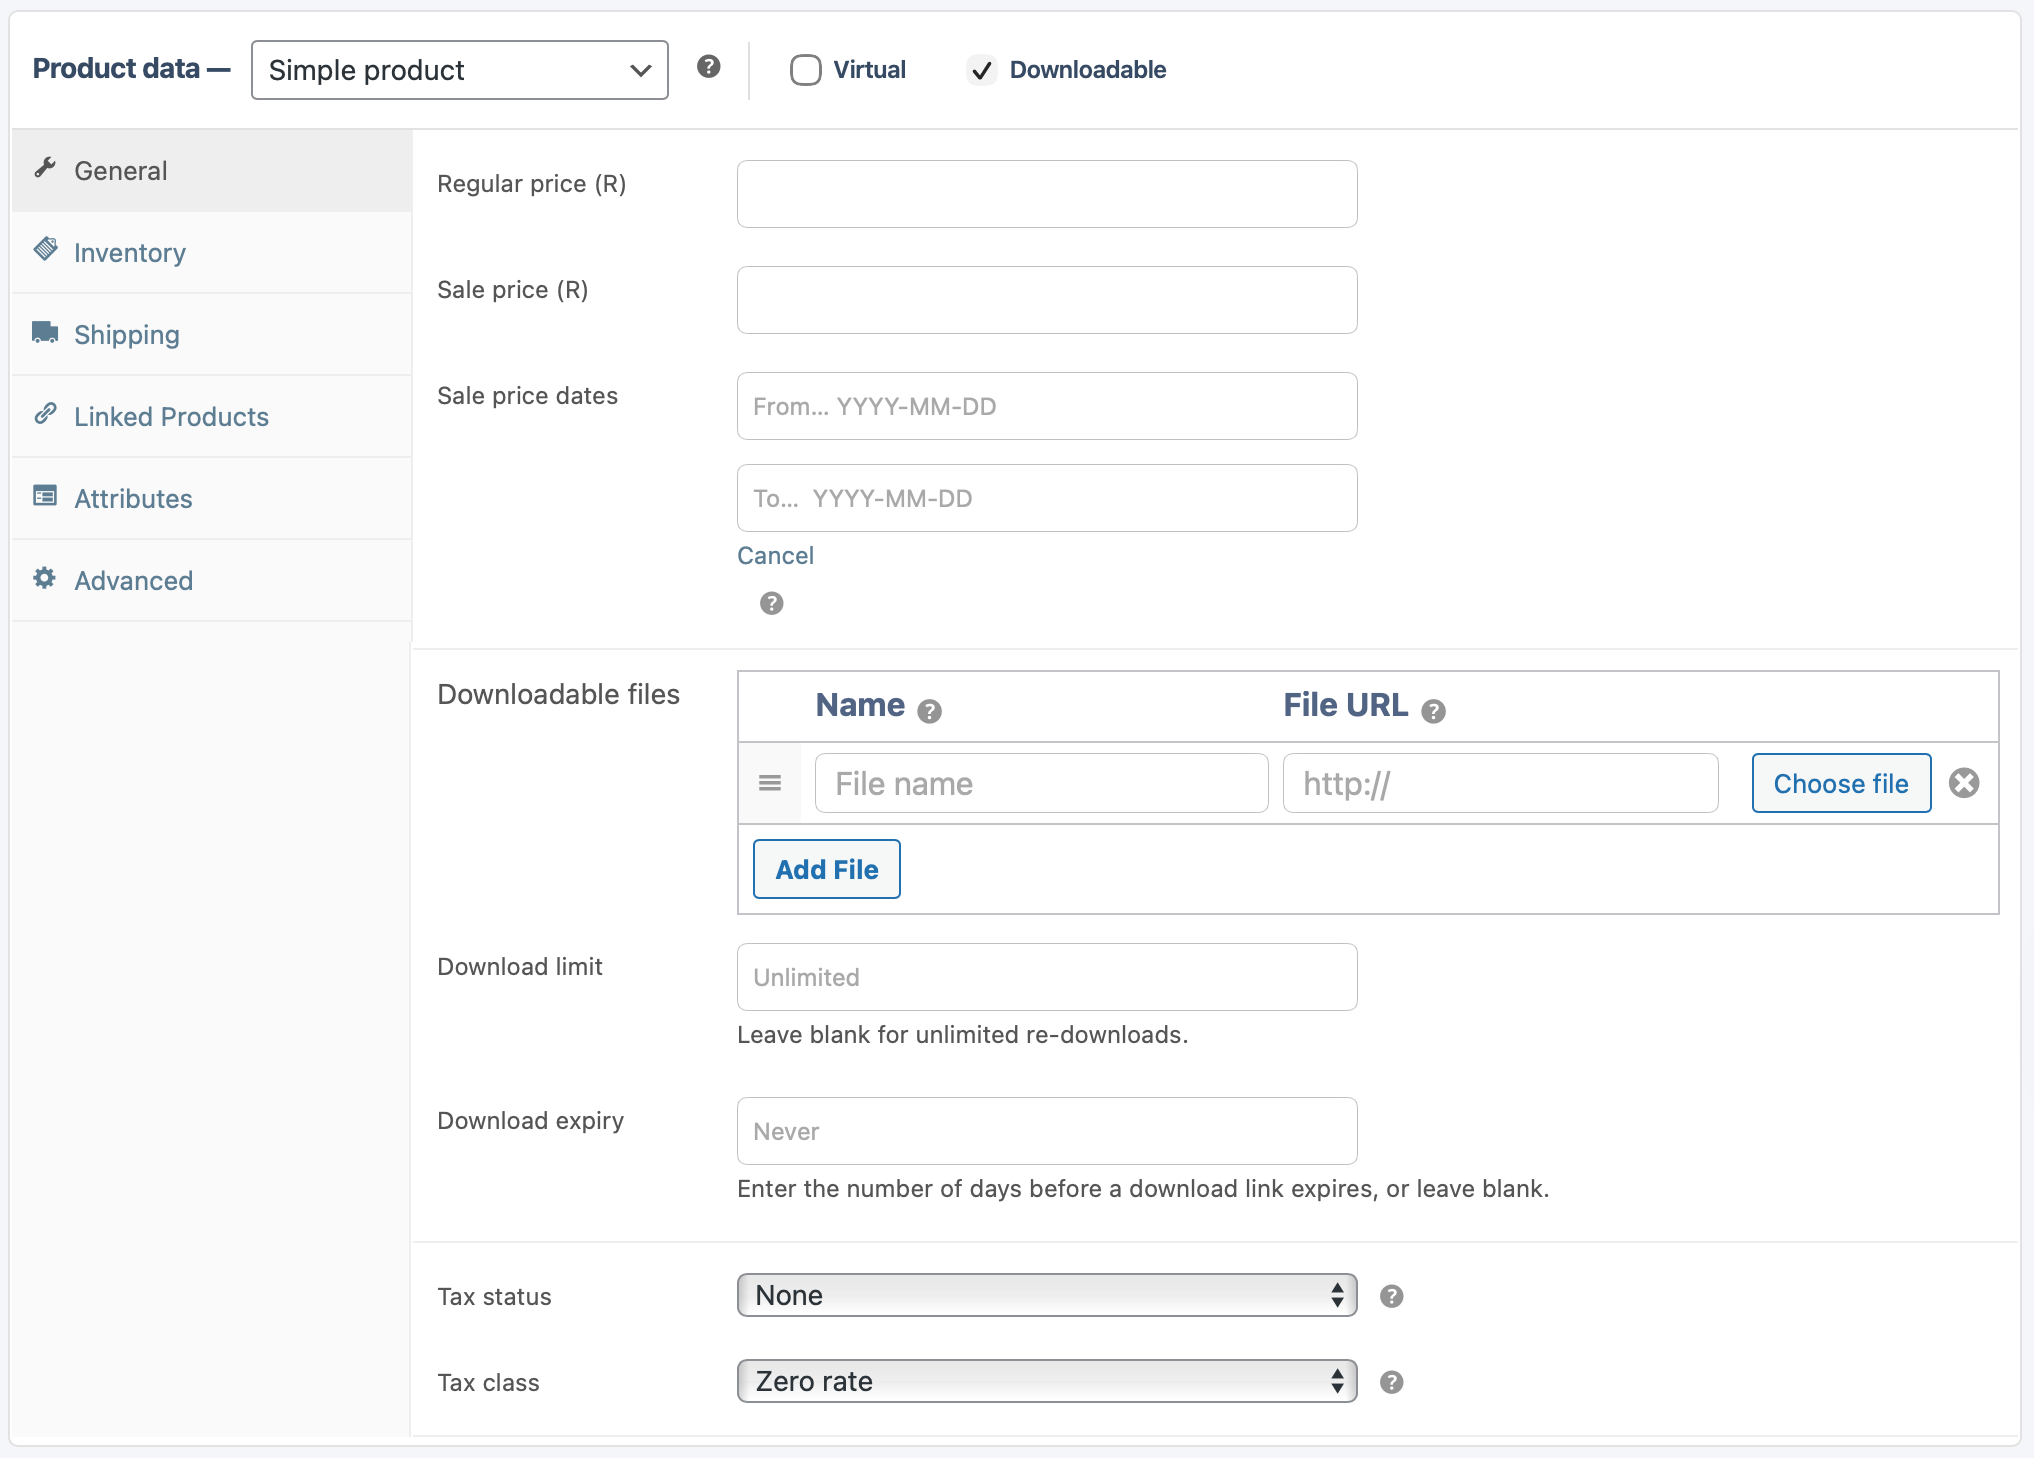
  • Virtual – If your product is only available online and is not a physical product, tick this box. This will remove the “Shipping” section of the Pricing Form. If your product is a physical product, leave this box unticked.
  • Downloadable – If your product is only available online and needs to be downloaded after it has been purchased, tick this box. This will add an additional field on the form where you can upload your file. If your product is a physical product, leave this box unticked.


6.2. General settings

  • Regular price – Set your normal price for your item.
  • Sale price – Set a sale price if you are running a special; otherwise, leave it blank.
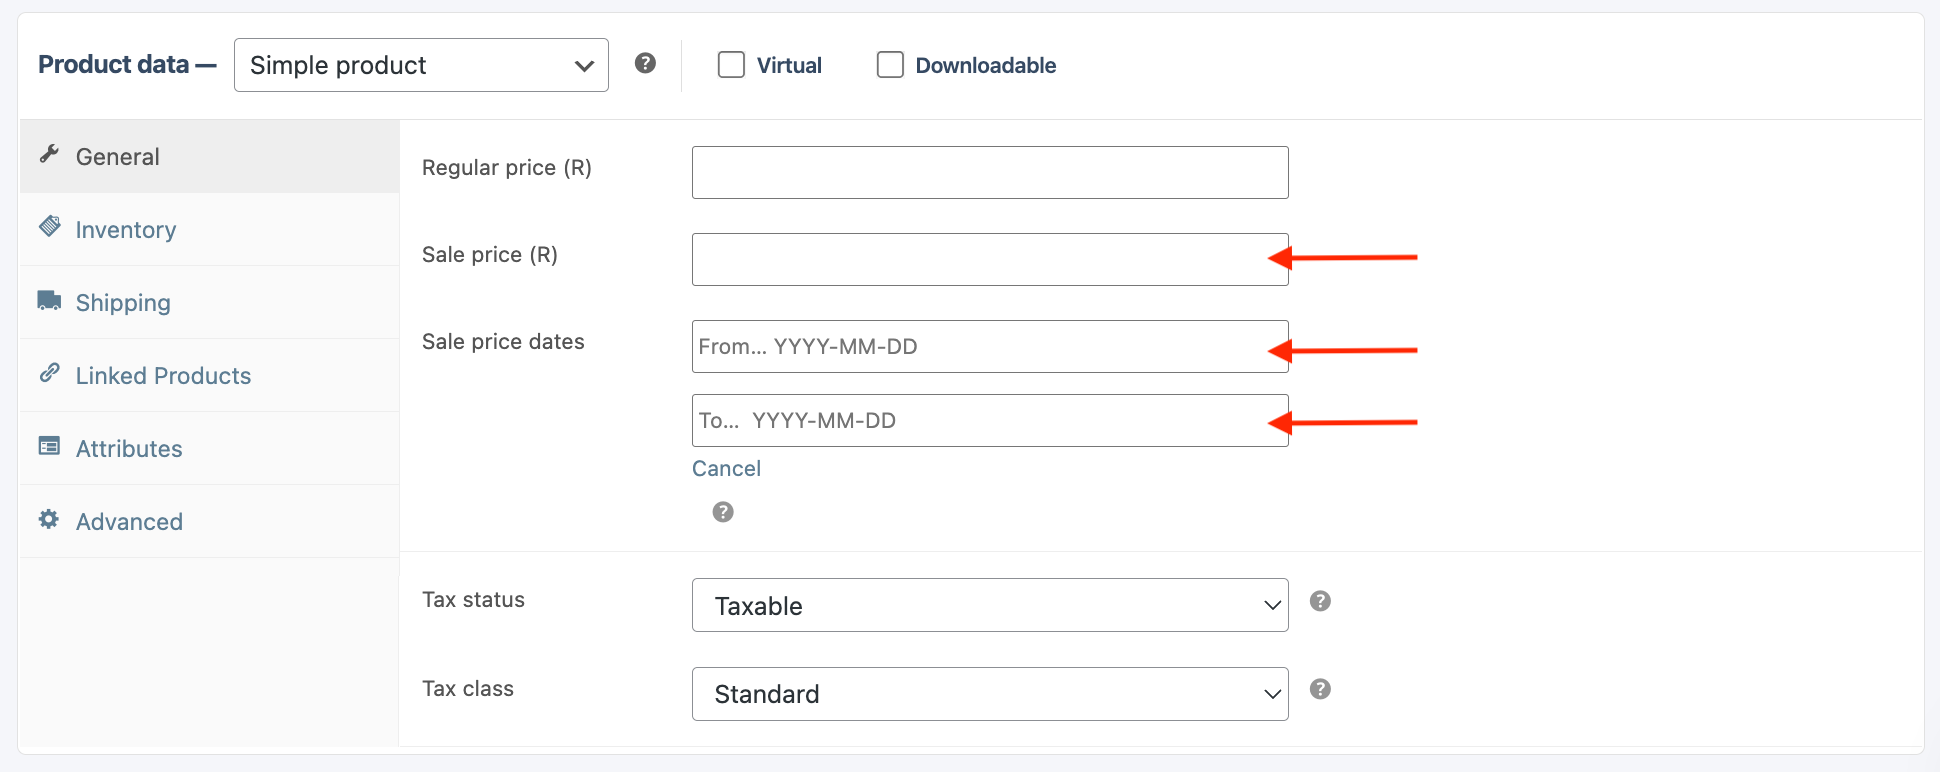
  • Schedule – Just below the “Sale Price,” you will see “Schedule”. If you are running a sale and would like to only run this sale for a specified period, you can click this link, and it will open up two extra fields where you can add the start and end date of the sale.
  • Downloadable files (only if Downloadable was selected) – Here, you will add your file that the customer will be purchasing. Only after the sale is complete will the customer have access to the file. Simply click on “Add File” and create a File Name. Choose the file or add a File URL if the file is available somewhere else on the internet for download. Click Add File again if you need to load more than one file.
  • Download limit (only if Downloadable was selected) – You can add the number of times a customer is allowed to download the product after it has been purchased.
  • Download expiry (only if Downloadable was selected) – You can enter the number of days that the customer will have access to the file to download it.
  • Tax status – If you are tax-registered and you would like to add tax to your product and/or shipping, you can set this here. 
  • Tax class – If you are tax-registered, you can set the type of Tax you would like to add to your product here.
 

6.3. Inventory:

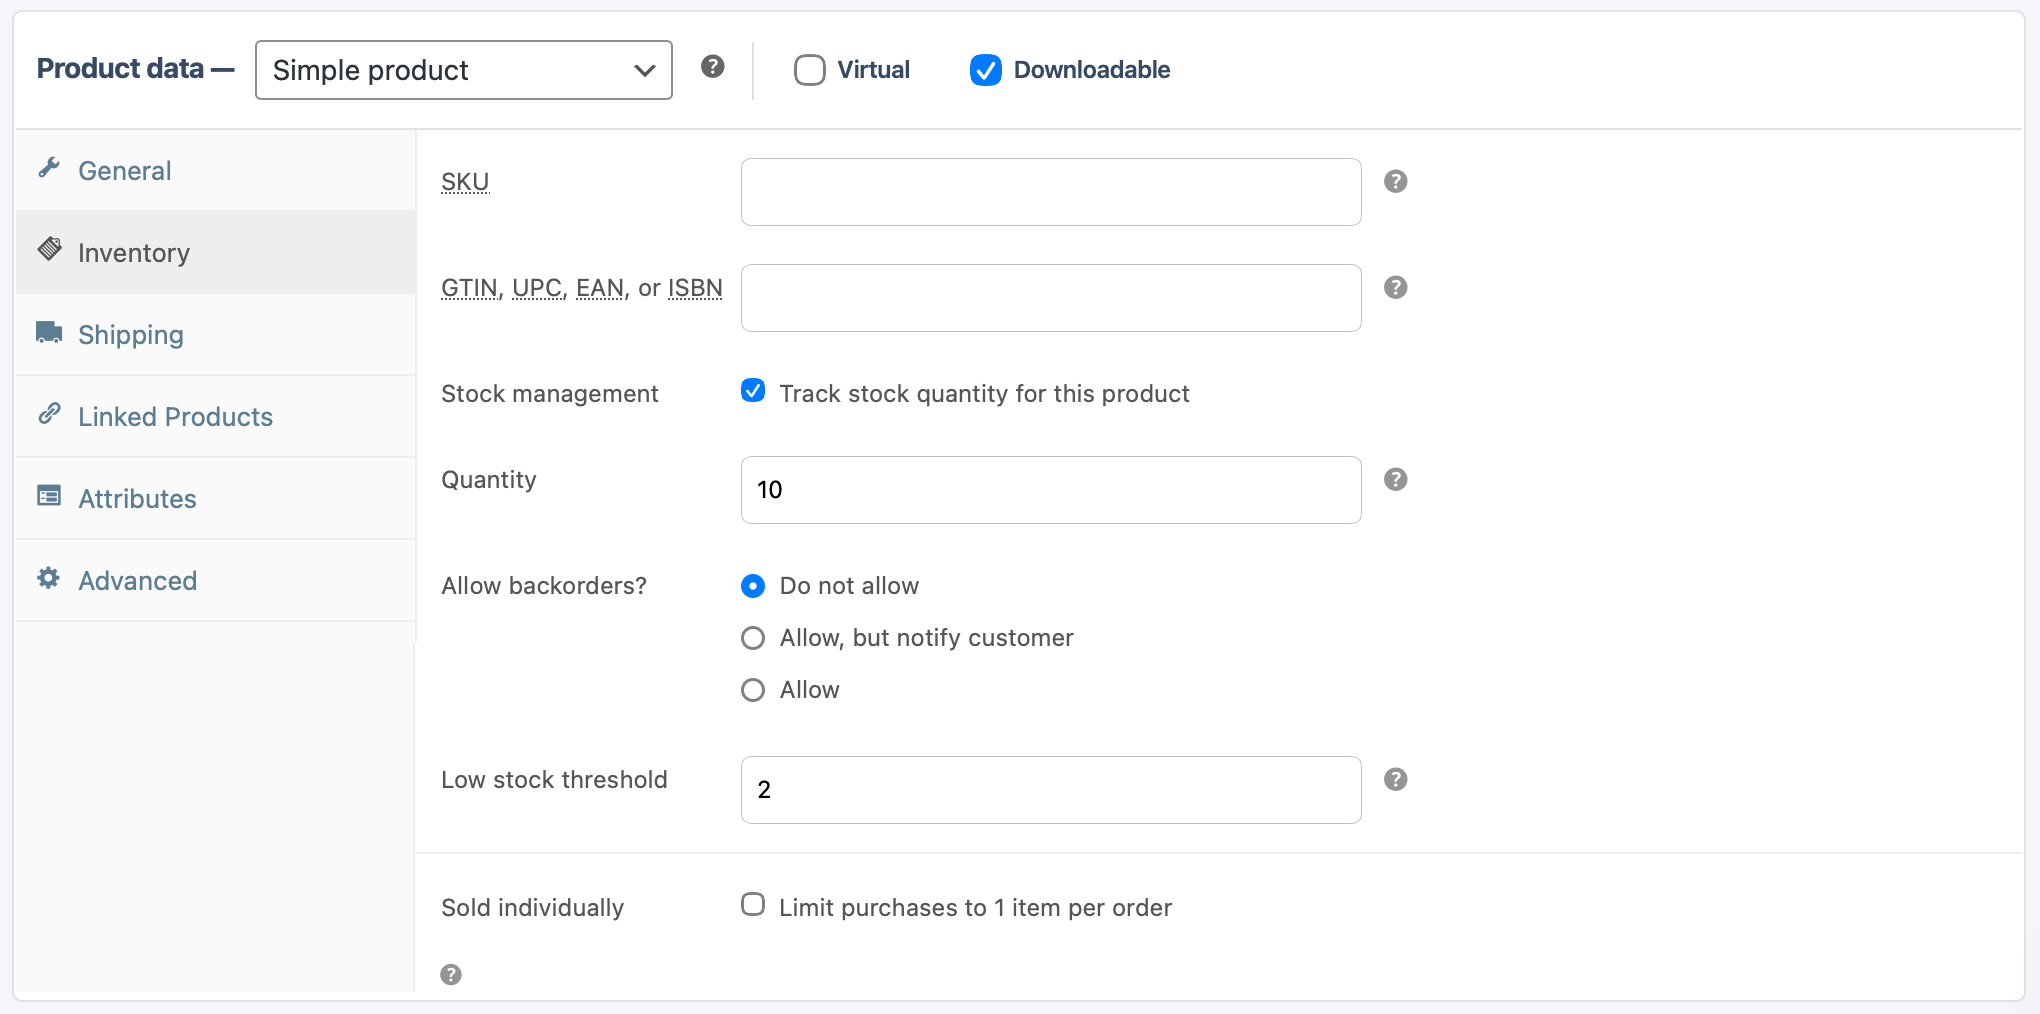
  • SKU – Personal Code or name of a product so that you can keep track of stock. You may leave this blank if preferred.
  • GTIN, UPC, EAN or ISBAN – Other identifiers for your products. You may leave this blank if desired.
  • Stock management – If you would like to keep track of your physical product stock, or if you would like to show the user on the frontend when stock is either low or sold out, you may tick this box. If you doubt, you will run out of stock of your product, or if products are made on demand, you may leave this unticked.
  • Quantity (only if Stock management was selected) – Add the amount of stock of the product that you have available. Only use numbers (example: 9), do not type the number out (example: nine).
  • Allow backorders – Backorders mean that a client is still allowed to order and pay for a product, even if you don’t currently have any stock available. Choose the option that suits your business best.
  • Low stock threshold – Select what you consider to be low stock for your business.
  • Sold individually – Tick this box only if customers need to be limited to a single product each. Meaning they may not buy more than 1 product per order.
 

6.3 Shipping:

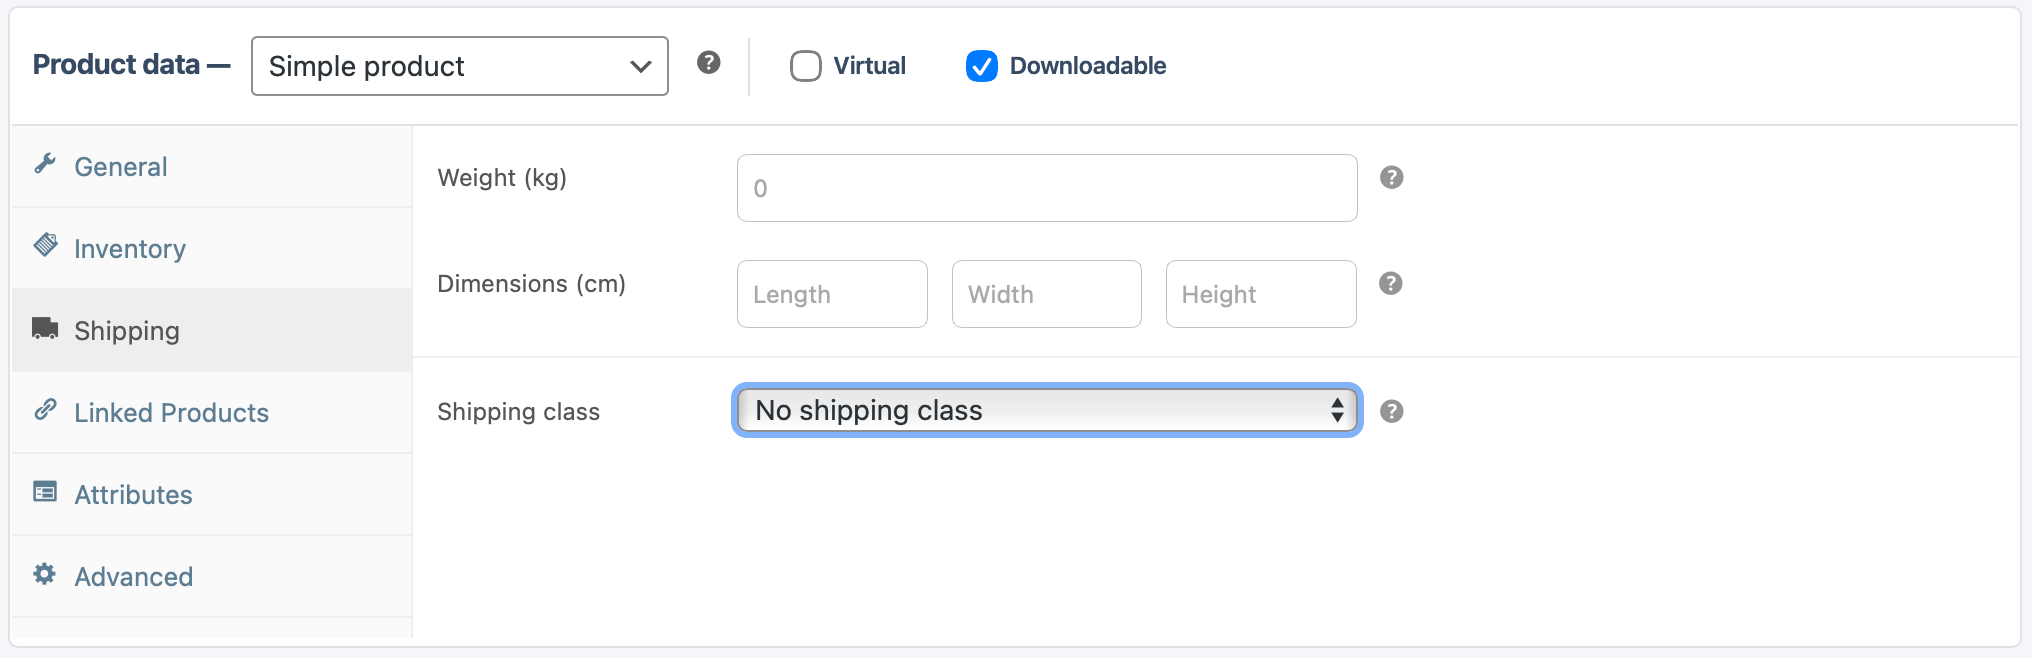
  • Weight – Enter the weight of your product. Remember to include the shipping packaging (box, wrapping, etc.) if applicable.
  • Dimensions – Enter the shipping dimensions. This means it will include the packaging that will make it shipping-ready.
  • Shipping class – Select the shipping class relevant for this product. You can set up your store’s shipping classes/options by following the instructions at “How to set up my store shipping options” in the FAQ topic under Vedors above.
 

6.4 Linked Products:

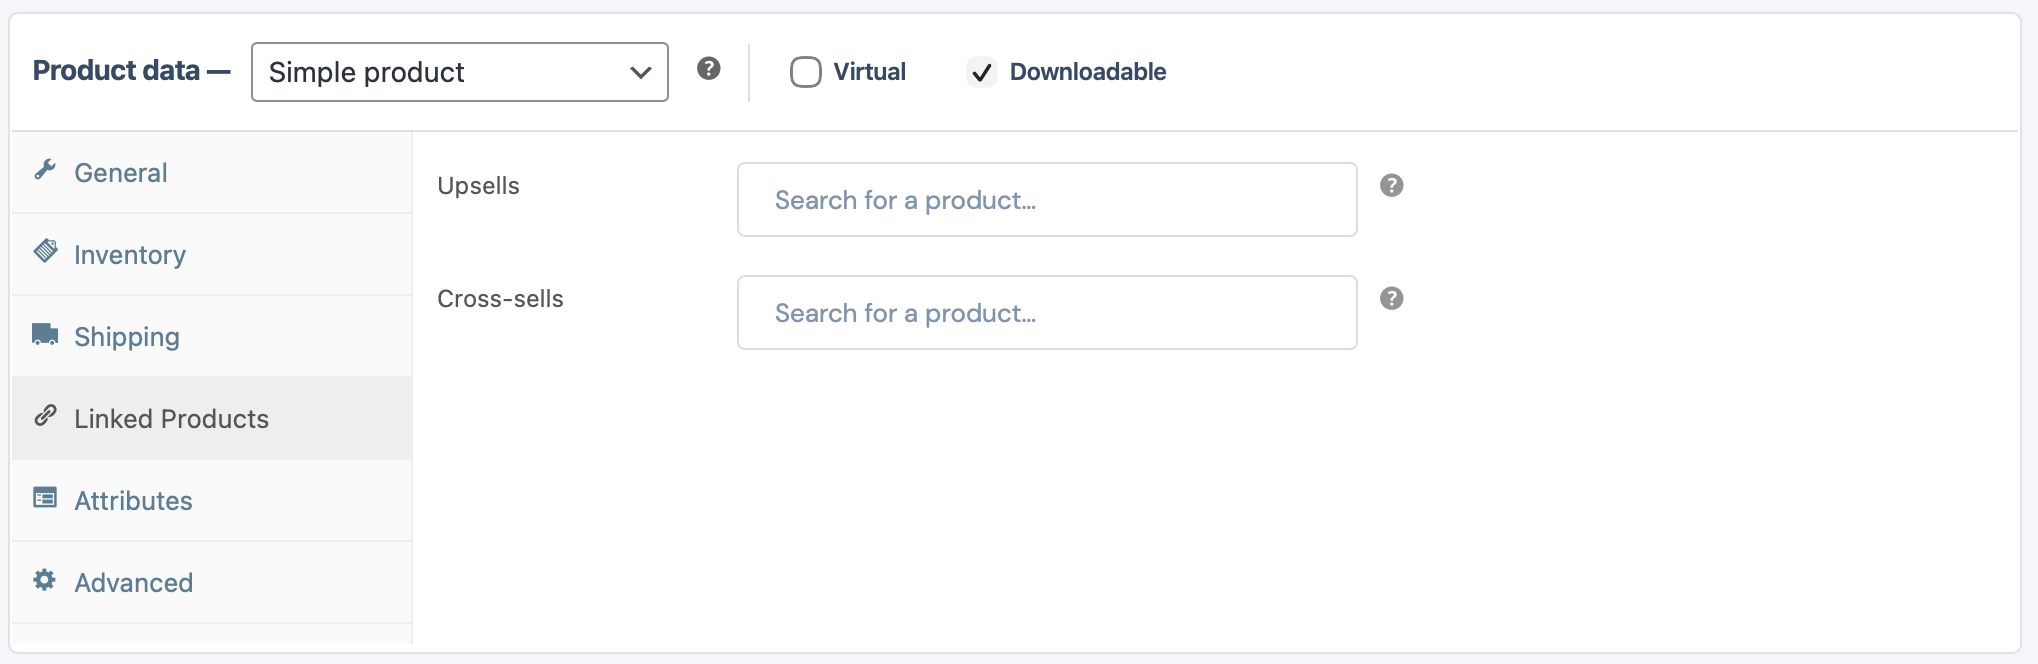
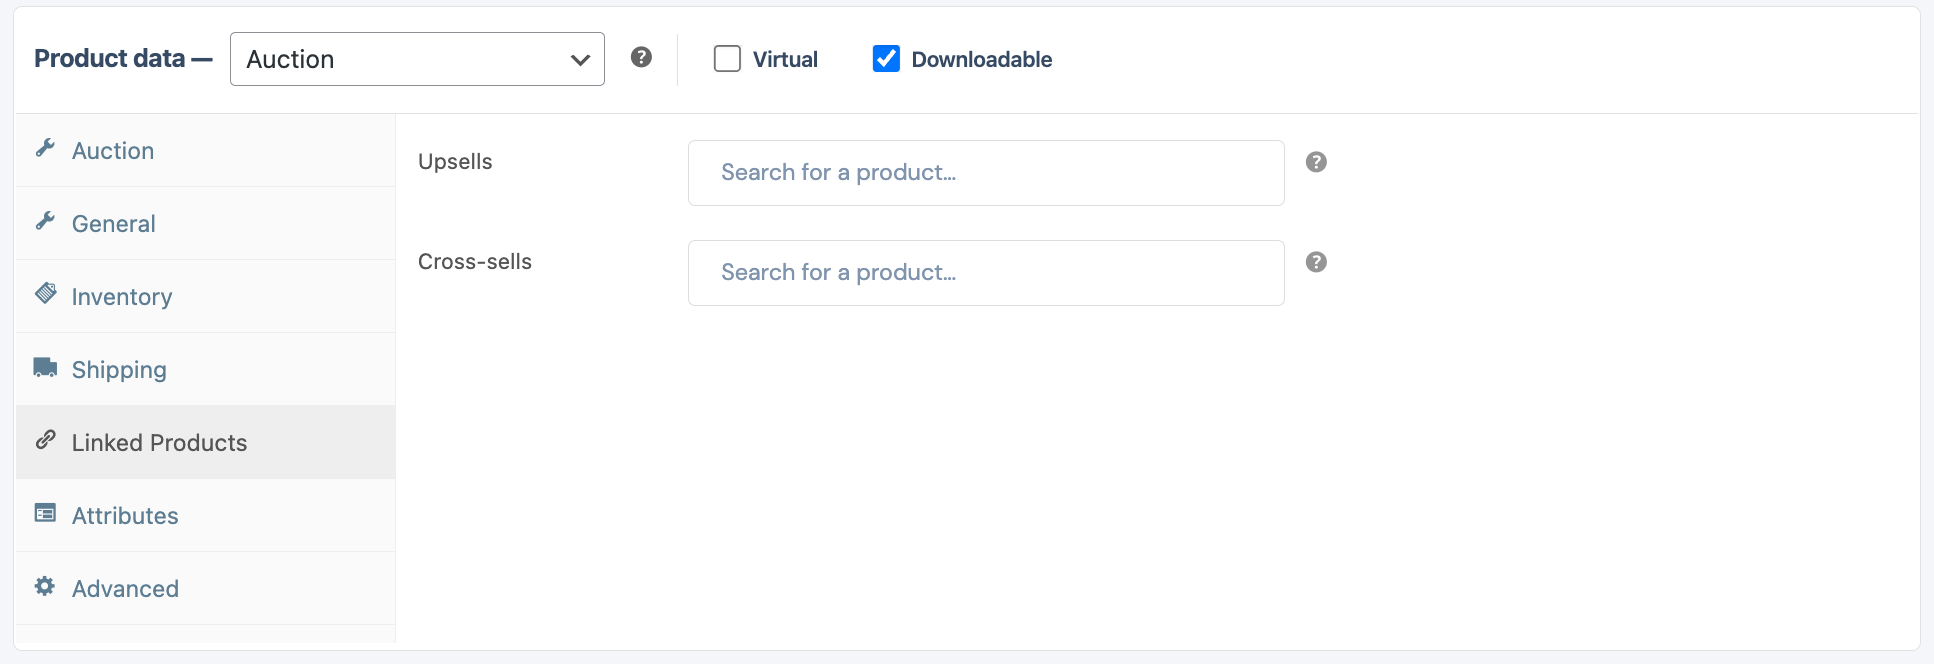
  • Upsells and Cross-sells – If you have already added other products prior to adding this product, you can display these products to your clients during checkout. This could lead to more sales for your store/business. You can only add these products here if they have already been created. 
 

6.5 Attributes:

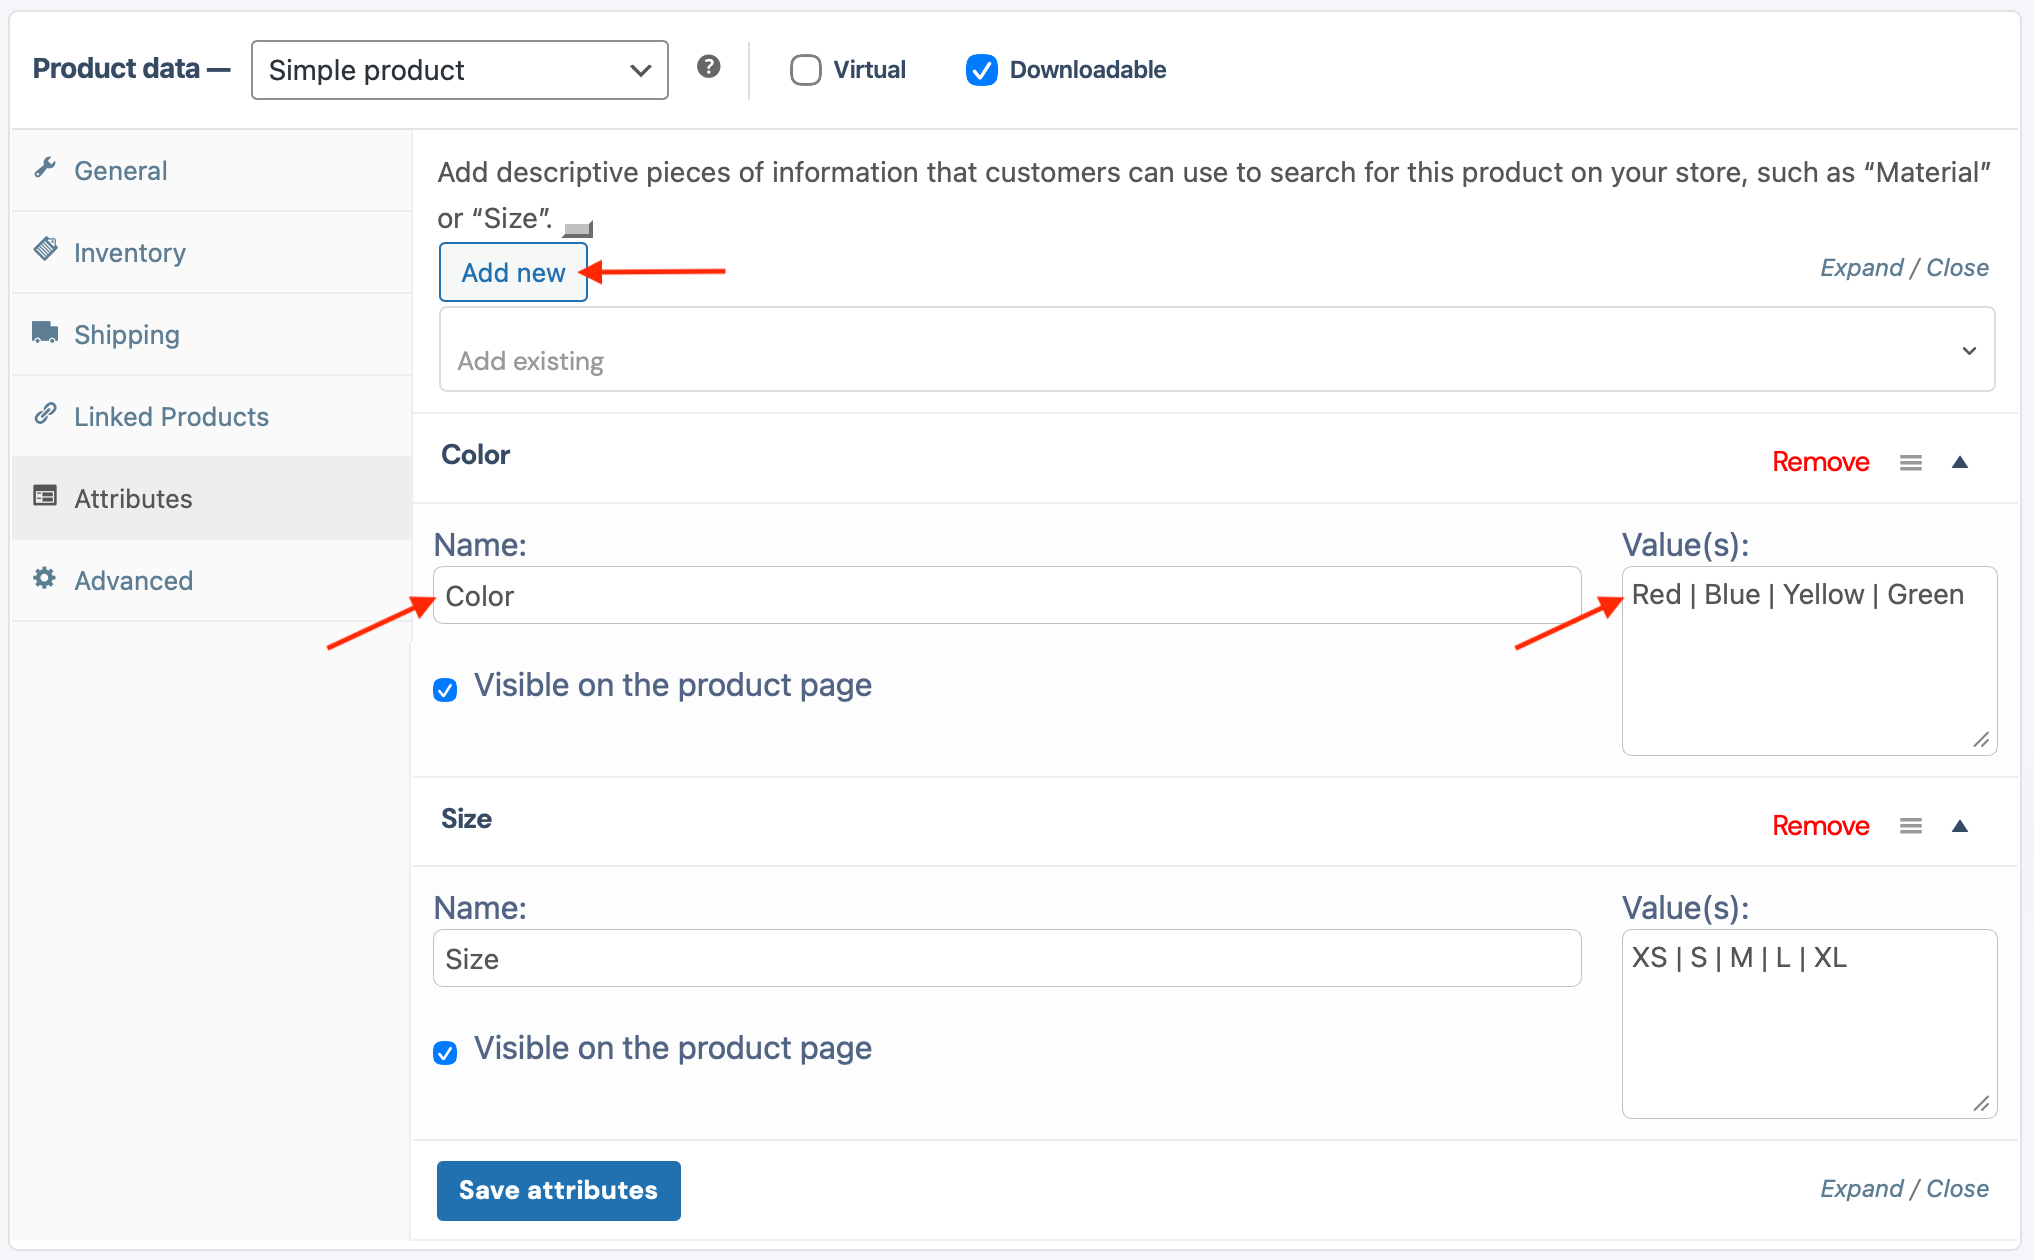
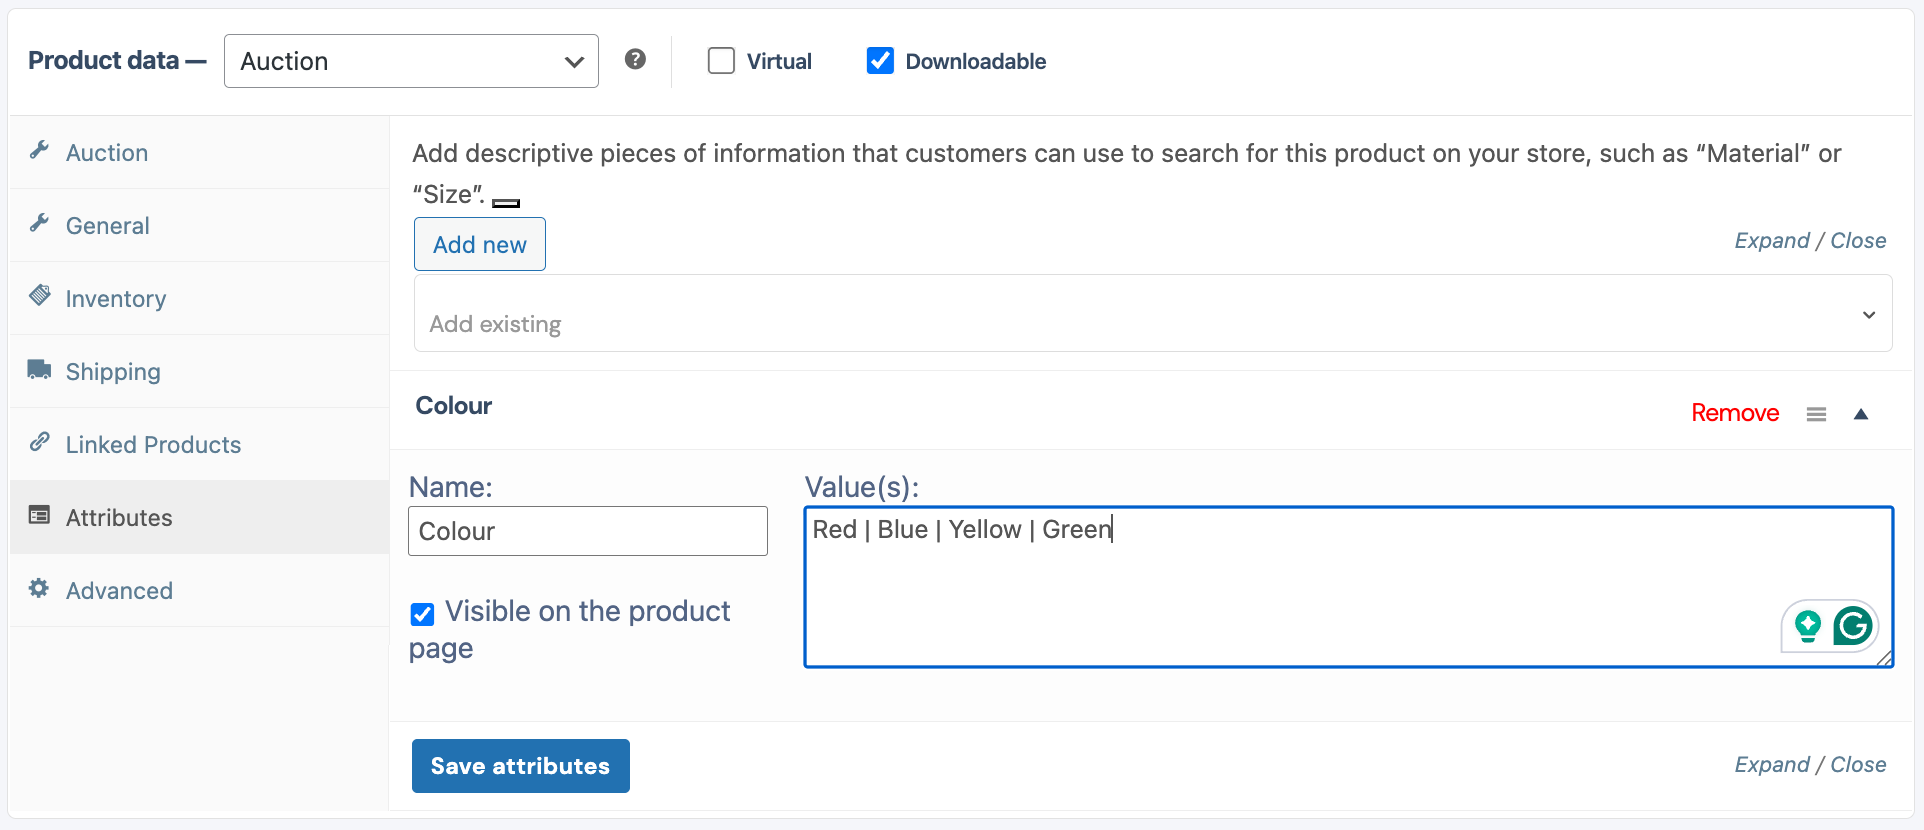
  • Add new – Use Attributes to create variable products with different options (like, for example, a T-Shirt with different sizes of colours). Attributes provide a way to list product characteristics that help customers narrow down their choices and purchase the option that they’re looking for. If your product doesn’t have different attributes, you may leave this tab blank. Attributes on a “Simple Product” will not alter the pricing of each option, so a Red shirt will cost the same as a Yellow shirt, or a Small shirt will cost the same as a Medium shirt.
  • Name – Name your Attribute. For example: Colour. This will only be visible if you clicked on Add new. Leave blank if not needed.
  • Value(s) – Here you will add all the different options/attributes of your product. For example: Red | Blue | Yellow | Green. Remember to separate each option with ” | “
  • Save attributes – If you have added attributes, remember to save them by clicking on “Save attributes” prior to moving to a new tab.
 

6.5 Advanced:

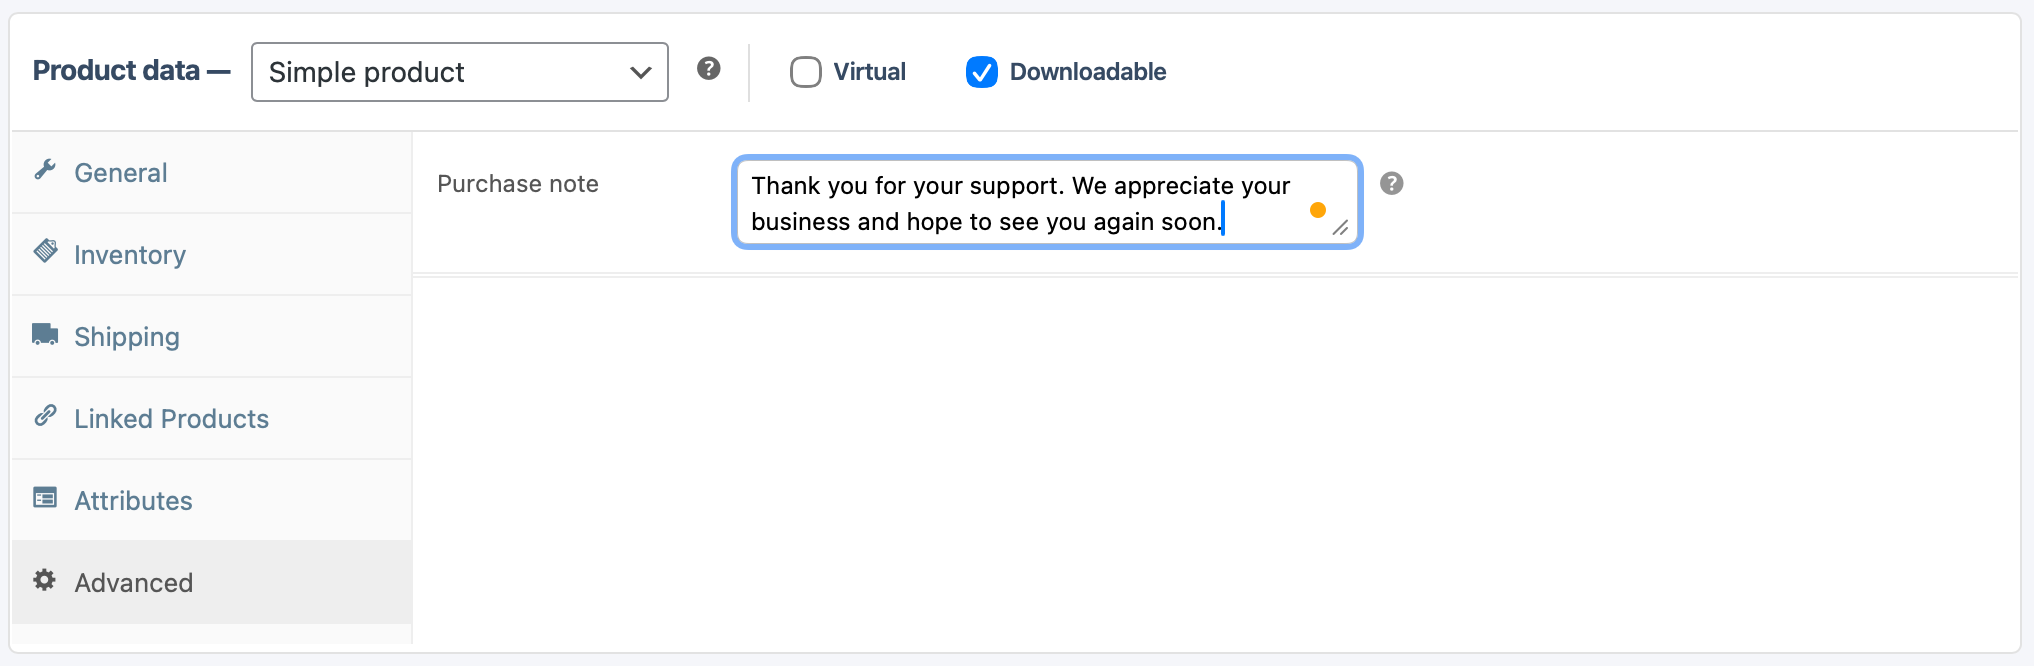
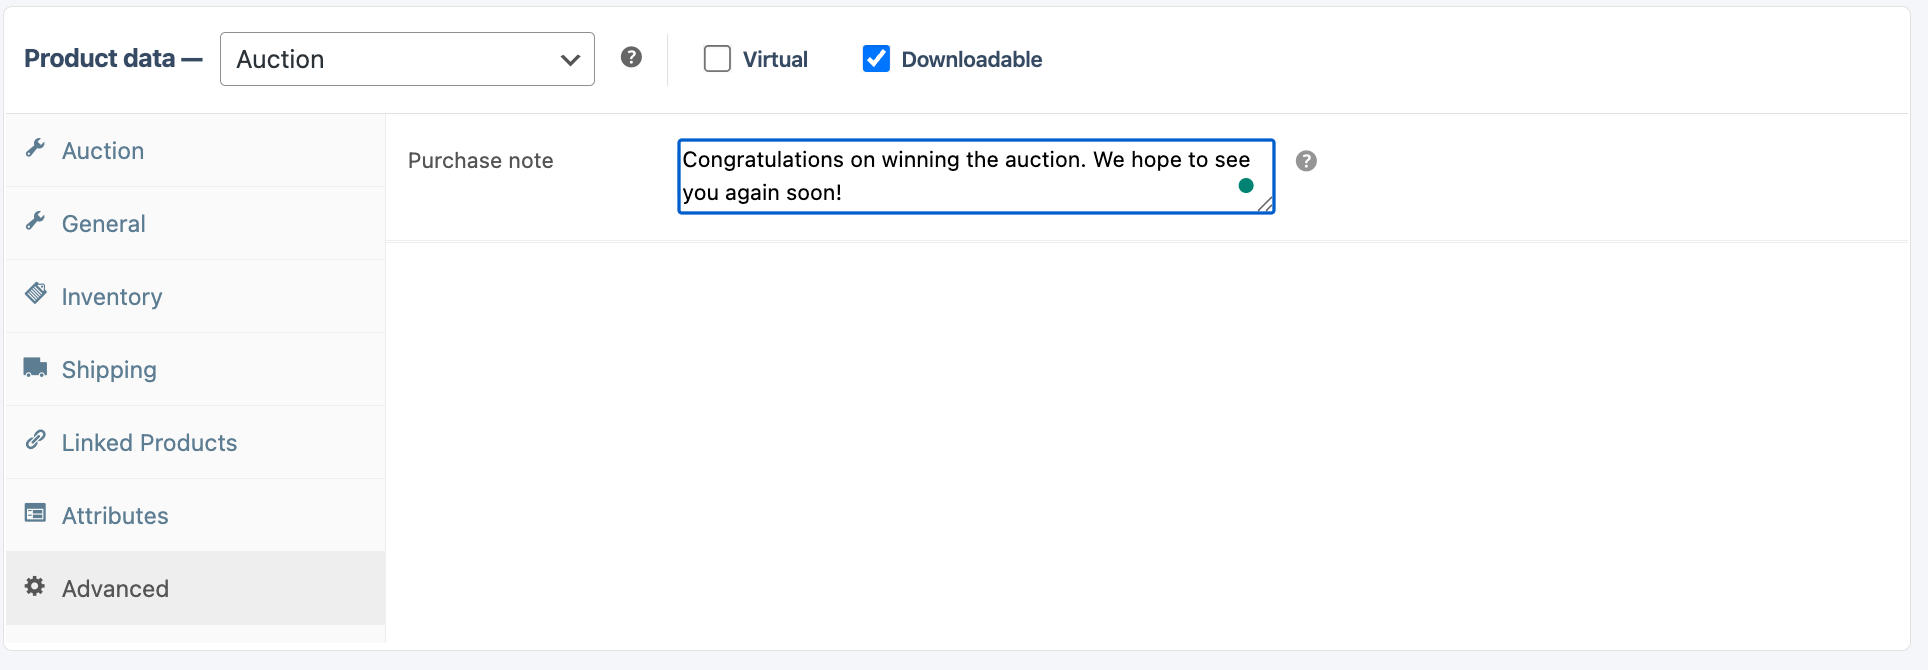
  • Purchase Note – If there is a special note you would like your customer to receive after they have purchased, you may enter this message here.
 

7. Variable Product – (This is a Single Product that has more than one option available, for example, you are selling T-shirts that are different colors or sizes. Or you are selling homemade baked goods and have a few bread varieties to choose from).

7.1 Initial settings:

  • Product Data – Select Variable Product.
 

7.2 General:

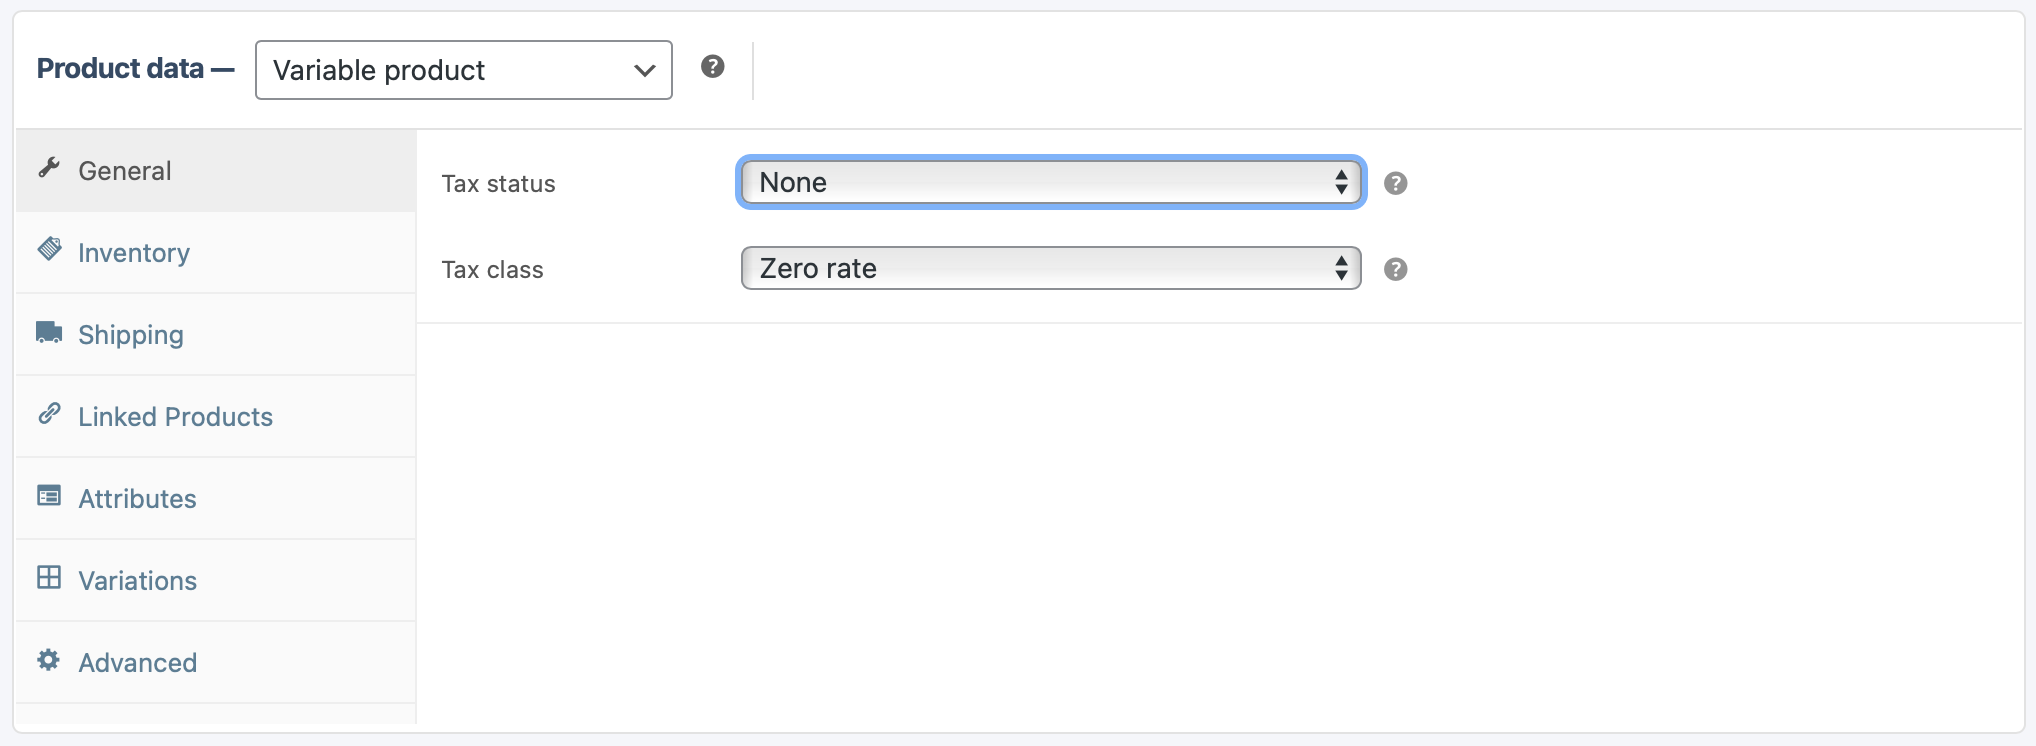
  • Tax status – If you are tax-registered and you would like to add tax to your product and/or shipping, you can set this here. 
  • Tax class – If you are tax-registered, you can set the type of Tax you would like to add to your product here.
 

7.3 Inventory:

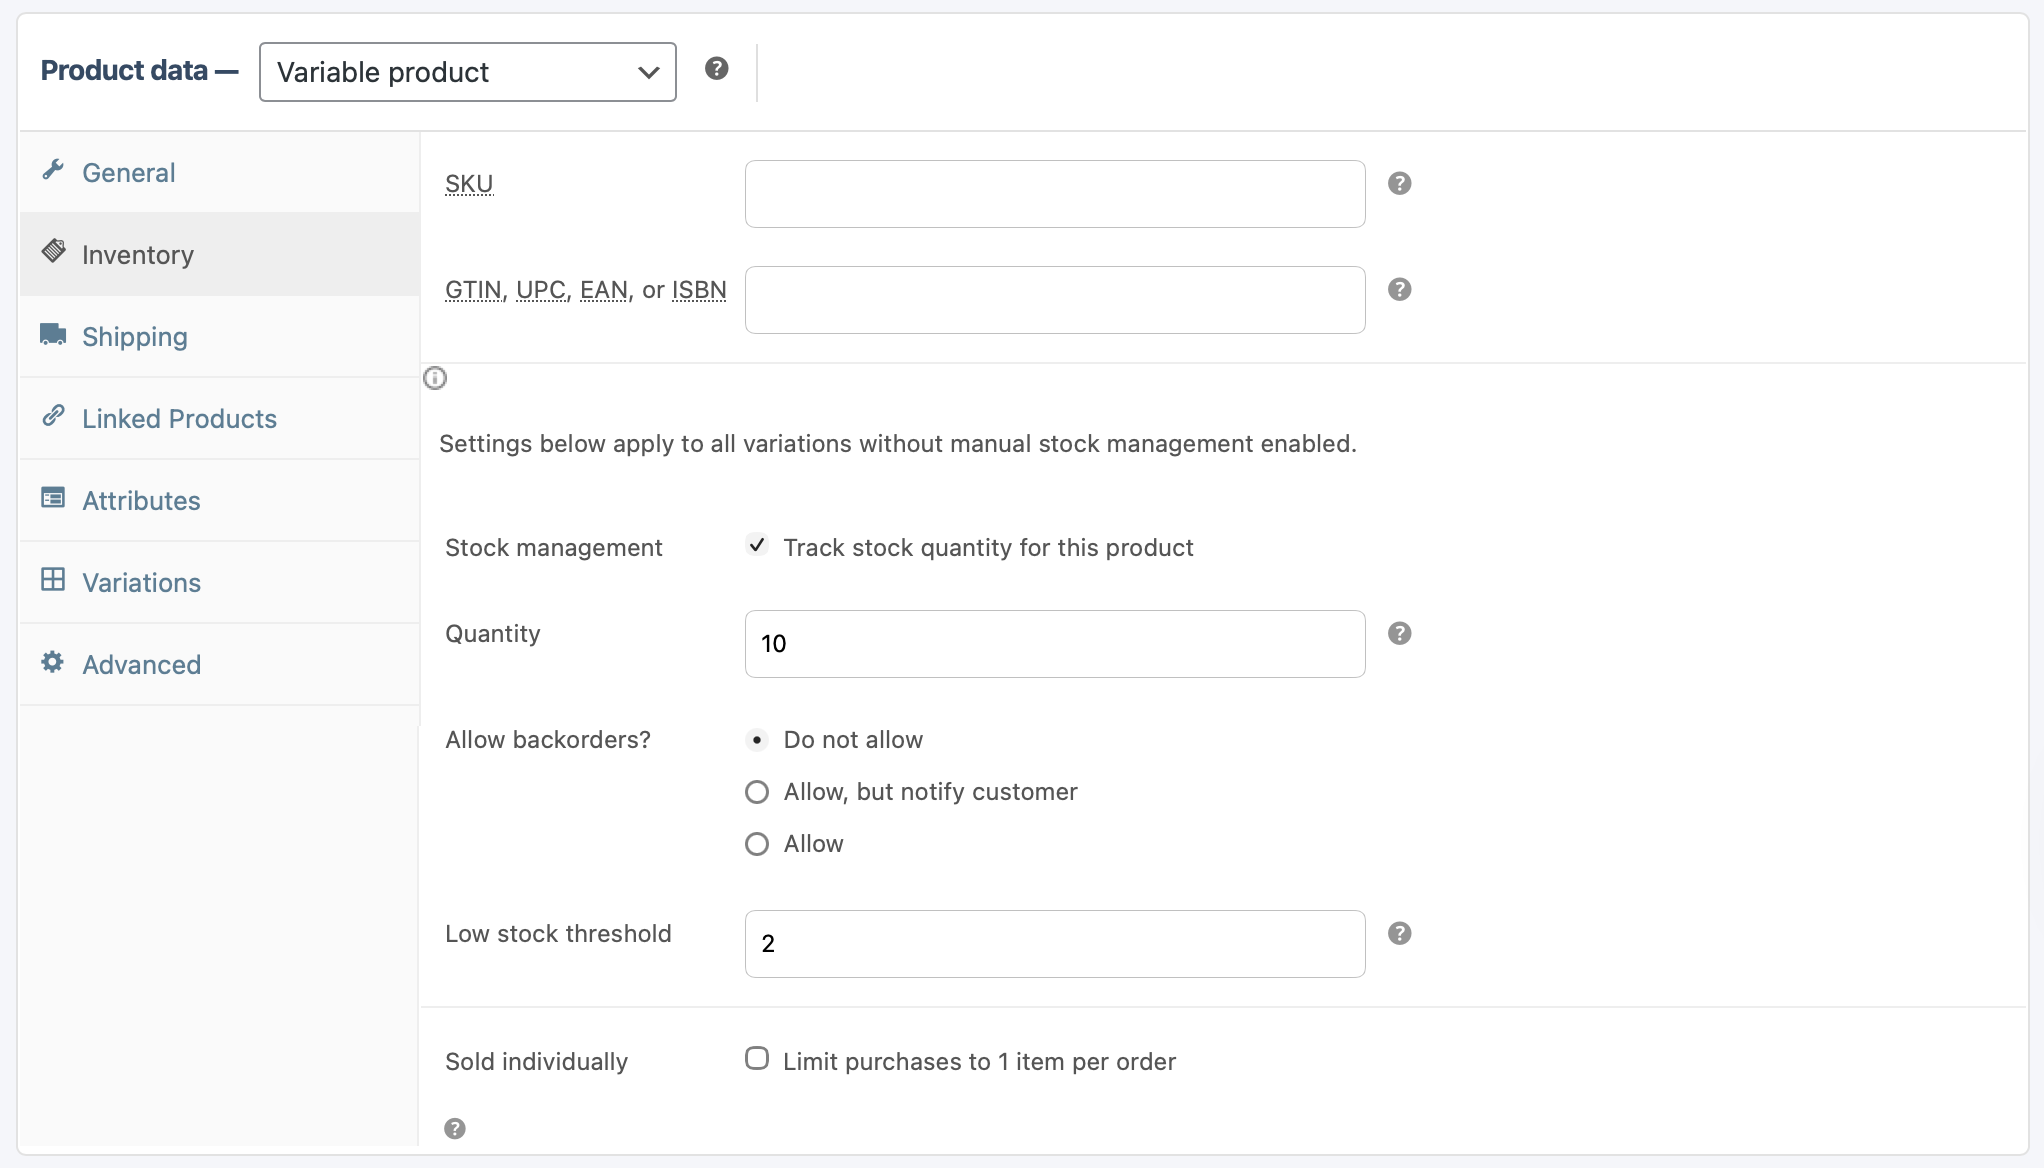
  • SKU – Personal Code or name of a product so that you can keep track of stock. You may leave this blank if preferred.
  • GTIN, UPC, EAN or ISBAN – Other identifiers for your products. You may leave this blank if desired.
  • Stock management – If you would like to keep track of your physical product stock, or if you would like to show the user on the frontend when stock is either low or sold out, you may tick this box. If you doubt, you will run out of stock of your product, or if products are made on demand, you may leave this unticked.
  • Quantity (only if Stock management was selected) – Add the amount of stock of the product that you have available. Only use numbers (example: 9), do not type the number out (example: nine).
  • Allow backorders – Backorders mean that a client is still allowed to order and pay for a product, even if you don’t currently have any stock available. Choose the option that suits your business best.
  • Low stock threshold – Select what you consider to be low stock for your business.
  • Sold individually – Tick this box only if customers need to be limited to a single product each. Meaning they may not buy more than 1 product per order.
 

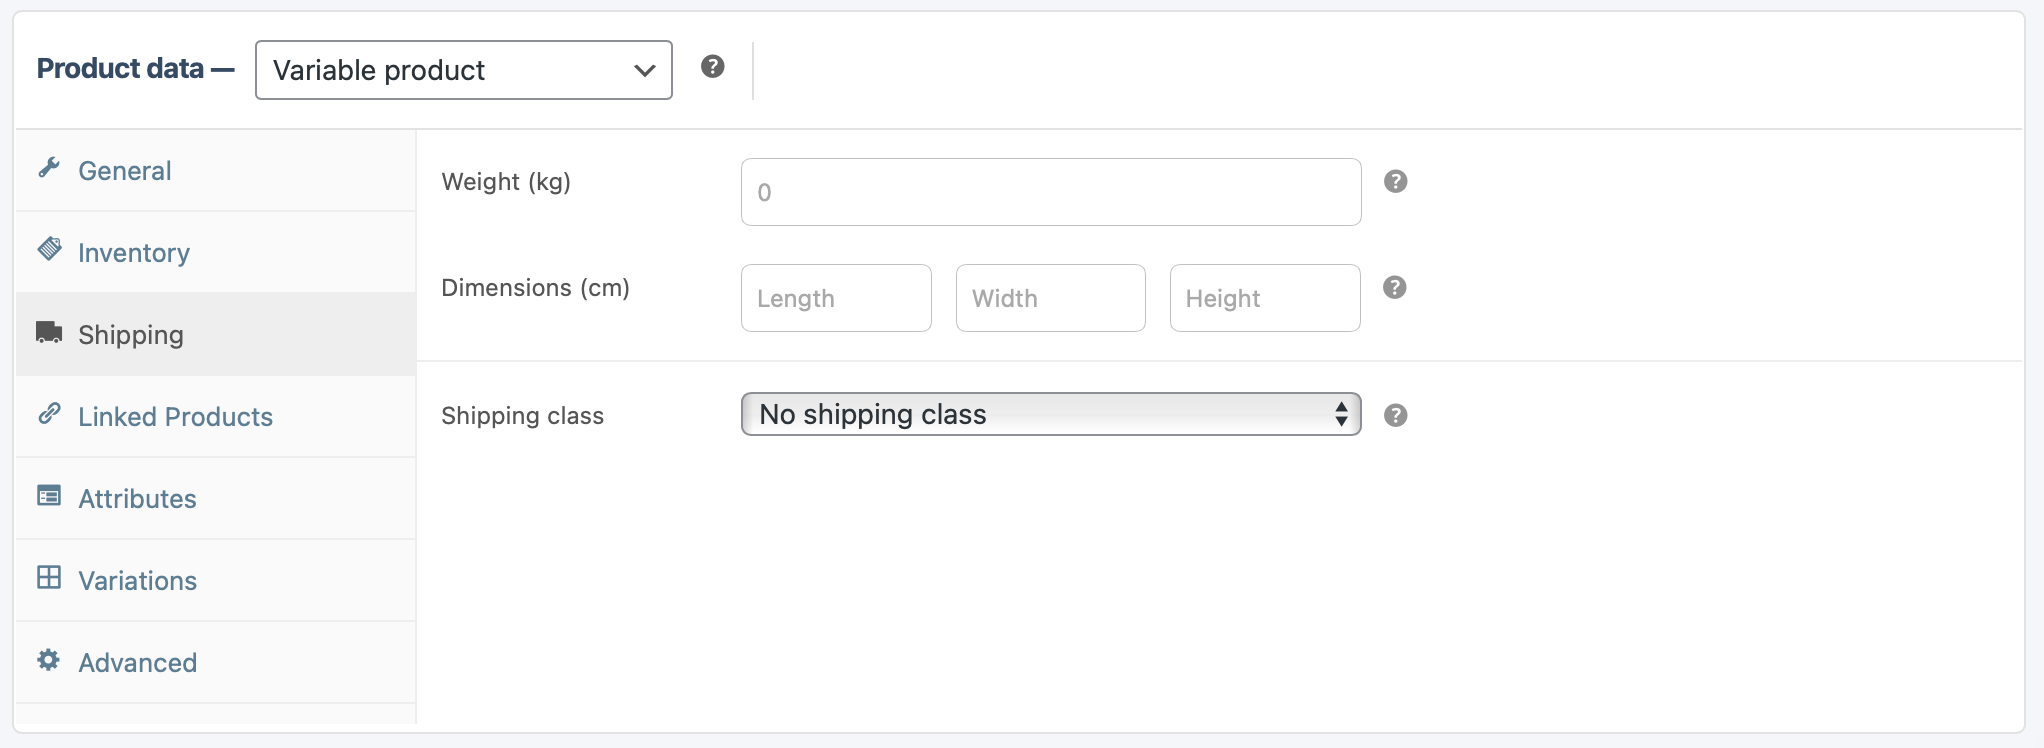
7.4 Shipping:

  • Weight – Enter the weight of your product. Remember to include the shipping packaging (box, wrapping, etc.) if applicable.
  • Dimensions – Enter the shipping dimensions. This means it will include the packaging that will make it shipping-ready.
  • Shipping class – Select the shipping class relevant to this product. You can set up your store’s shipping classes/options by following the instructions at “How to set up my store shipping options” in the FAQ topic under Vedors above.
 

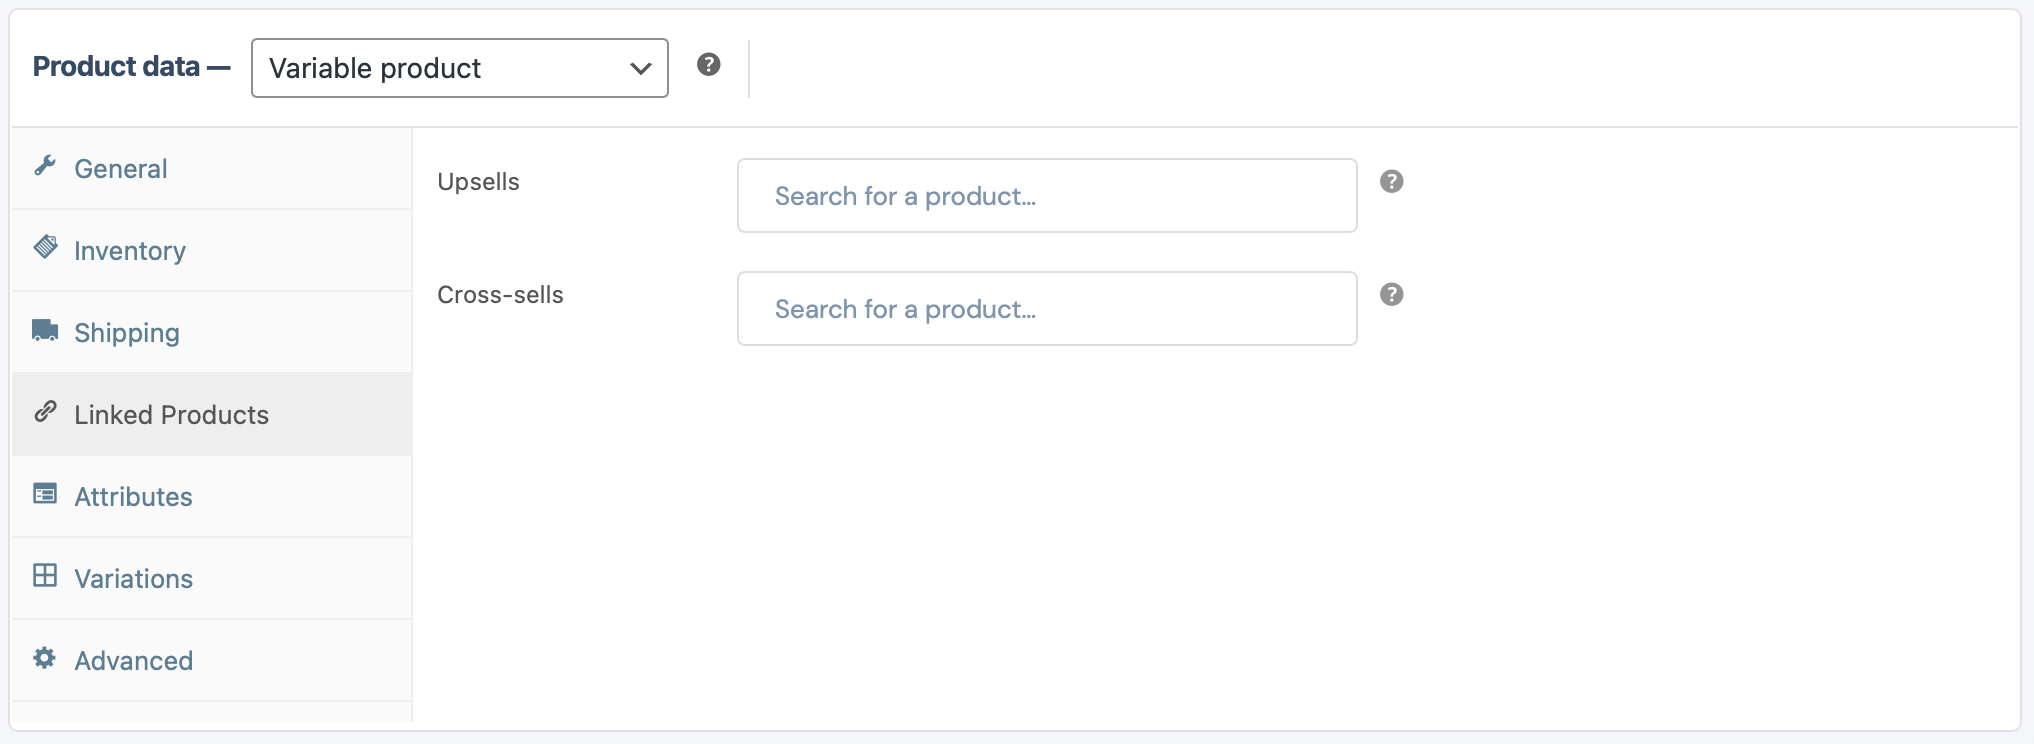
7.5 Linked Products:

  • Upsells and Cross-sells – If you have already added other products prior to adding this product, you can display these products to your clients during checkout. This could lead to more sales for your store/business. You can only add these products here if they have already been created. 
 

7.6 Attributes:

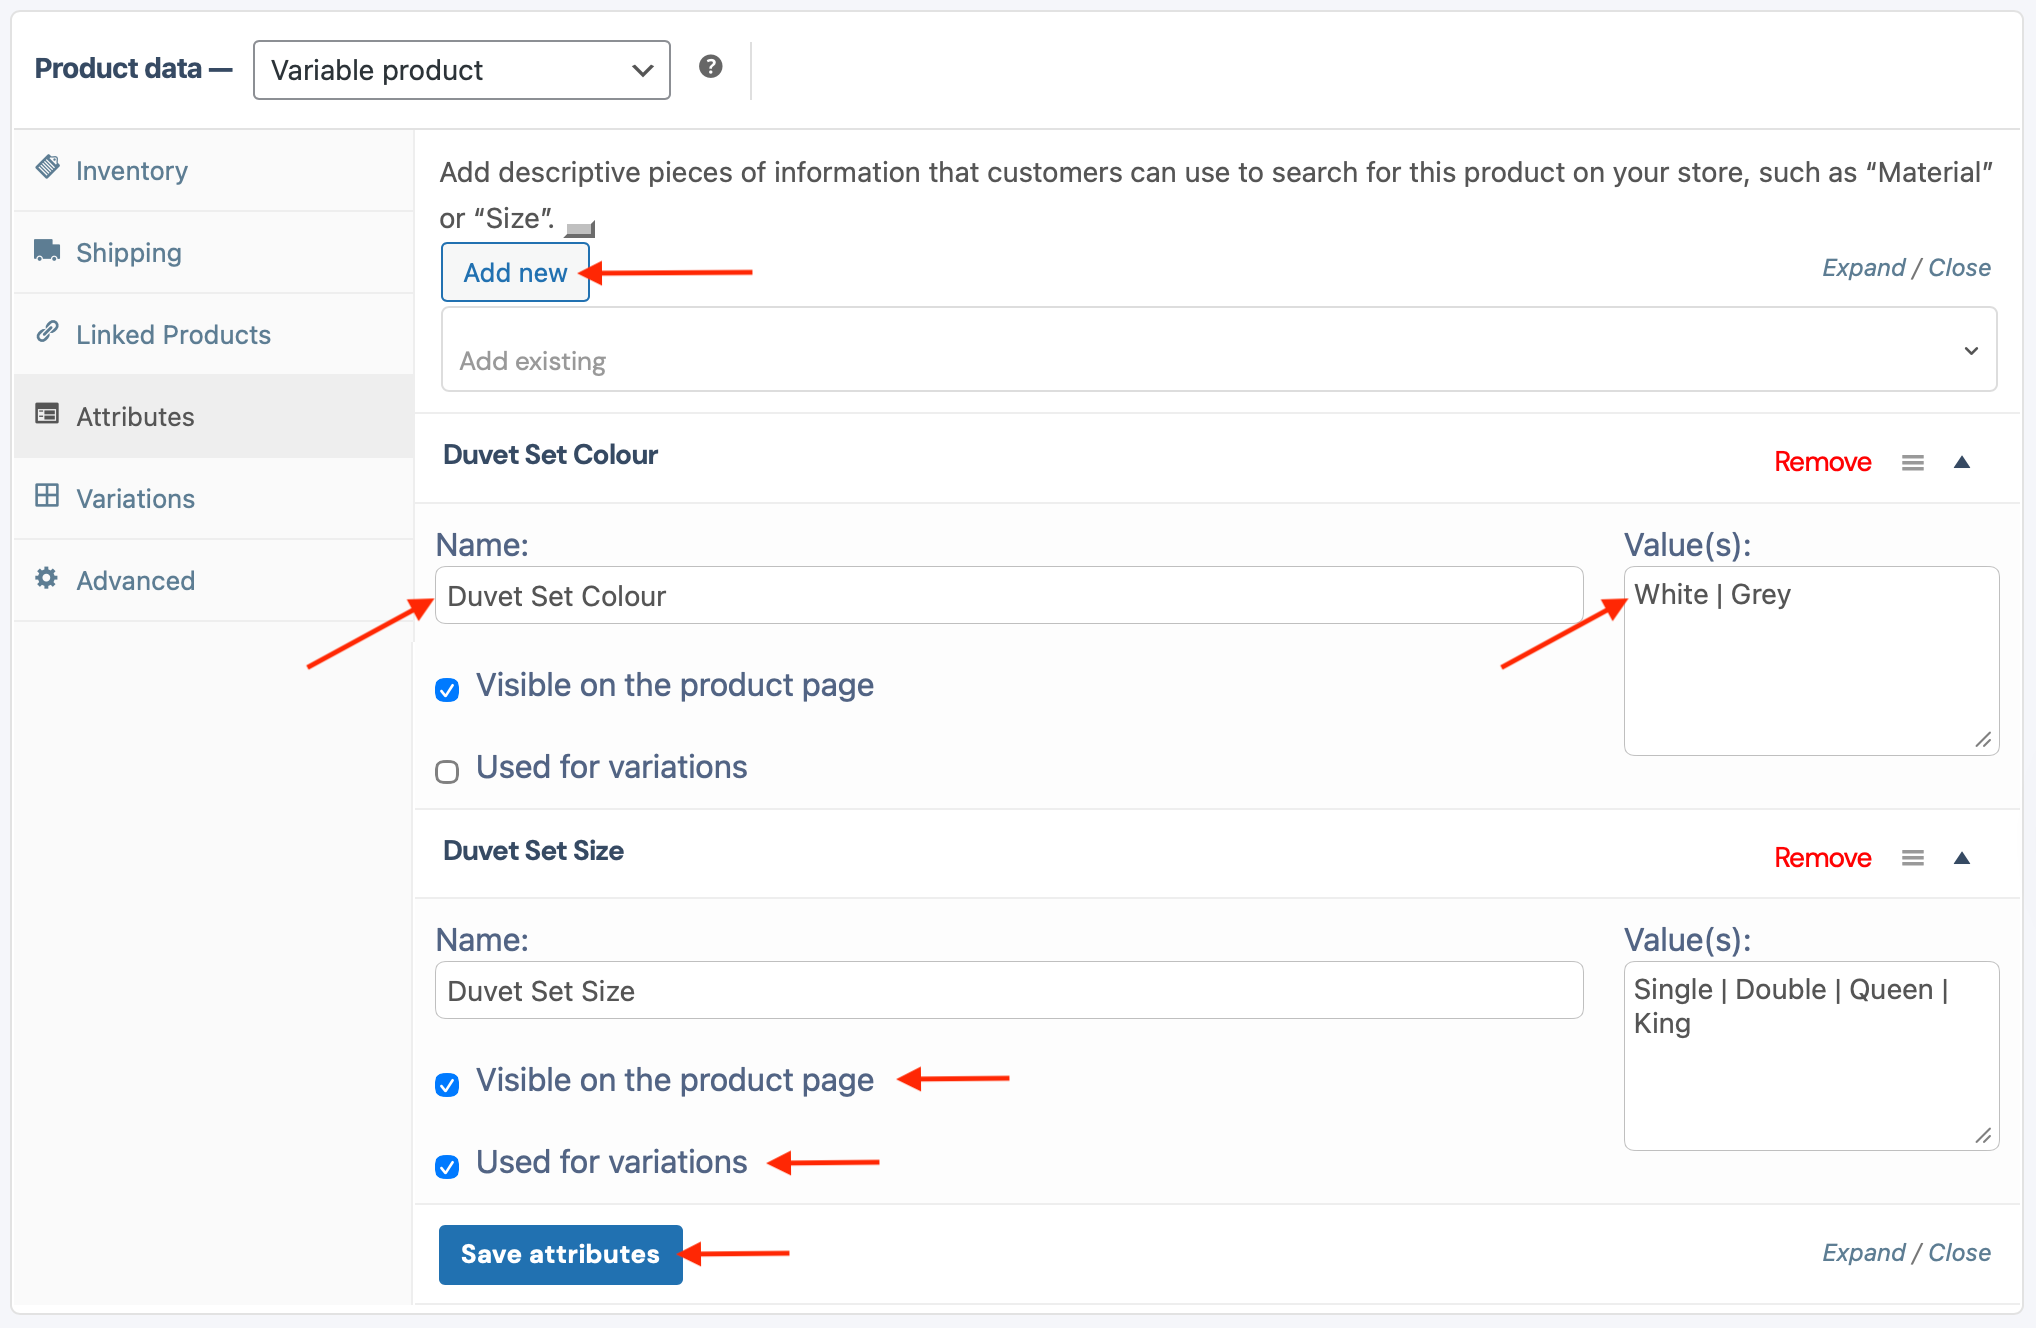
  • Add new – Use Attributes to create variable products with different options (like, for example, bedding with different sizes or materials). Attributes provide a way to list product characteristics that help customers narrow down their choices and purchase the option that they’re looking for. Attributes on a “Variable Product” will allow you to alter the pricing of each option under Variations, so a Single Bed Duvet Set will cost less than a King Size Duvet Set, or a Cotton Set will cost more than a Synthetic Material Set.
  • Name – Name your Attribute. For example: Duvet Set Size.
  • Value(s) – Here you will add all the different options/attributes of your product. For example: Single | Double | Queen | King. Remember to separate each option with ” | “
  • Visible on Product Page – Tick the box
  • Used for variations – Tick the box of the Attributes that will have different pricing, stock quantity, or any other variation that is specific to your product.
  • Save attributes – If you have added attributes, remember to save them by clicking on “Save attributes” prior to moving to a new tab.
 

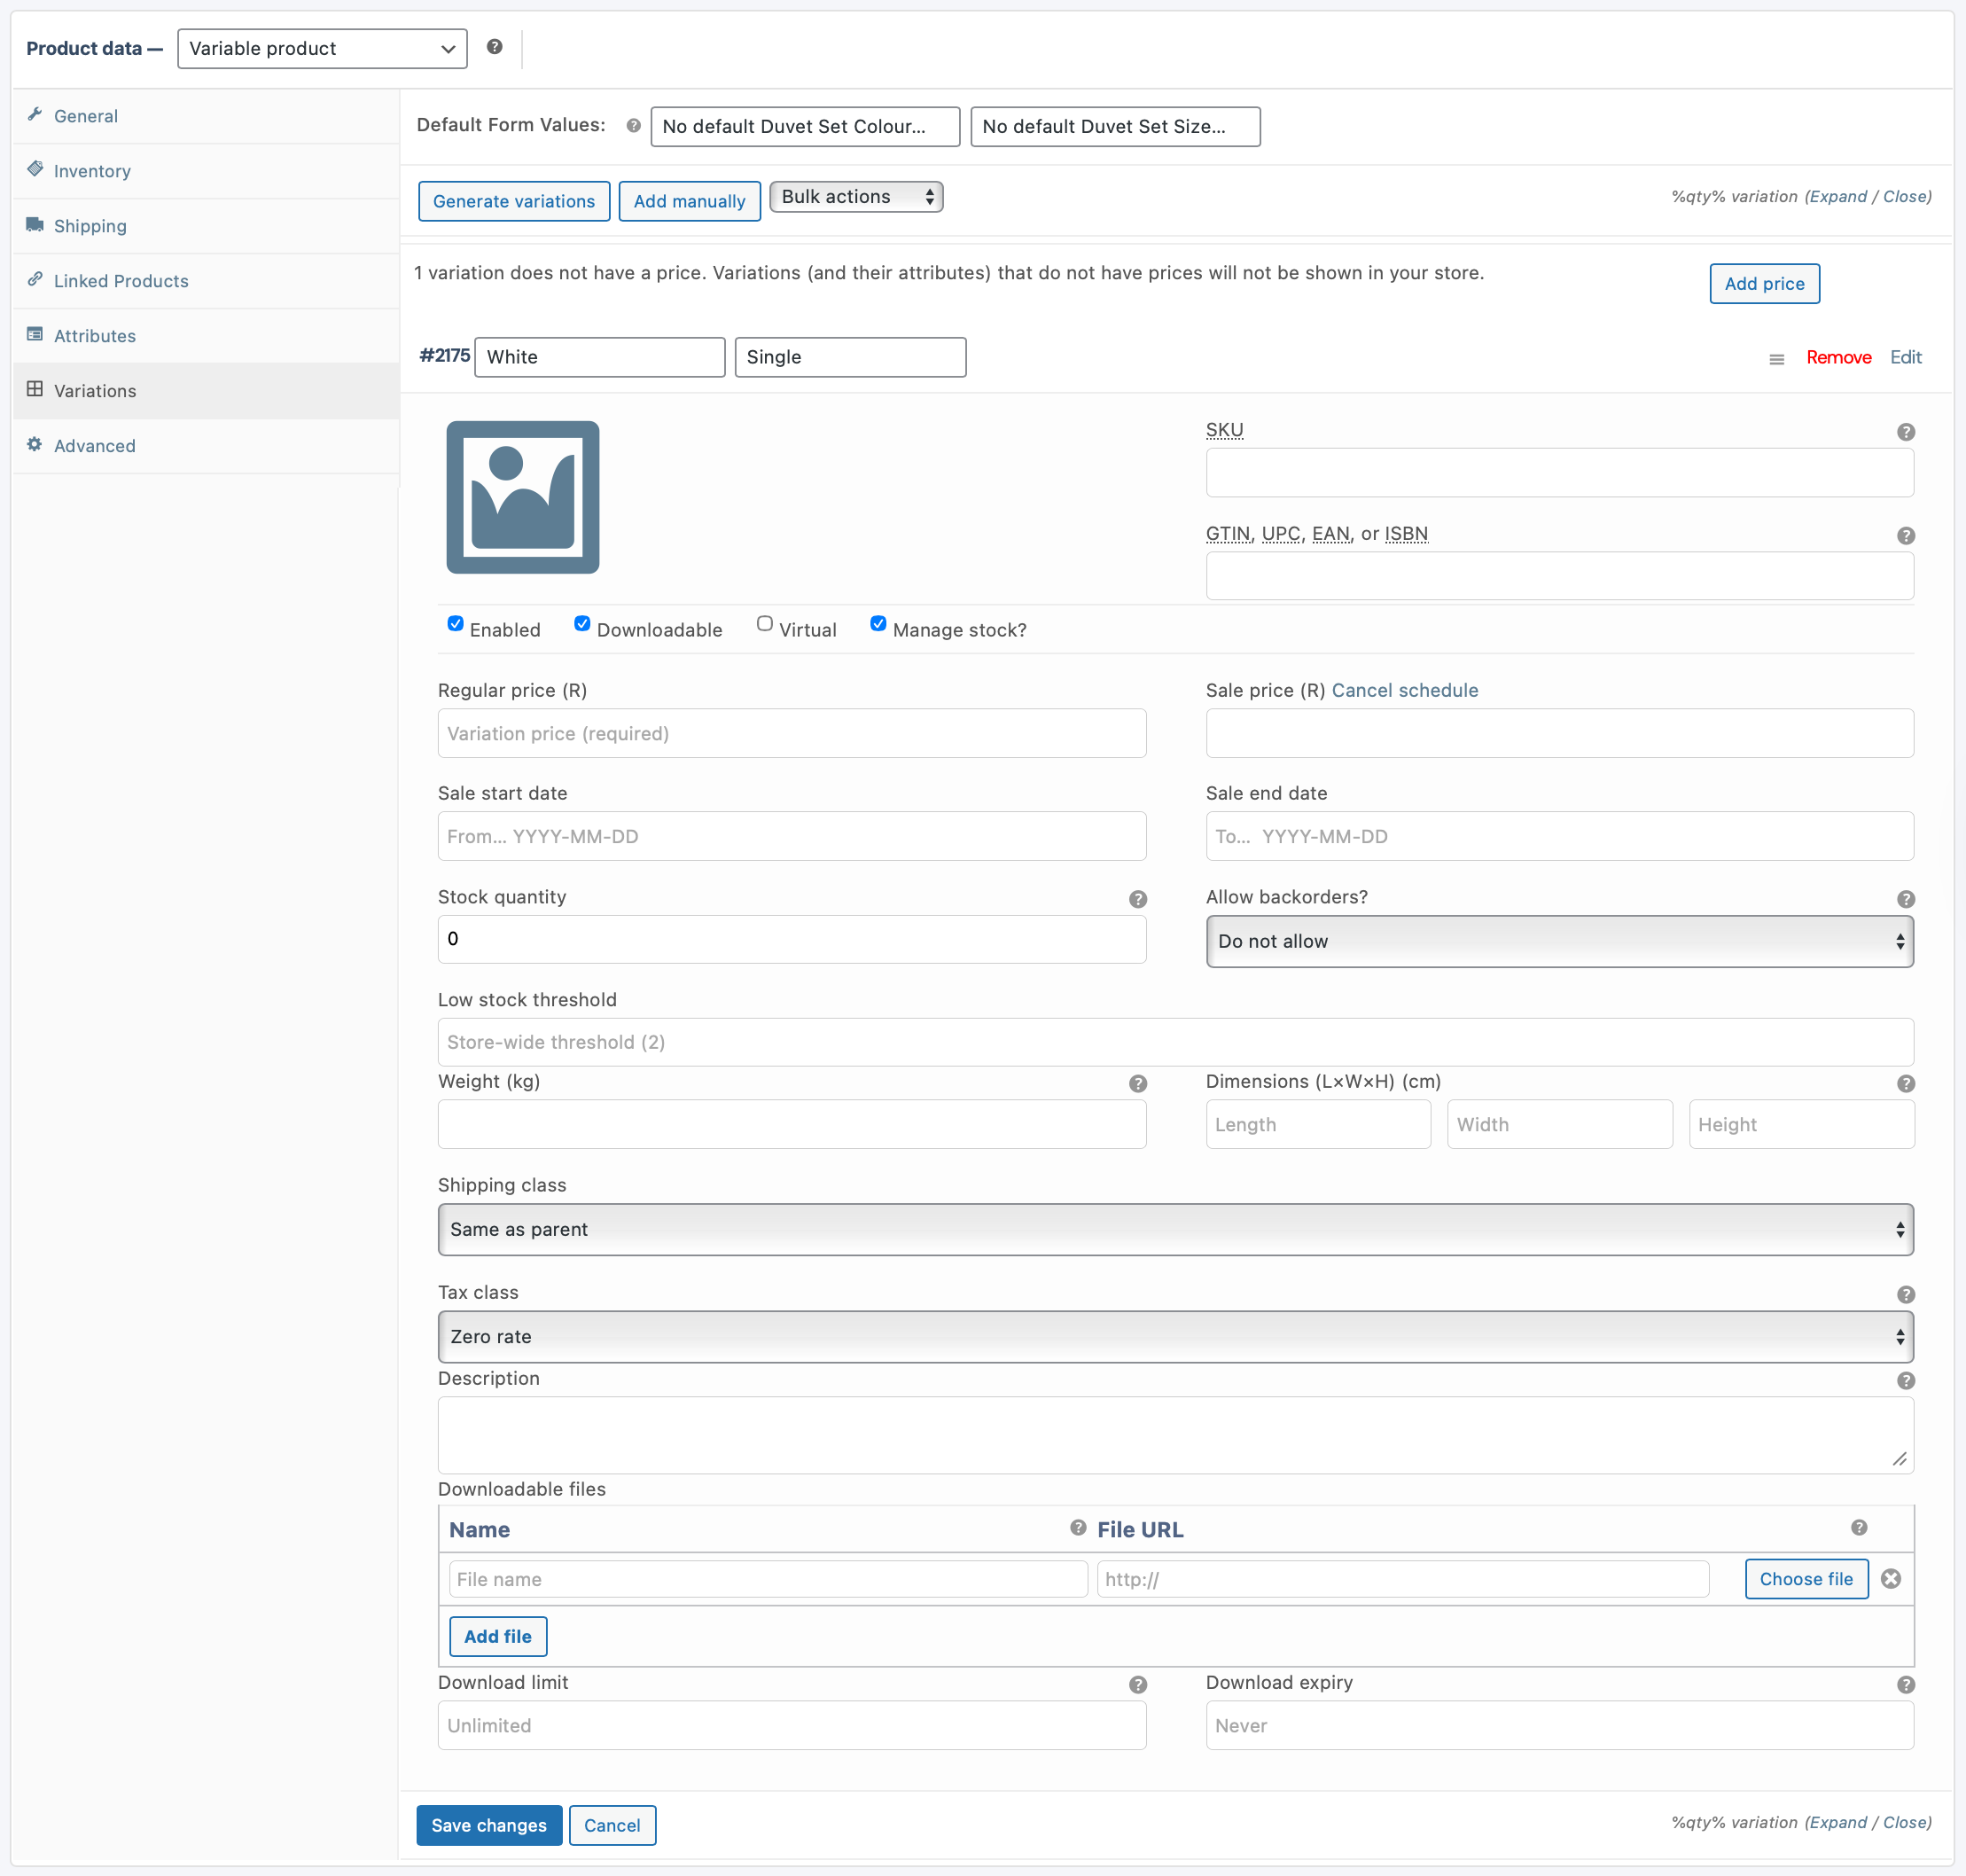
7.7 Variations

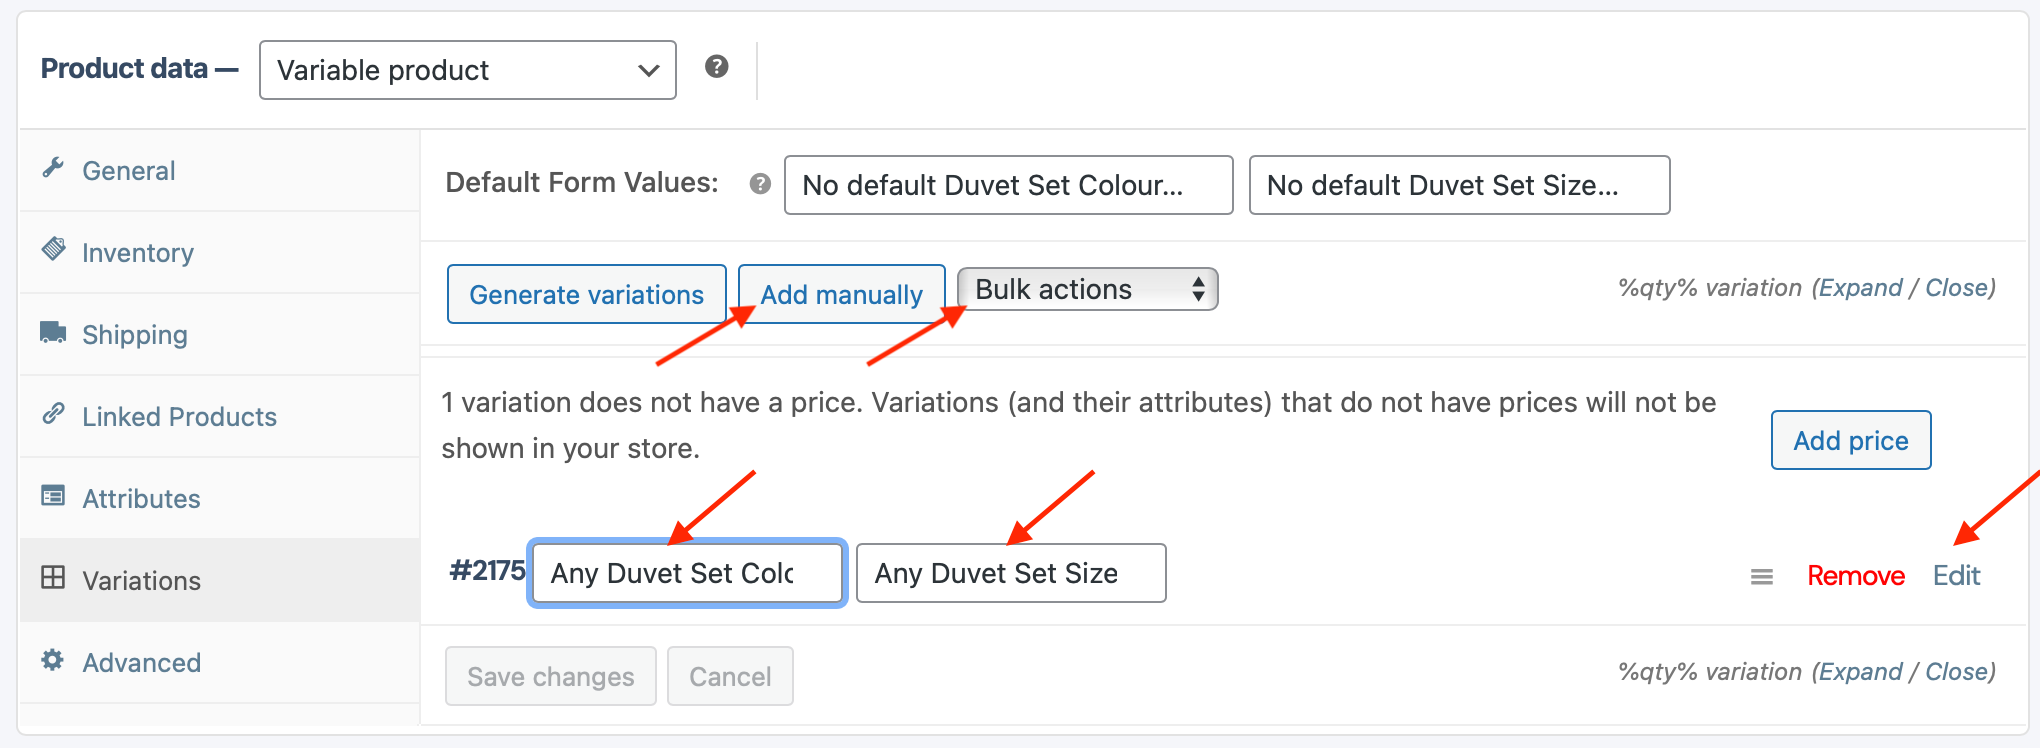
  • Add manually – Select “Add manually” as “Bulk actions”
  • Select the Vation or Variation Combination and click on Edit to make changes.
 

  • Upload an Image – Upload a Main Image for this Product Variation.
  • SKU – Personal Code or name of a product so that you can keep track of stock. You may leave this blank if preferred.
  • GTIN, UPC, EAN or ISBAN – Other identifiers for your products. You may leave this blank if desired.
  • Enabled – Tick this box
  • Downloadable – If this product variation is only available online and needs to be downloaded after it has been purchased, tick this box. This will add an additional field on the form where you can upload your file. If your product is a physical product, leave this box unticked.
  • Virtual – If your product is only available online and is not a physical product, tick this box. This will remove the “Shipping” section of the Form. If your product is a physical product, leave this box unticked.
  • Manage Stock – If you would like to keep track of your physical product stock, or if you would like to show the user on the frontend when stock is either low or sold out, you may tick this box. If you doubt, you will run out of stock of your product, or if products are made on demand, you may leave this unticked.
  • Regular price – Set your normal price for your item.
  • Sale price – Set a sale price if you are running a special; otherwise, leave it blank.
  • Schedule – Just beside the “Sale Price” field title, you will see “Schedule”. If you are running a sale and would like to only run this sale for a specified period, you can click this link, and it will open up two extra fields where you can add the start and end date of the sale.
  • Stock quantity (only if Manage stock was selected) – Add the amount of stock of the product that you have available. Only use numbers (example: 9), do not type the number out (example: nine).
  • Allow backorders – Backorders mean that a client is still allowed to order and pay for a product, even if you don’t currently have any stock available. Choose the option that suits your business best.
  • Low stock threshold – Select what you consider to be low stock for your business.
  • Weight – Enter the Shipping weight of your product. Remember to include the shipping packaging (box, wrapping, etc.) if applicable.
  • Dimensions – Enter the shipping dimensions. This means it will include the packaging that will make it shipping-ready.
  • Shipping class – Select the shipping class relevant for this product. You can set up your store’s shipping classes/options by following the instructions at “How to set up my store shipping options” in the FAQ topic under Vedors above.
  • Tax class – If you are tax-registered, you can set the type of Tax you would like to add to your product here.
  • Description – Give a short description of the Product Variation.
  • Downloadable files (only if Downloadable was selected) – Here, you will add your file that the customer will be purchasing. Only after the sale is complete will the customer have access to the file. Simply click on “Add File” and create a File Name. Choose the file or add a File URL if the file is available somewhere else on the internet for download. Click Add File again if you need to load more than one file.
  • Download limit (only if Downloadable was selected) – You can add the number of times a customer is allowed to download the product after it has been purchased.
  • Download expiry (only if Downloadable was selected) – You can enter the number of days that the customer will have access to the file to download it.
  • Save changes – Remember to click on “Save changes” before moving to the next tab. If you move to the next tab without saving your data, entered might be lost.
  • To add another Variation, simply redo the entire process, starting with: Add manually – Select “Add manually” as “Bulk actions”…
 

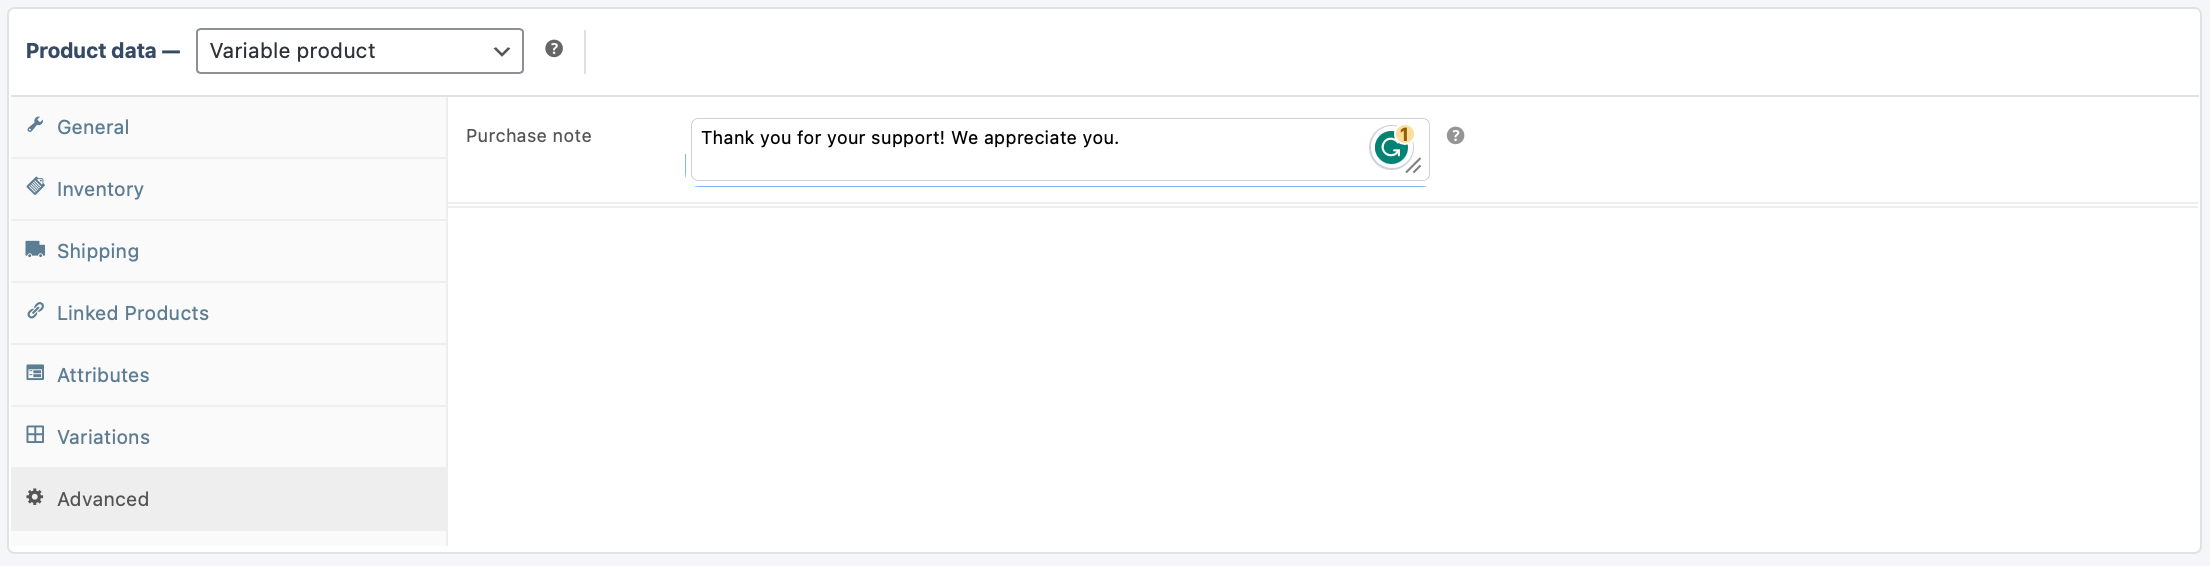
7.8 Advanced: 

  • Purchase Note – If there is a special note you would like your customer to receive after they have purchased, you may enter this message here.


8. Remember to click on “Send Product for Review” or to “Save as Draft” at the top of the form before leaving the page. If you do not save the form, the data you just entered will be lost. 
 

1. Go to your Listing Dashboard. Select the Products tab on the left menu.

2. If you would like to edit an existing Product, you can search for the Product Name or find it in the list shown. To edit the Product, click on the 3 dots (…) on the right-hand side of the Product in question. From the Menu that opens, select “Edit Product”.

3. If you are adding a new Product, you will see a button in the top right corner, “Add Product”. Click this button

4. On the Product page, we will be working on the “Product Data”. This is where we set the Pricing for the Product/Listing.

5. The first thing we will need to consider is what type of Product we are adding. There are a few options to consider:

  • Simple Product (Local Products, Second Hand Products, and Events with no ticket availability confirmation required)
  • Variable Product (Local Products, Second Hand Products, and Events with no ticket availability confirmation required, all with more than 1 option available per product)
  • Grouped Product (multiple Products grouped together and sold as a bundle)
  • Bookable Product (Activities and Events where the ticket availability needs to be confirmed before the customer pays for the tickets)
  • Auction Product (Auction Products)
  • Accommodation Product ( Accommodation Products)


6. Bookable Product
– (Activities, or Events where the ticket availability needs to be confirmed by the Vendor before the Customer pays for the tickets).

6.1. Initial settings:
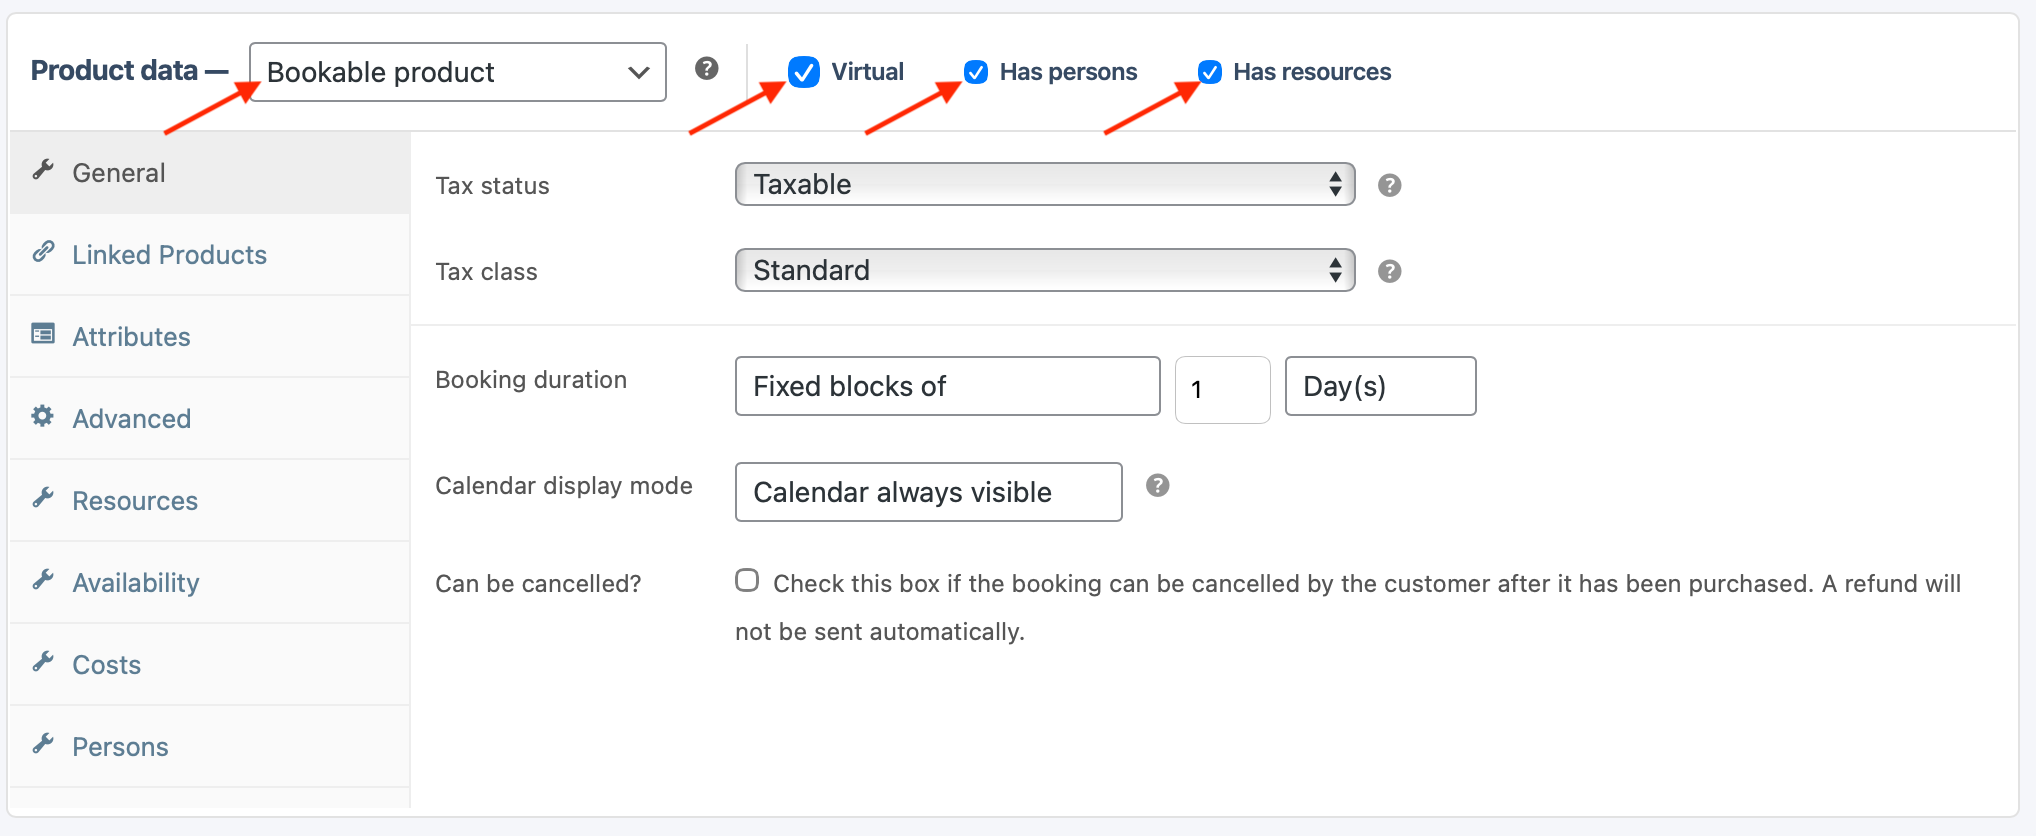
  • Product Data – Select Bookable Product.
  • Virtual – Tick this box. As the Activity and Event Listings don’t require delivery, it will remove this part of the form that is not needed.
  • Has persons – Tick this box. This will add an extra tab to the form where we will enter more information on person types and quantities allowed.
  • Has resources – This option allows you to add any additional costings to your listing, for example, different ticket types or activity packages.

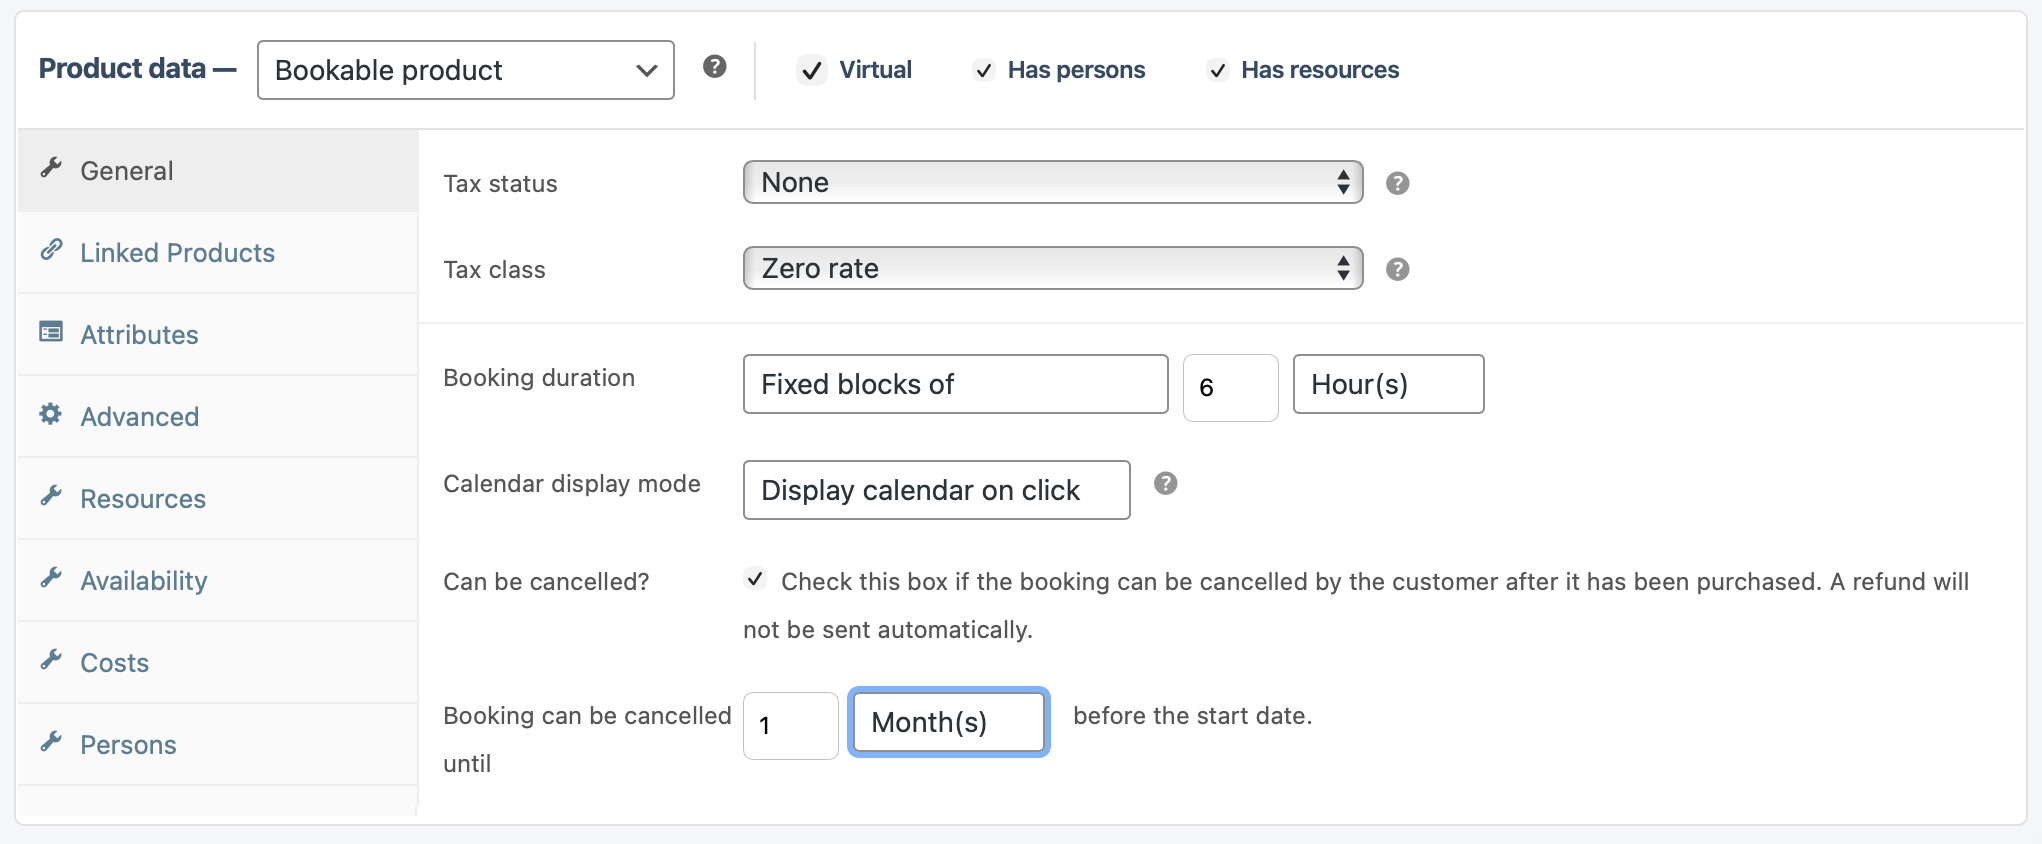
6.2. General:

  • Tax status – If you are tax-registered and you would like to add tax to your product and/or shipping, you can set this here. 
  • Tax class – If you are tax-registered, you can set the type of Tax you would like to add to your product here.
  • Booking duration – This is how long your activity or event will be. If your activity/event is for 6 hours, you will select “Fixed blocks of” & 6 & Hour(s).
  • Calendar display mode – Select “Display Calendar on click”.
  • Can be cancelled – If you offer refunds for cancellations, you will tick this box. If you do not offer refunds for cancellations, leave the box unticked. You can add your cancellation policy further down in the “Add Product Form”.
  • Booking can be cancelled until – (Only available if you ticked the “Booking can be cancelled” box). Here you will select till when before the actual activity/event booking the customer may cancel. You can define the cancellation price or the percentage the client will receive back in your cancellation policy.

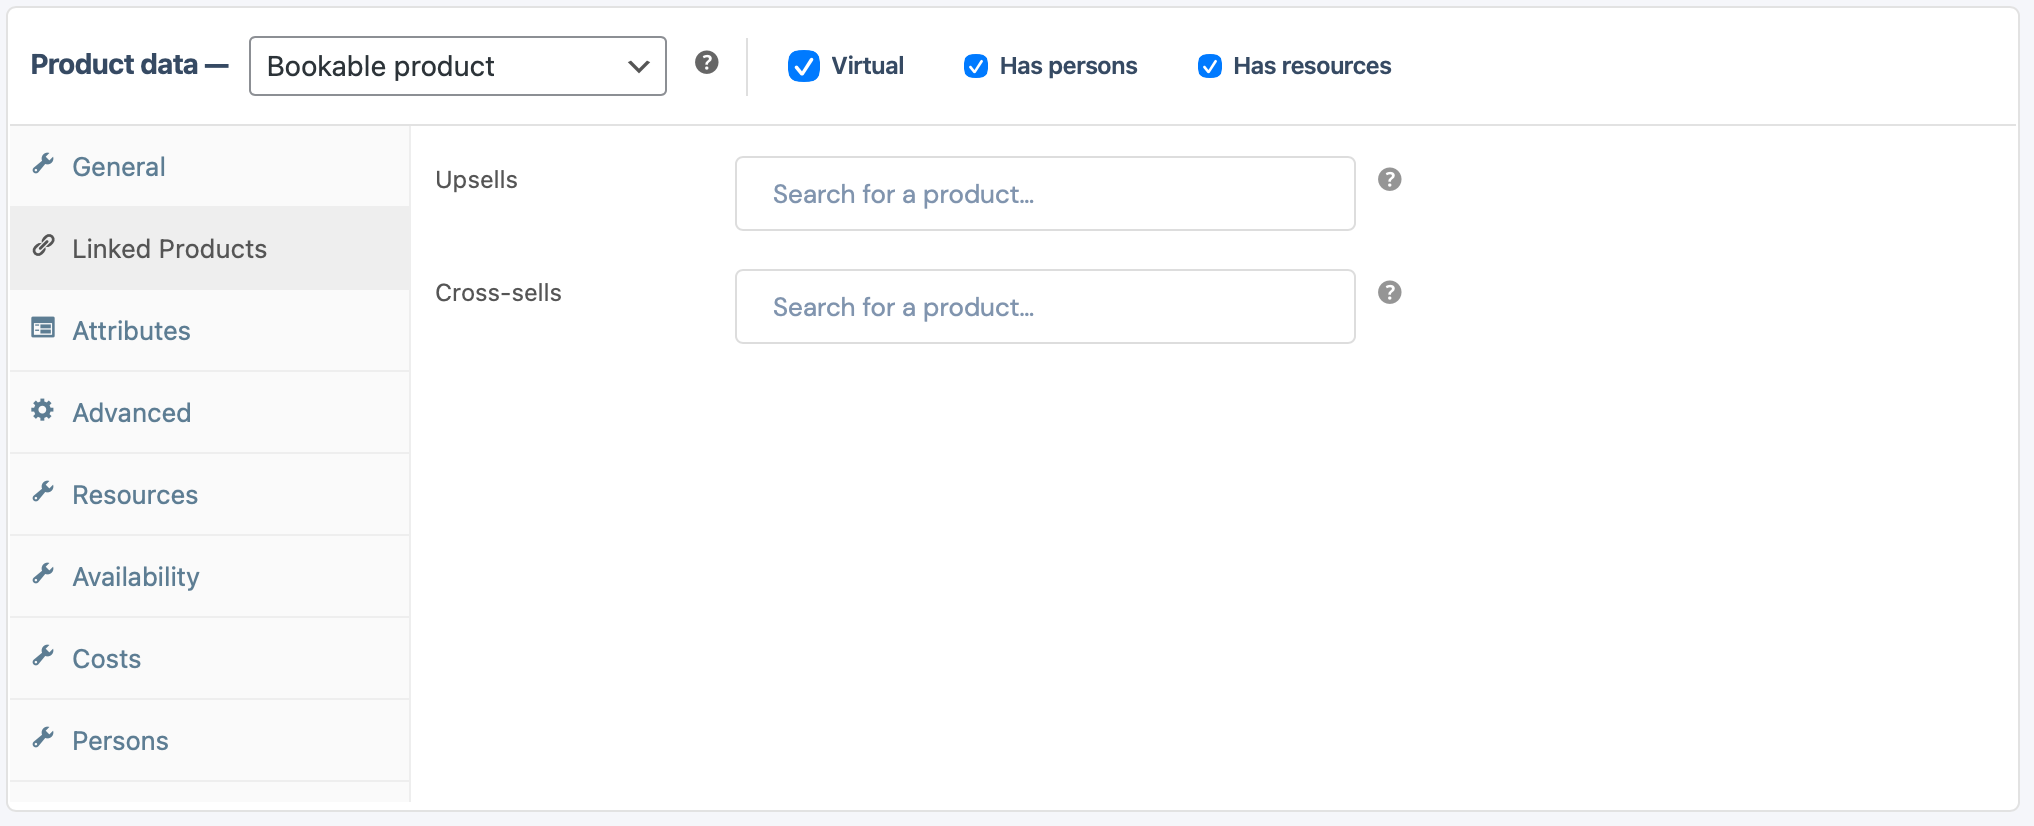
6.3. Linked Products:

  • Upsells and Cross-sells – If you have already added other products prior to adding this product, you can display these products to your clients during checkout. This could lead to more sales for your store/business. You can only add these products here if they have already been created. 

6.4 Attributes:

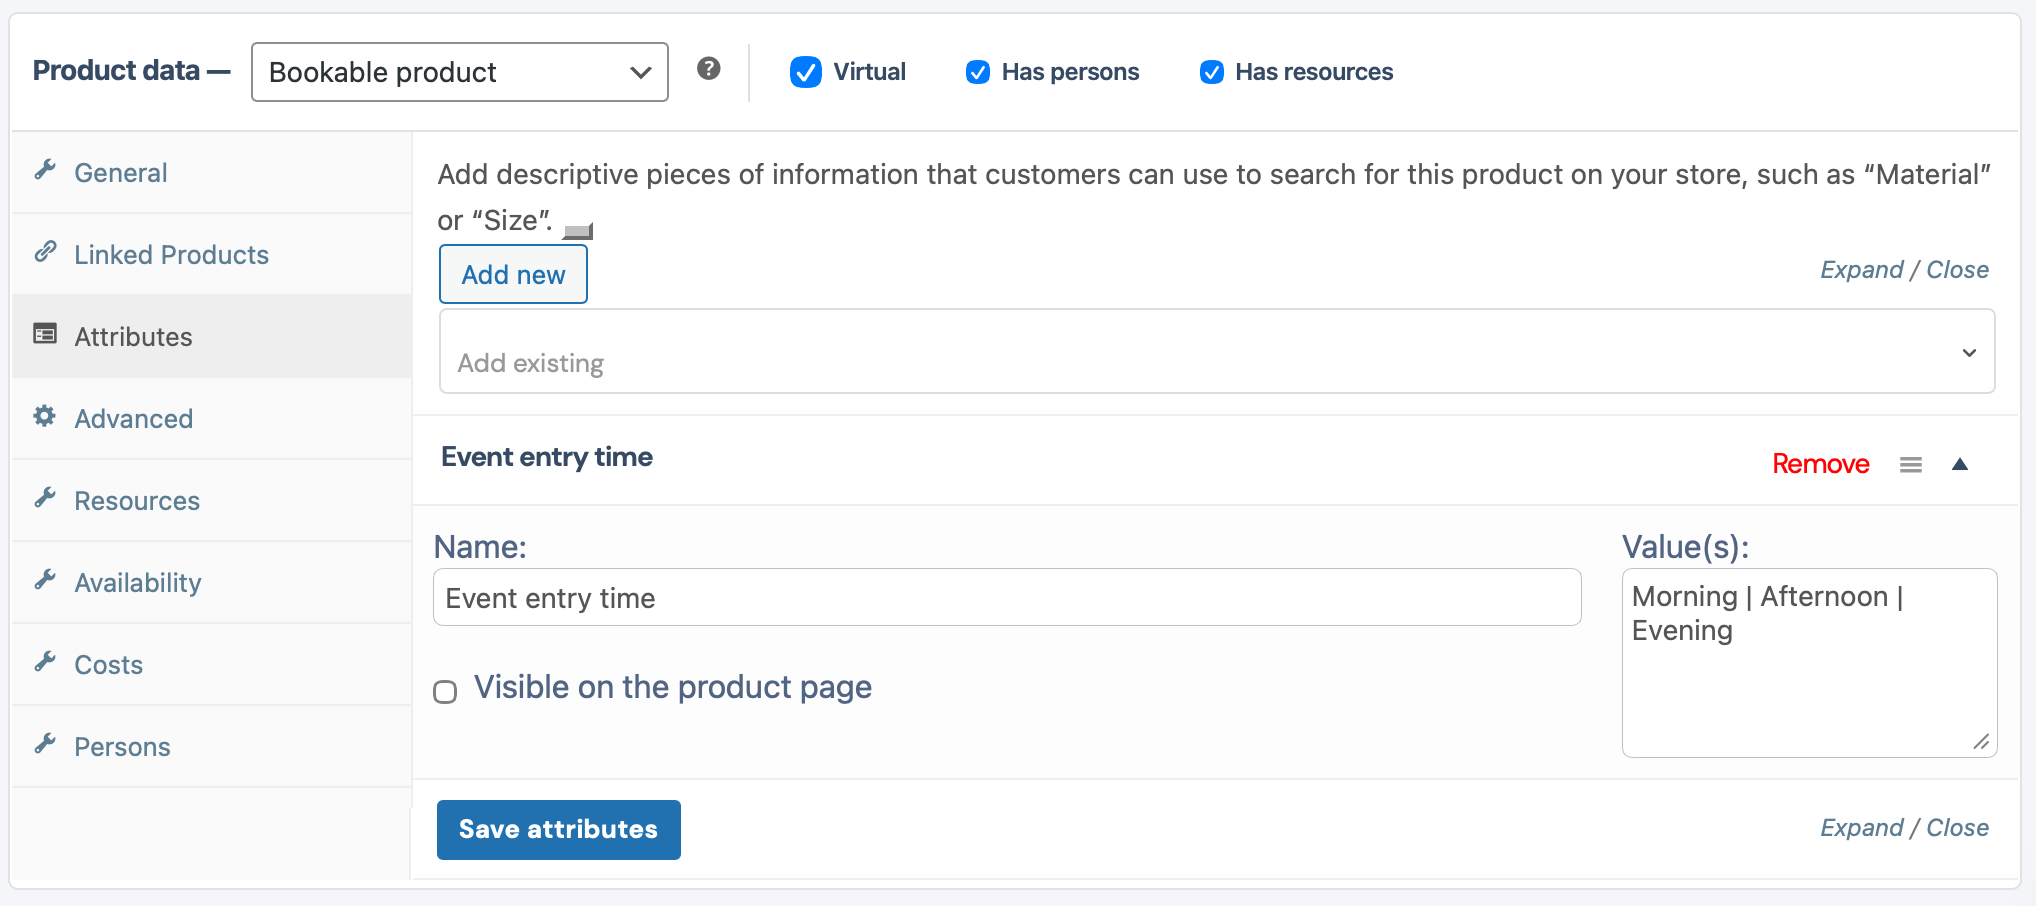
  • For Activities and Events, we won’t really use “Attributes,” but you can still add some if you prefer. Use Attributes to create products with different options (like, for example, an event with different dates). Attributes provide a way to list product characteristics that help customers narrow down their choices and purchase the option that they’re looking for. If your product doesn’t have different attributes, you may leave this tab blank.
  • Add new – Attributes on a “Booking Product” will not alter the pricing of each option, but will highlight if the product has a few different options to choose from.
  • Name – Name your Attribute. For example: Event entry time. This will only be visible if you clicked on Add new. Leave blank if not needed.
  • Value(s) – Here you will add all the different options/attributes of your product. For example: Morning | Afternoon | Evening. Remember to separate each option with ” | “
  • Save attributes – If you have added attributes, remember to save them by clicking on “Save attributes” prior to moving to a new tab.

6.5 Advanced:

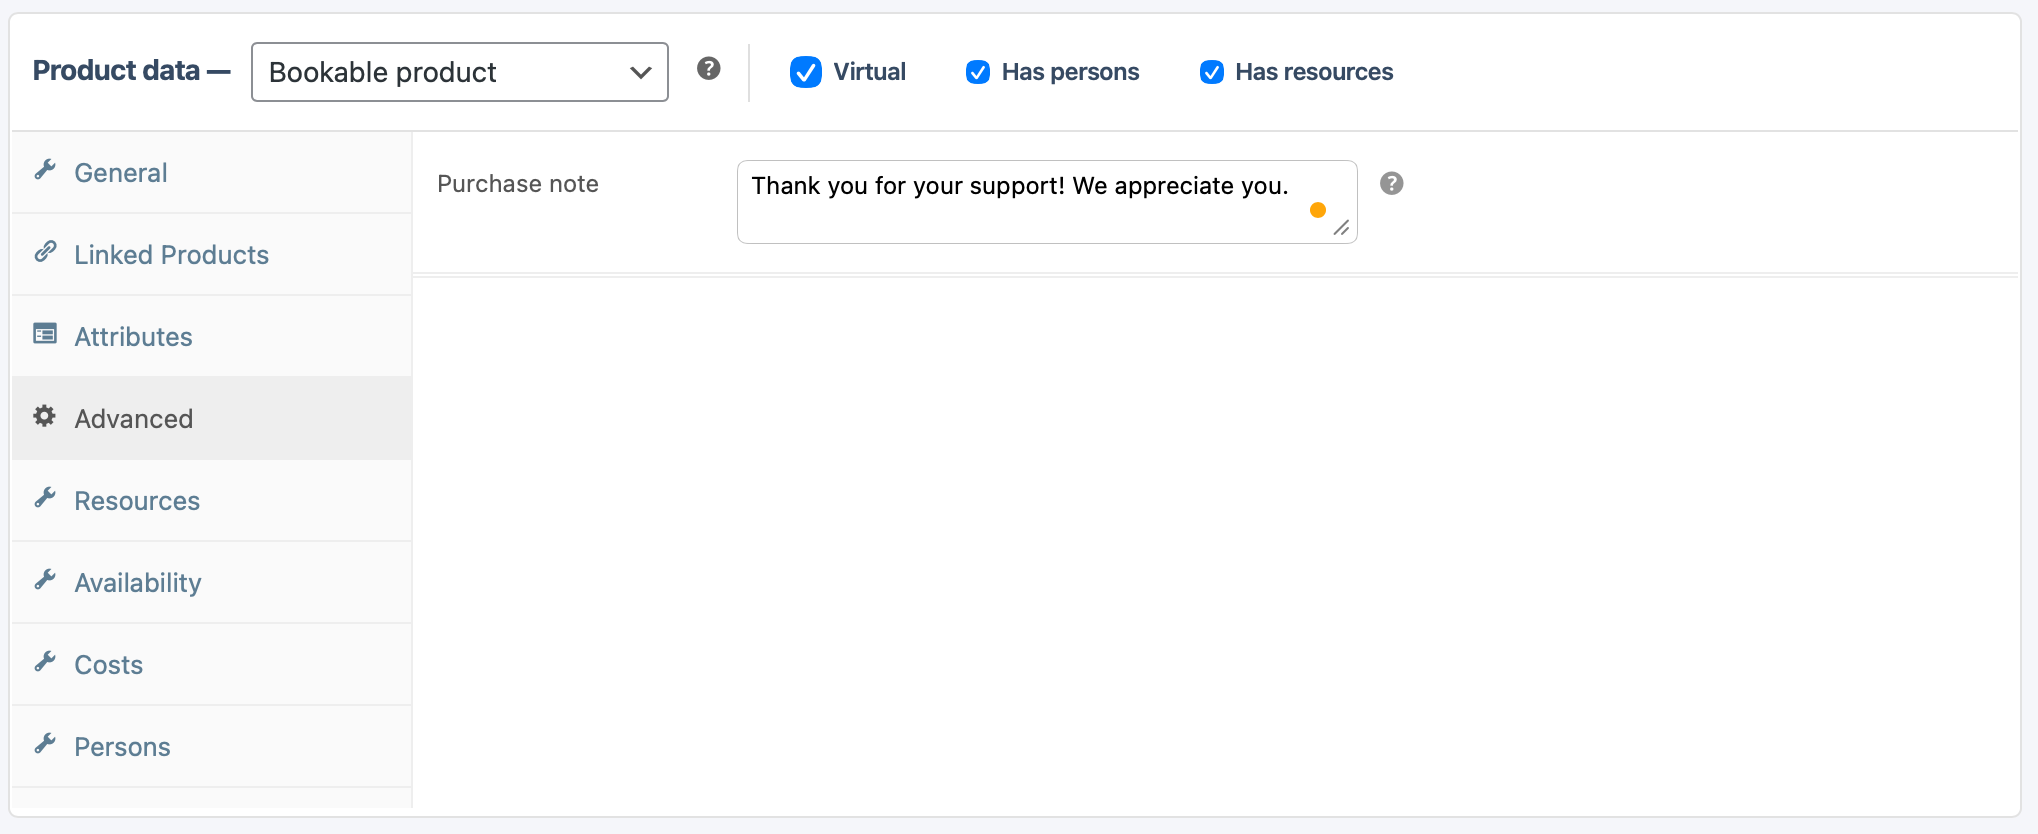
  • Purchase Note – If there is a special note you would like your customer to receive after they have purchased, you may enter this message here.

6.6 Resources:

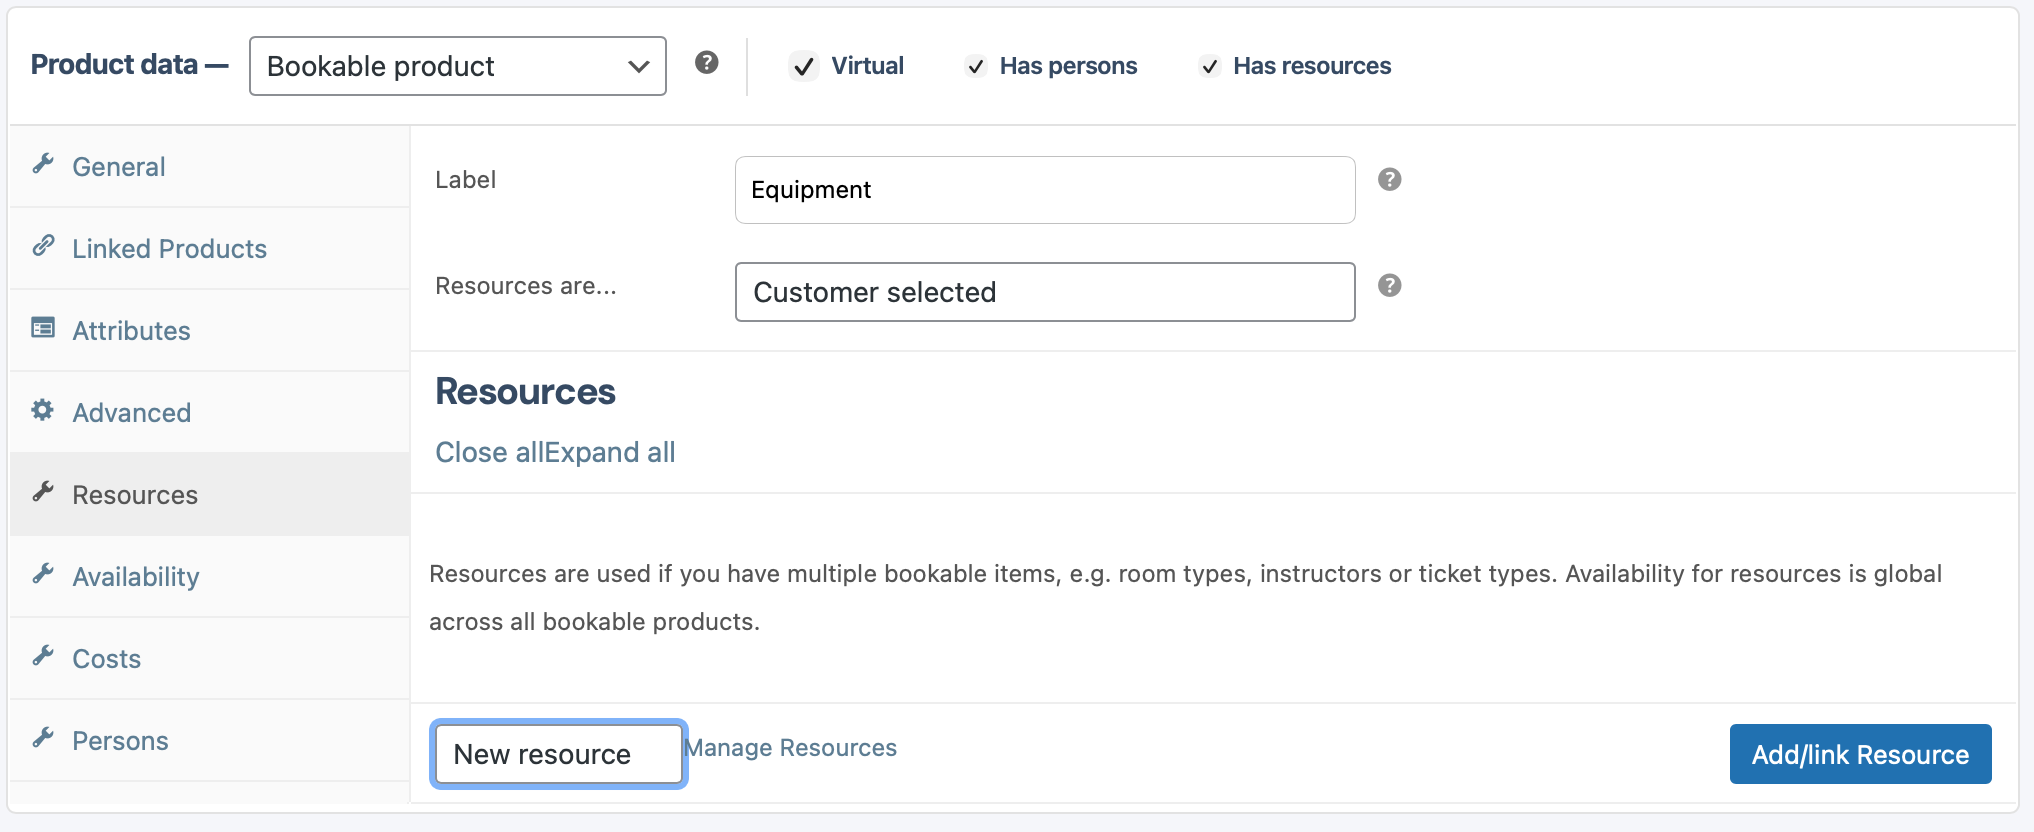
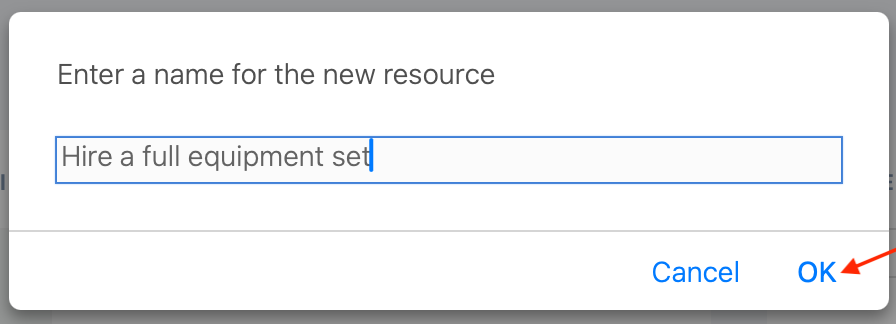
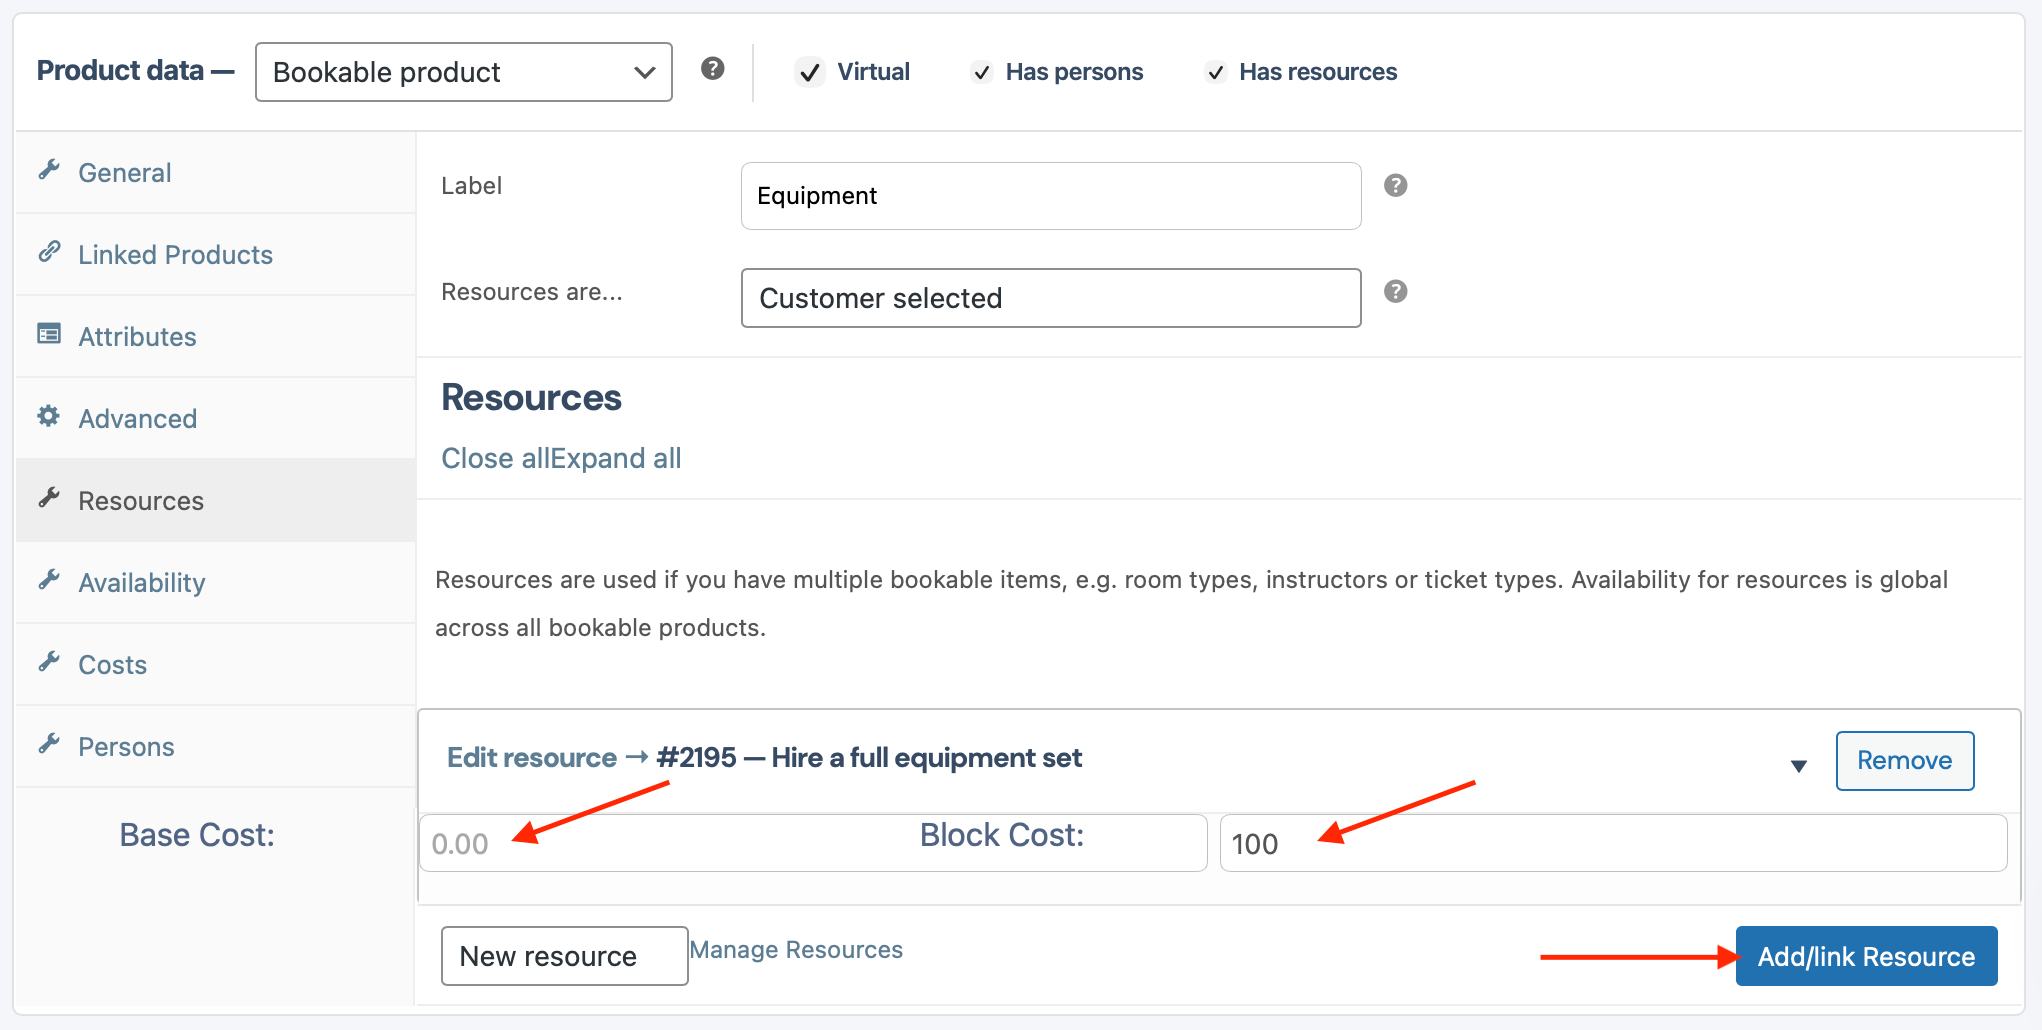
  • Resources are used to add different bookable items within your product that might or might not be priced differently. For example, if you have an activity where you have different equipment options: hire a full equipment set, hire a partial equipment set, or bring your own equipment. 
  • Label – Here you will name your resource selection (for example: Equipment).
  • Resources are – Select “Customer selected”.

  • Add/link Resource – A pop-up window will open where you will list your resource options one at a time. Click OK to save the resource once done.

  • Base Cost – If the fee is once-off regardless of the length of the booking selected (so, for example, your product booking spans the length of one full day, however, your customer books 3 days after each other, therefore the fee for the resource will only be charged once-off for the 3 days).
  • Block Cost – The fee is charged per booking block. (So, considering the example above, as your normal booking spans the length of 1 day, but your customer selected 3 days, they will be paying the R100 every day, so a total of R300 will be received for the 3-day booking).
  • Considering the Base Cost and Booking Cost, they can also be used together to add a once-off fee as well as a booking-block fee for every block of the booking.
  • You will repeat the process to add another Resource option, starting by clicking on “Add/link Resource”, until you have finished adding all the different options available.

6.7 Availability:

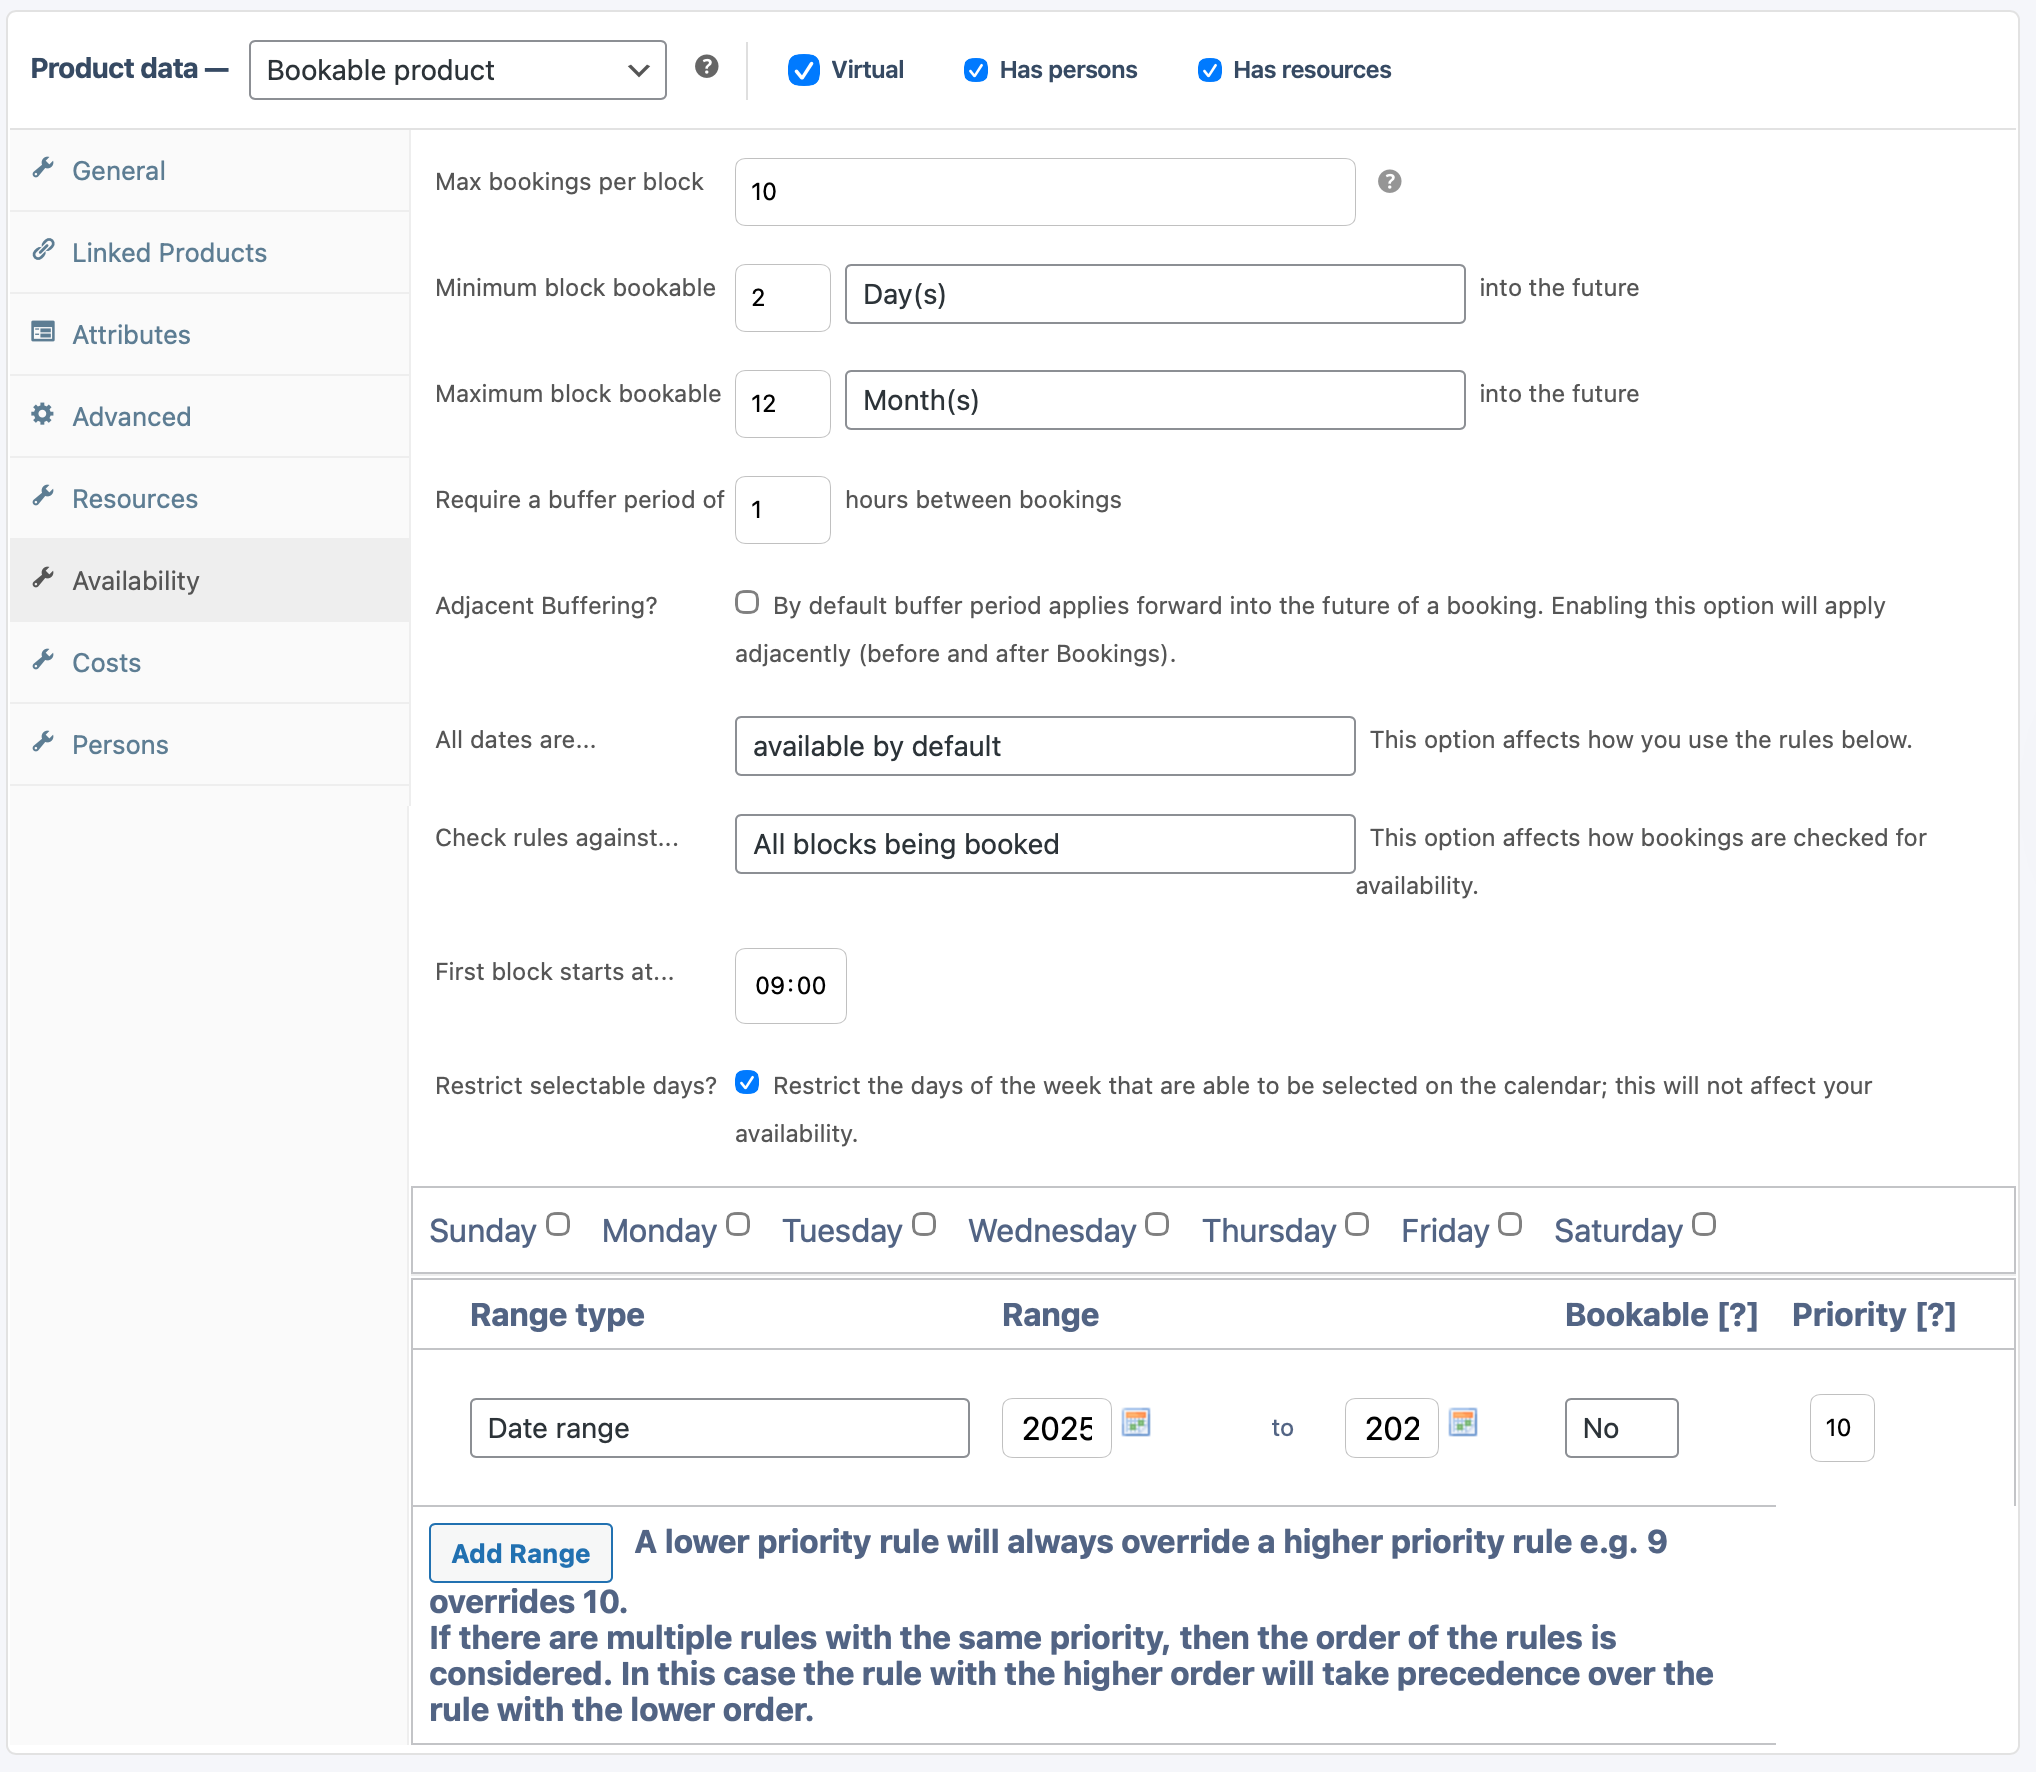
  • Max booking per block – Here, you will select how many bookings you can take simultaneously at the same time.
  • Minimum block bookable – How much notice do you require from the date of receiving the booking request, vs when the booking can be honored. (So, for example, if you require 2 days’ notice at least)
  • Maximum block bookable – How far into the future may customers book?
  • Require a buffer period – How much time do you require in-between bookings? (For example, if you have multiple bookable slots available during the day but prefer to have an hour in between bookings, you can set this up here).
  • Adjacent Buffering – This will add the buffering time you set above to add it both before and after a booking. You may leave this unticked if not required. 
  • All dates are – you can set this as “available by default”
  • Check rules against – you can set this as ” All blocks being booked” as you want all your settings you make to apply to booking requests.
  • First block starts at – Set the time for when you will start your first booking block that can be booked by customers.
  • Restrict selectable days – If you would like to make certain days of the week unbookable, you can tick this box and then select the days where no bookings can be made. This will ensure that these days are greyed out on your calendar when customers view available booking spots.
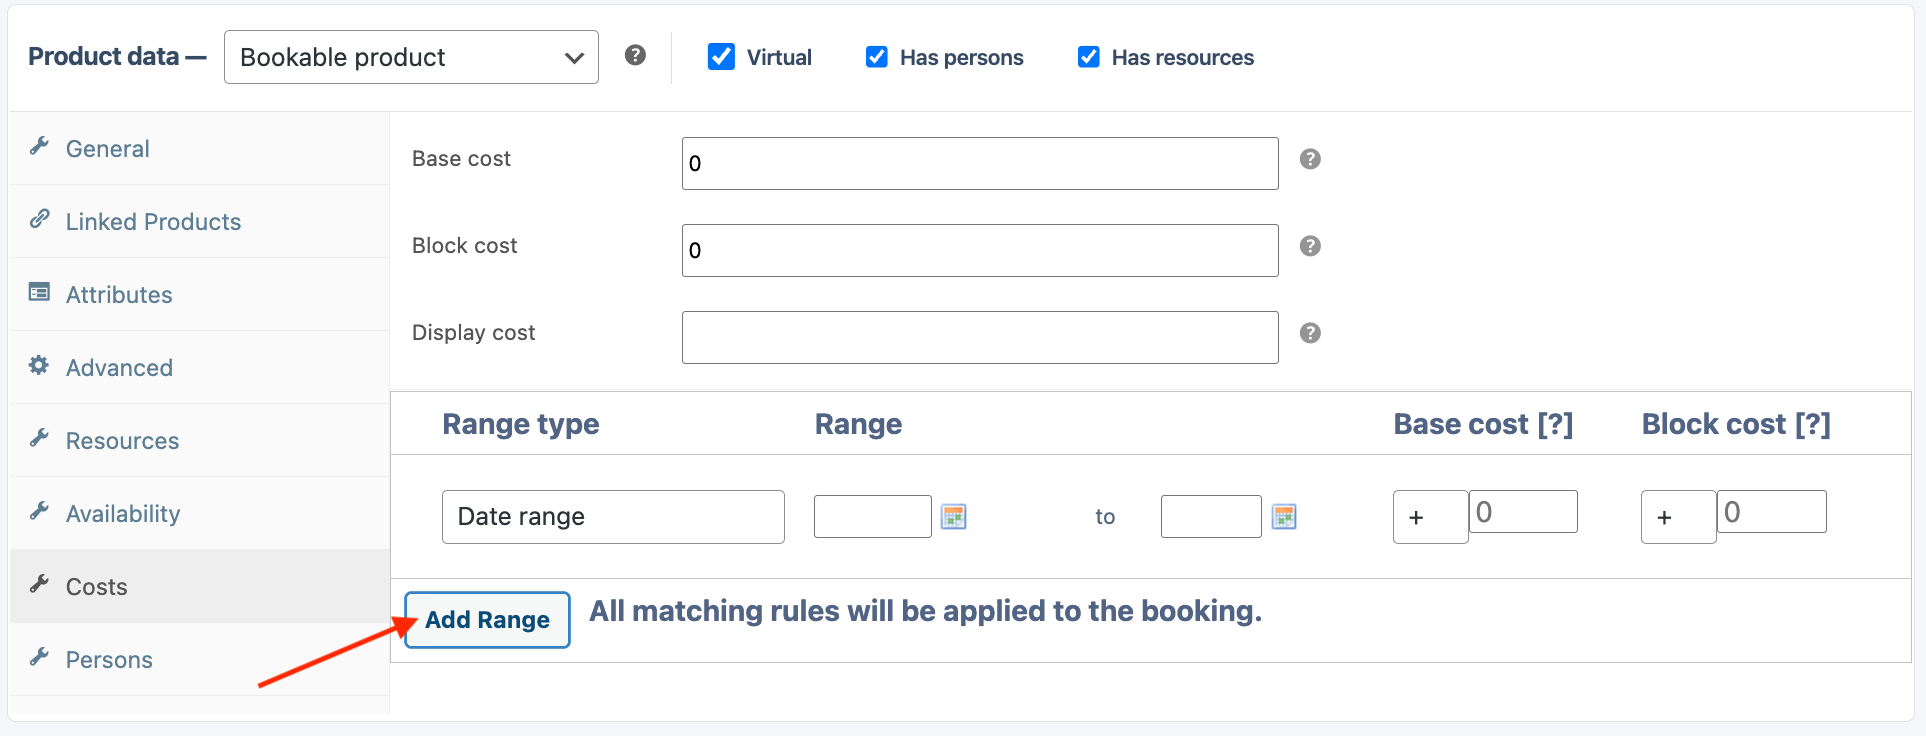
  • Add Range – When you add a range, you can select certain dates or times (or both) where bookings are enabled or disabled. To add a date range, click on “Add Range”. Then select the Range type, followed by the relevant specification of the range type. Select whether the Date Range is bookable or not. You may add multiple Date Ranges in the same way by just clicking again on “Add Range”.

6.8 Cost 

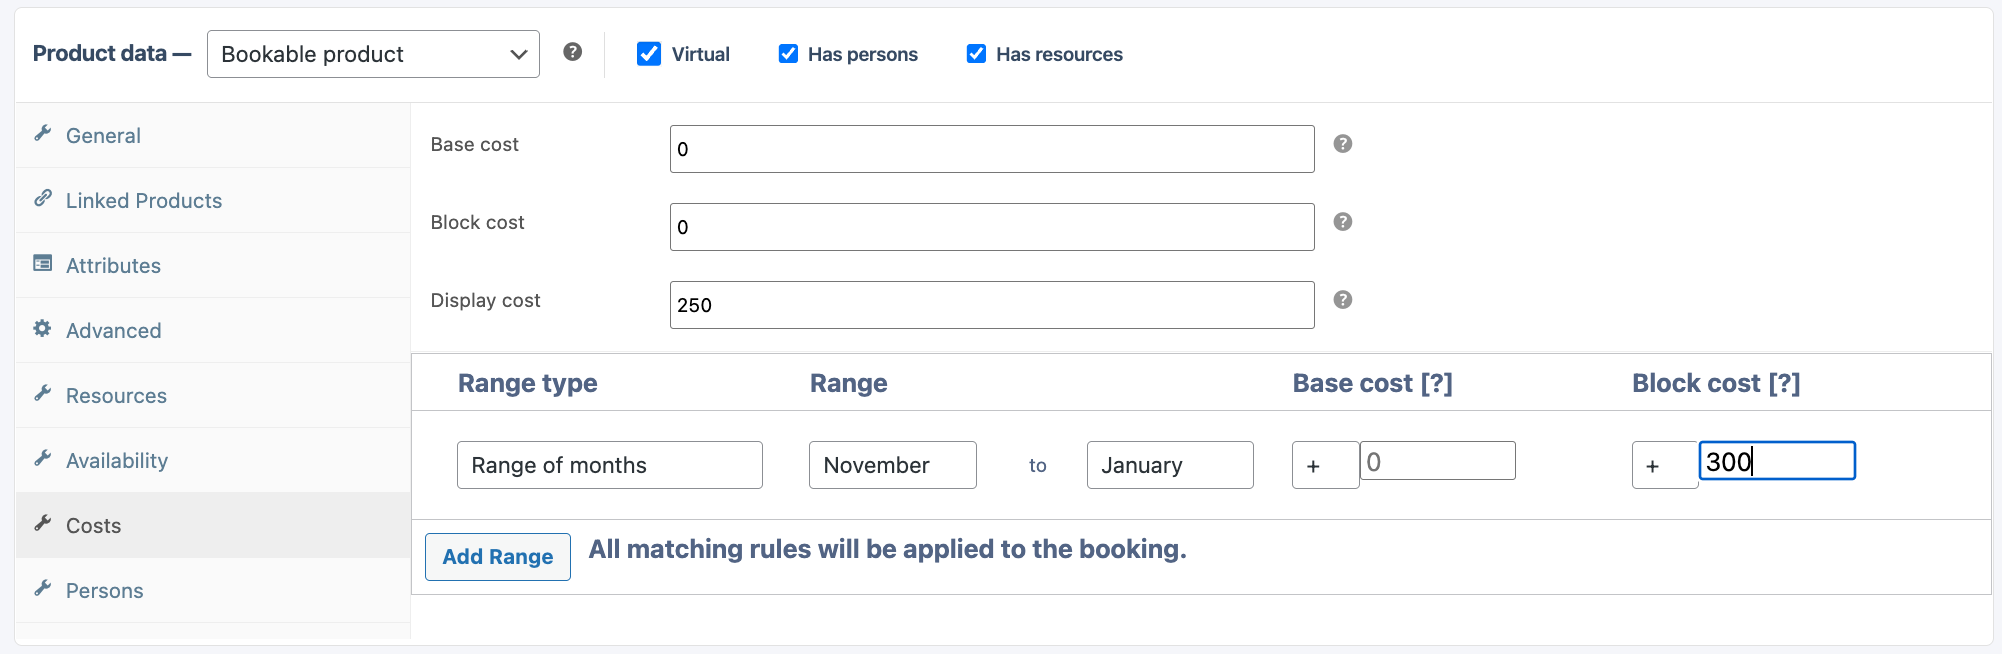
  • It is important to understand what a Booking Block is on the system before we jump into the price settings. A Booking block is the shortest period that would count as a successful booking from a customer. So, for example, your client may book 1 day minimum, or they may book for up to 7 days at a time. With this example, your booking block will be 1 day (24hours). OR your booking may, for example, be only 1 hour each, but you allow your customer to make multiple bookings one after the other. Here, your booking block is 1 hour each. To set your block duration, go to “General” and then “Booking duration”.
  • Base Cost – This will be a one-off fee for the entire booking, regardless of whether a single or multiple Booking Blocks are selected.
  • Block Cost – This is the cost per block of time that counts as a “Booking Block”. If your customer selects multiple booking blocks, they will pay the block cost for every block selected.
  • Display Cost – This will be the price displayed on the listings pages or map pages and normally reads “Price from: R…”.
  • Add Range – If you would like to set up different pricing for a selected date range, you may use this section to set it up. This will be useful if you have, for example, peak and off-peak season pricing. You may set as many price ranges as are required. 

6.9 Persons

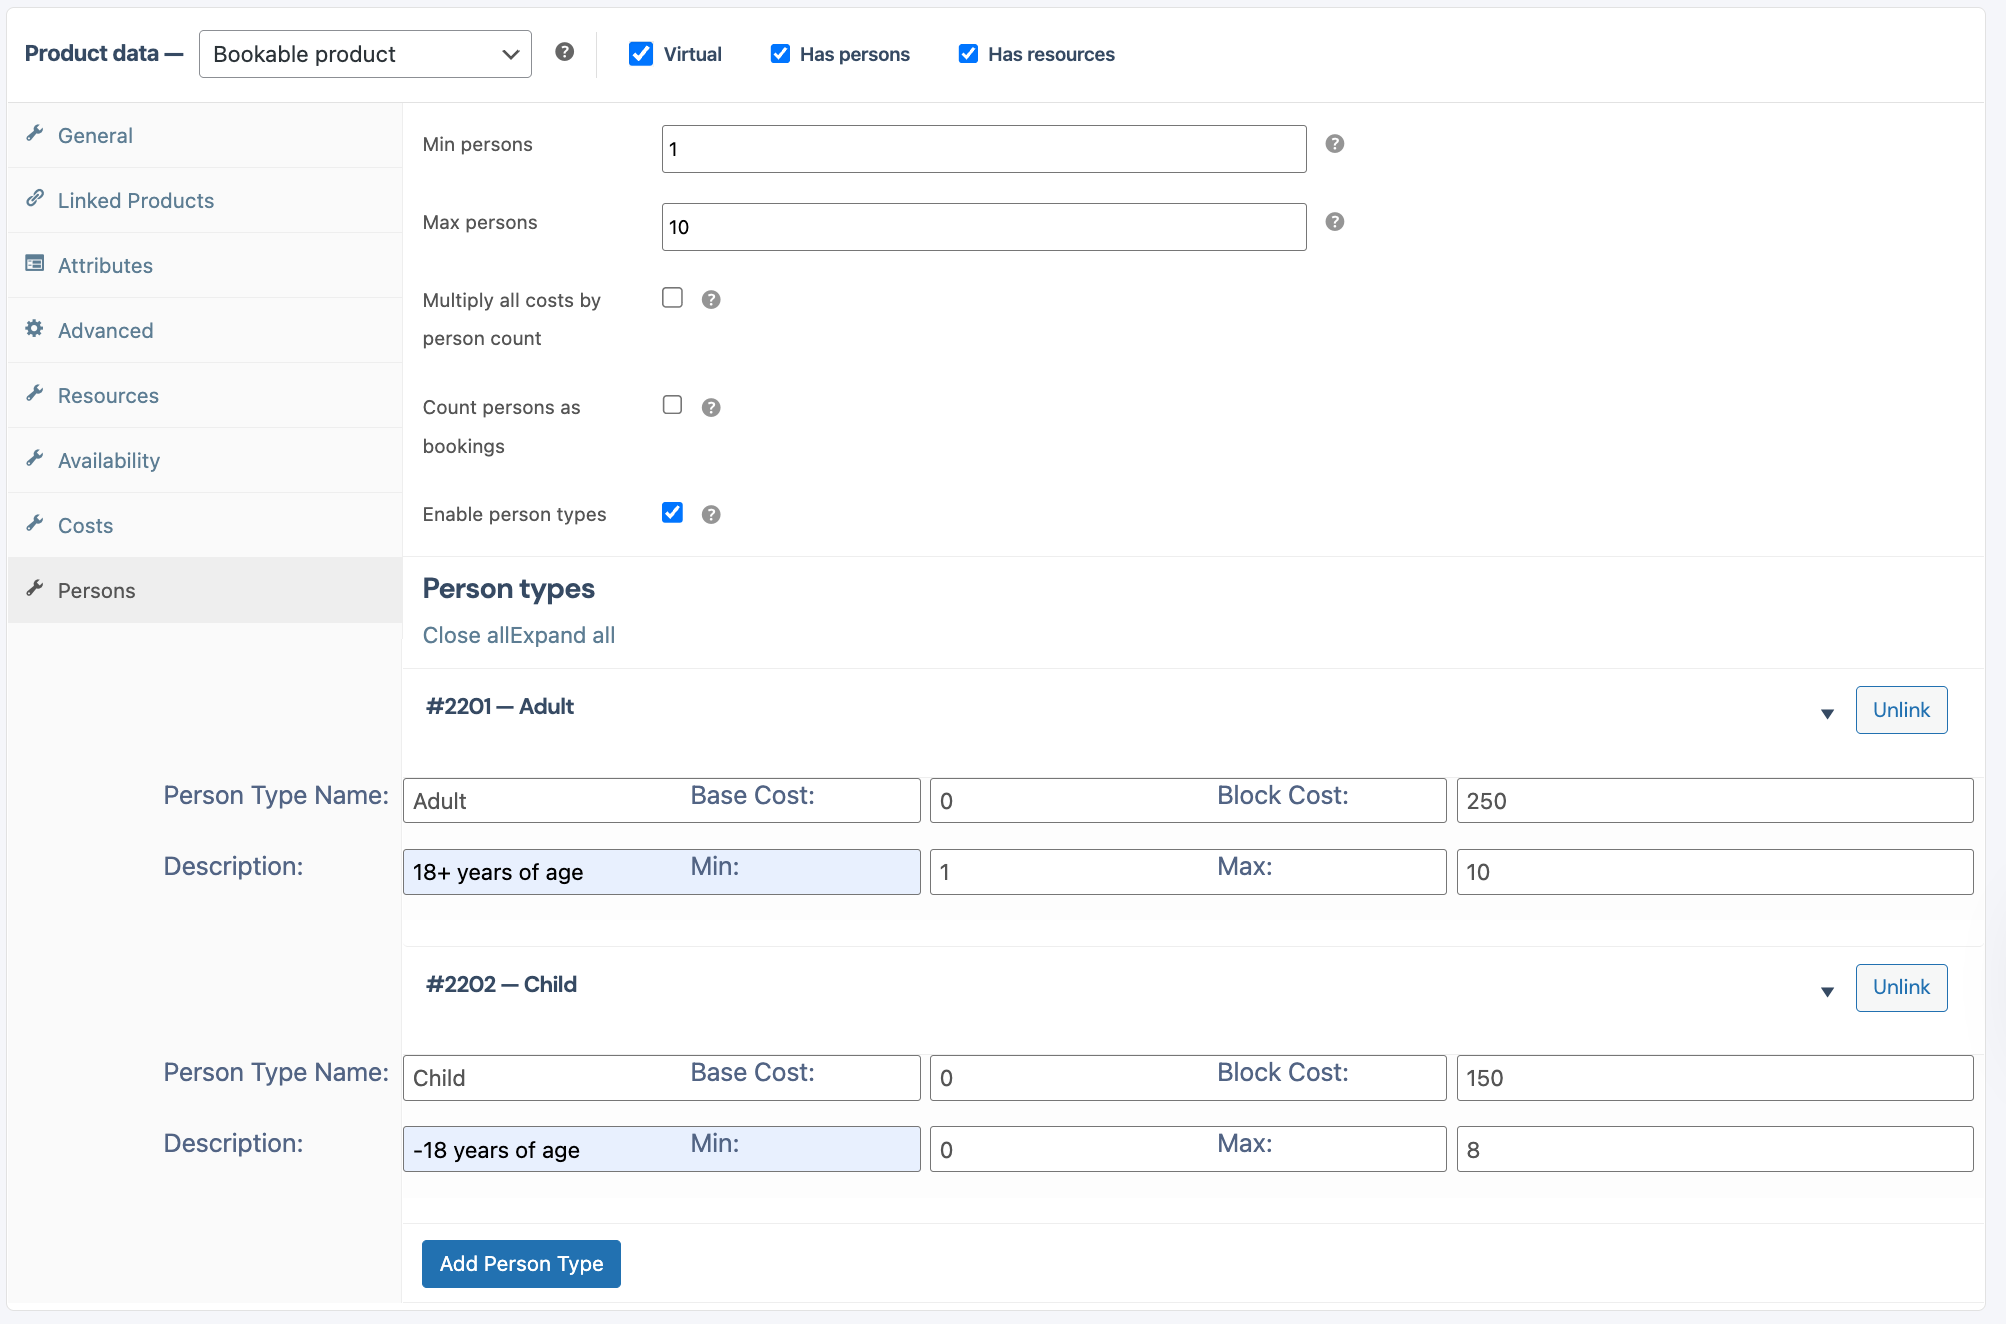
  • Min persons – Minimum number of persons required per booking
  • Max persons – Maximum number of people allowed per booking.
  • Multiply all costs by person count – If you will charge each person the base cost and block cost set up under “Costs”, then tick this box. If you will charge the base and block cost per booking regardless of the number of people attending, then leave this unticked. 
  • Count persons as bookings – If each person in a single booking will count towards the allowed bookings per block, then tick this block. You can set your bookings allowed per block at “Availability” and then “Max bookings per block”.
  • Enable person types – If you have different charges for selected person types (adult, child, infant, student, retiree, etc.), you can tick this box to set it up. It is also helpful when you would like to specify how many of each person type is allowed.
  • Add person types (will only display when “Enable person types” is ticked) – Person type name: Adult/Child/Infant. Base Cost is the Fee for the entire booking for that person type. Block Cost is the fee per block booked for that person type. Description of your person type. Min of the person type needed per booking. Max number of person types allowed per booking. You may add as many different person types as your listing requires. 

8. Remember to click on “Send Product for Review” or to “Save as Draft” at the top of the form before leaving the page. If you do not save the form, the data you just entered will be lost. 

1. Go to your Listing Dashboard. Select the Products tab on the left menu.

2. If you would like to edit an existing Product, you can search for the Product Name or find it in the list shown. To edit the Product, click on the 3 dots (…) on the right-hand side of the Product in question. From the Menu that opens, select “Edit Product”.

3. If you are adding a new Product, you will see a button in the top right corner, “Add Product”. Click this button

4. On the Product page, we will be working on the “Product Data”. This is where we set the Pricing for the Product/Listing.

5. The first thing we will need to consider is what type of Product we are adding. There are a few options to consider:

  • Simple Product (Local Products, Second Hand Products, and Events with no ticket availability confirmation required)
  • Variable Product (Local Products, Second Hand Products, and Events with no ticket availability confirmation required, all with more than 1 option available per product)
  • Grouped Product (multiple Products grouped together and sold as a bundle)
  • Bookable Product (Activities and Events where the ticket availability needs to be confirmed before the customer pays for the tickets)
  • Auction Product (Auction Products)
  • Accommodation Product ( Accommodation Products)


6. Auction
 – This selection is only suitable for Auction listings.

6.1 Initial settings:

  • Product Data – Select Auction.
  • Virtual – If your product is only available online and is not a physical product, tick this box. This will remove the “Shipping” section of the Pricing Form. If your product is a physical product, leave this box unticked.
  • Downloadable – If your product is only available online and needs to be downloaded after it has been purchased, tick this box. This will add an additional field on the form where you can upload your file. If your product is a physical product, leave this box unticked.

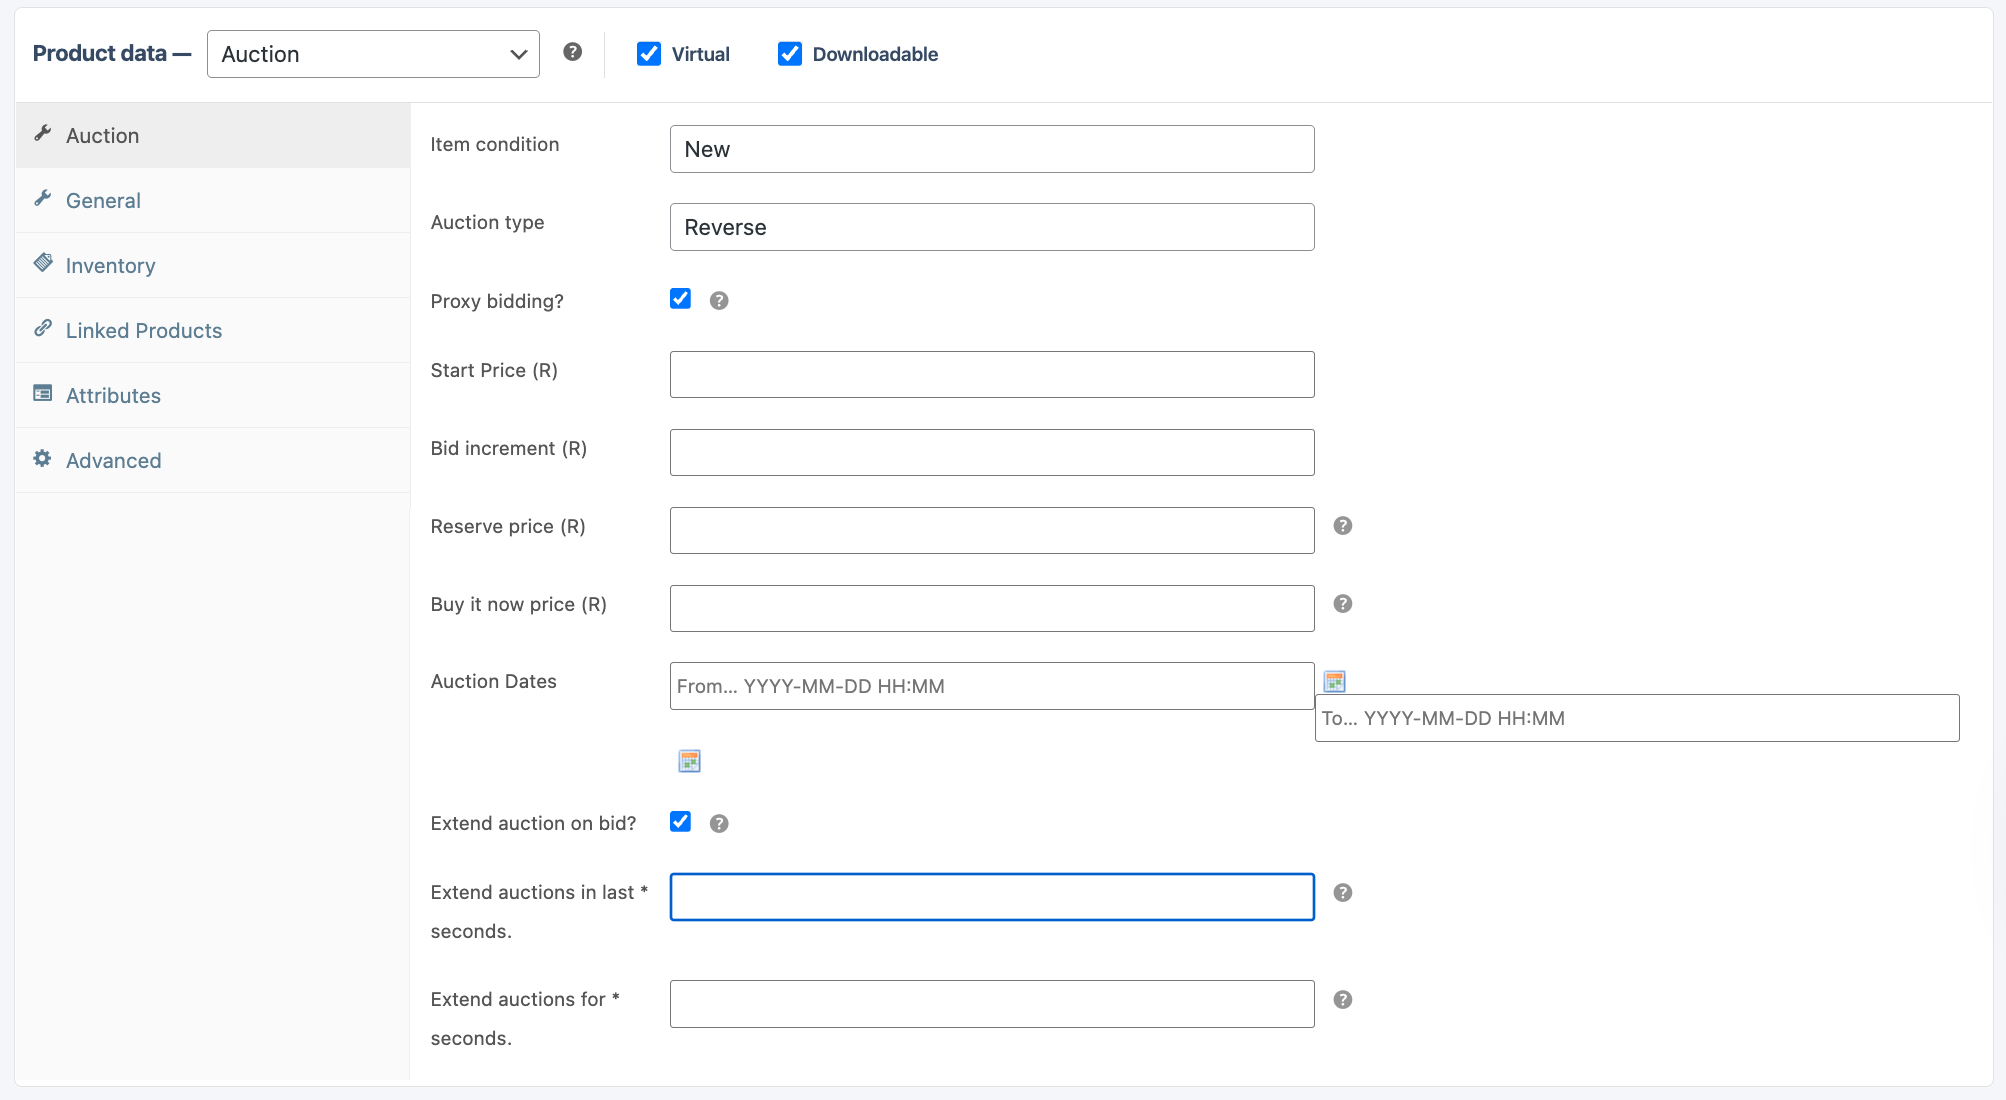
6.2 Auction:

  • Item Condition – Select New or Used
  • Auction type – Normal is where bidders offer a higher price than the last bid until the highest bidder wins. A reverse auction is where sellers compete by bidding prices down, with the lowest bidder winning the sale. Reverse auctions are a way for a buyer to find the lowest price for a specific product or service.
  • Proxy bidding – Proxy bidding allows users/customers to set a maximum bid amount, and the system automatically increases their bid by the minimum increment as others bid, up to that maximum. amount set. To enable this kind of bidding, simply tick the box to turn it on.  
  • Start Price – The starting price for bidding on your item.
  • Bid increment – With what minimum amount should a new bid be increased.
  • Reverse price – The lowest price you are willing to sell a time if you are doing a reverse bid. 
  • Buy it now price – If you would like to set a price where no auction is required for a bidder/customer who is willing to pay the specified price. Leave blank if you would not like to add this option. 
  • Auction Dates – Set the dates that you would like the auction to run for. 
  • Extend auction on bid – Should a last-minute bid be placed, you could extend the auction by an added amount of time to give competing bidders a chance to add a final bid. To activate this, simply tick the box.
  • Extend auction in the last seconds – It is advised to add “O” if you decide to extend the auction on a last-minute bid. 
  • Extend auctions for * seconds – Enter for how many seconds you would like to extend your auction should a last-minute bid be entered in an auction close. 

6.3 General:

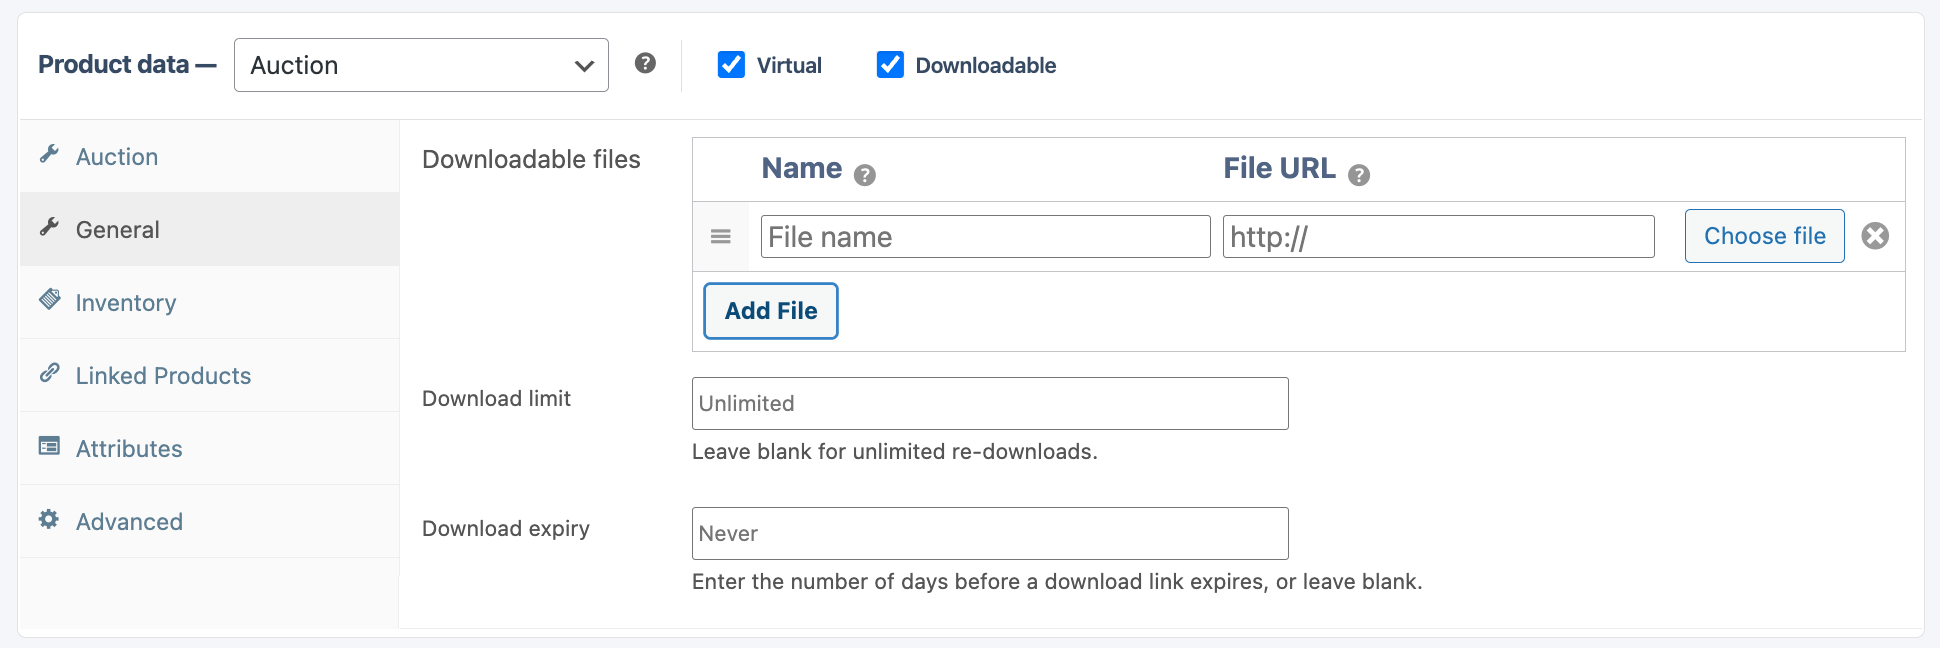
  • This tab will only appear if Downloadable was ticked on initial settings.
  • Downloadable files (only if Downloadable was selected) – Here, you will add your file that the customer will be purchasing. Only after the sale is complete will the customer have access to the file. Simply click on “Add File” and create a File Name. Choose the file or add a File URL if the file is available somewhere else on the internet for download. Click Add File again if you need to load more than one file.
  • Download limit (only if Downloadable was selected) – You can add the number of times a customer is allowed to download the product after it has been purchased.
  • Download expiry (only if Downloadable was selected) – You can enter the number of days that the customer will have access to the file to download it.

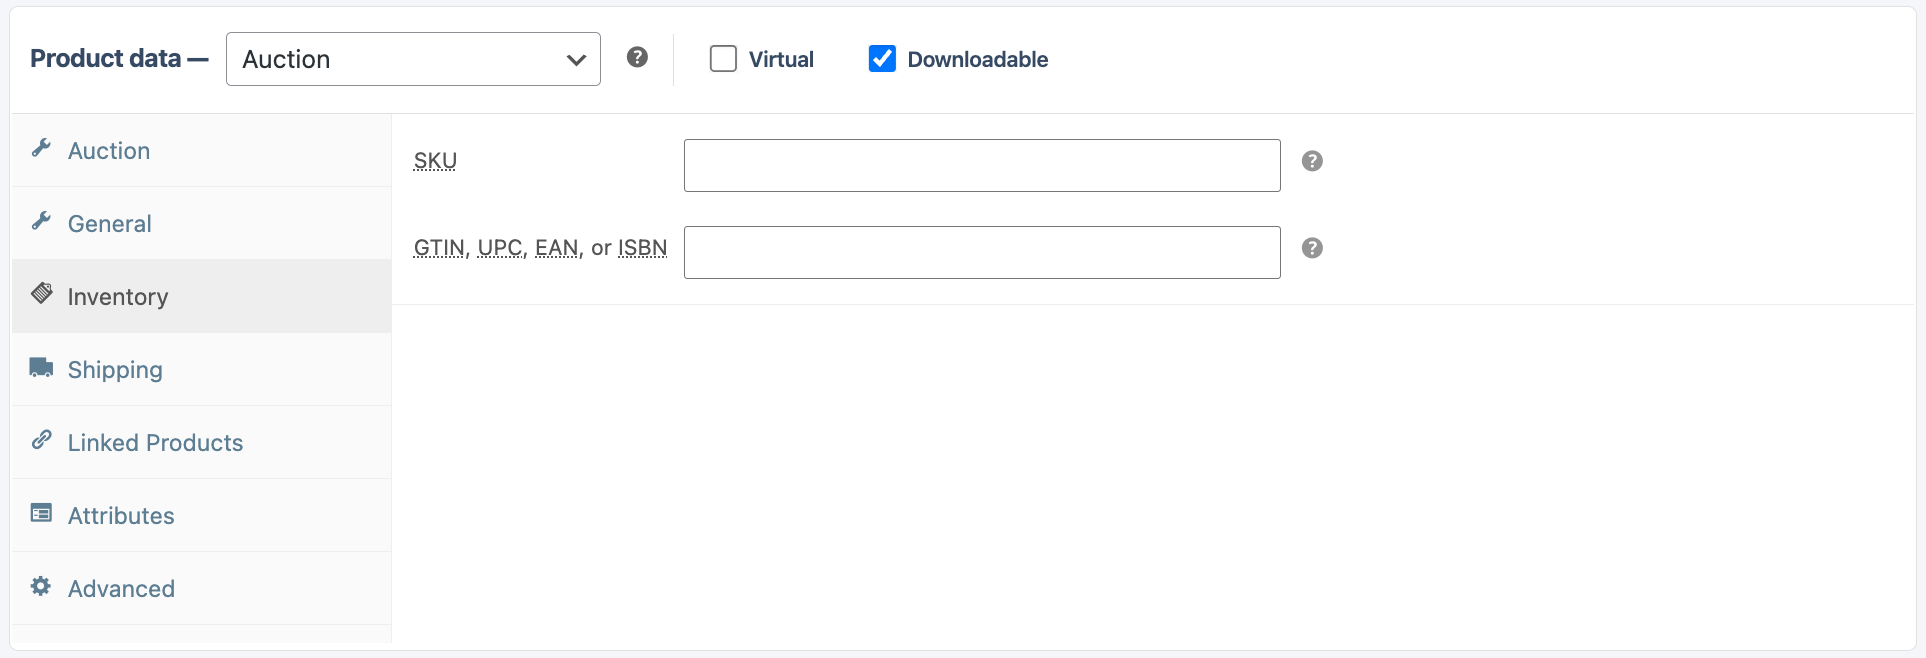
6.4 Inventory:

  • SKU – Personal Code or name of a product so that you can keep track of stock. You may leave this blank if preferred.
  • GTIN, UPC, EAN or ISBAN – Other identifiers for your products. You may leave this blank if desired.

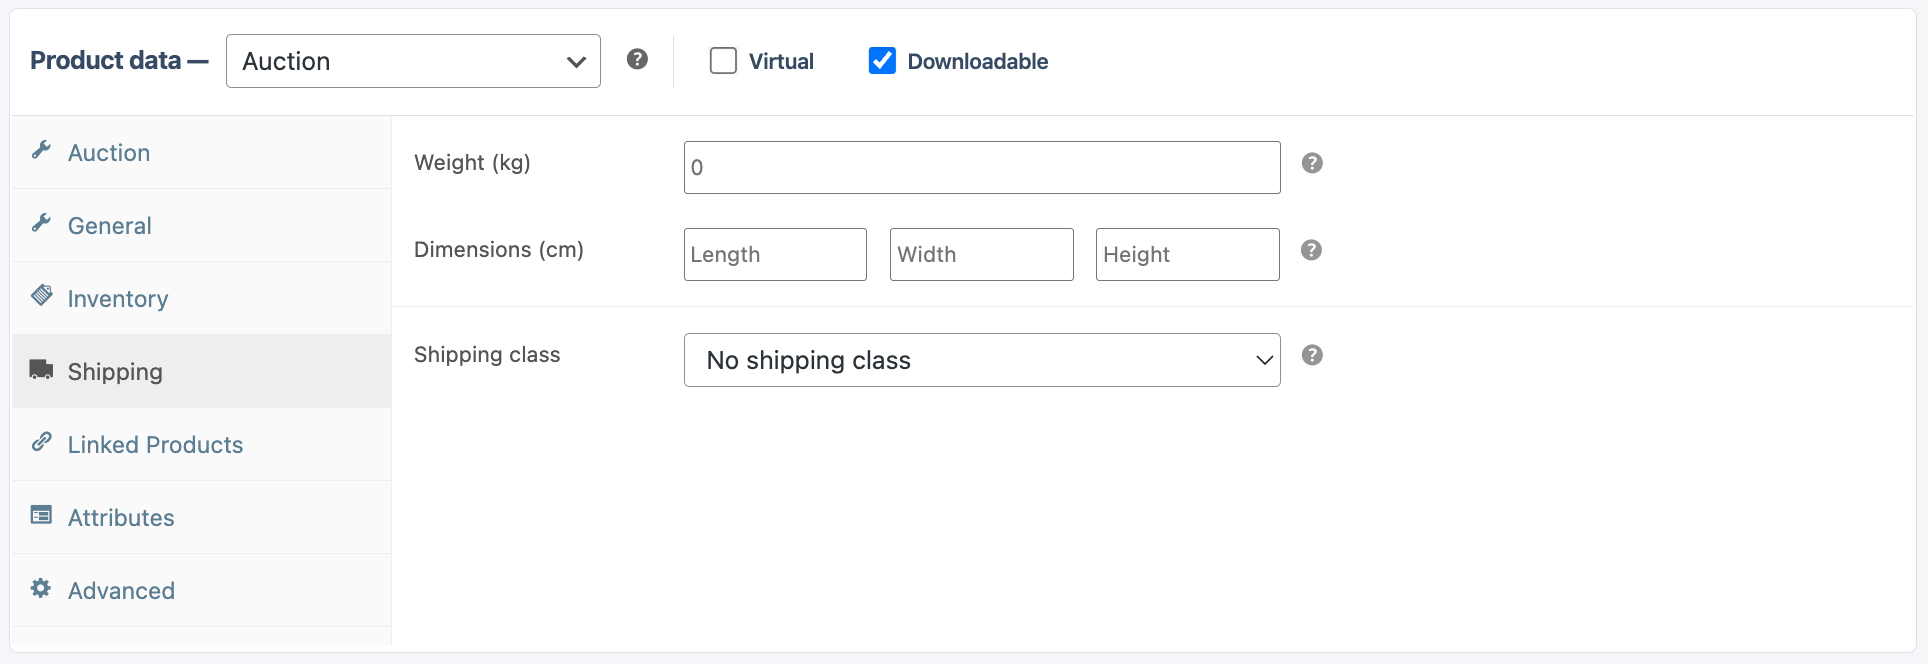
6.5 Shipping:

  • Weight – Enter the weight of your product. Remember to include the shipping packaging (box, wrapping, etc.) if applicable.
  • Dimensions – Enter the shipping dimensions. This means it will include the packaging that will make it shipping-ready.
  • Shipping class – Select the shipping class relevant to this product. You can set up your store’s shipping classes/options by following the instructions at “How to set up my store shipping options” in the FAQ topic under Vedors above.

6.6 Linked Products:

  • Upsells and Cross-sells – If you have already added other products prior to adding this product, you can display these products to your clients during checkout. This could lead to more sales for your store/business. You can only add these products here if they have already been created. 

6.7 Attributes:

  • Add new – Use Attributes to create variable products with different options (like, for example, a T-Shirt with different sizes of colours). Attributes provide a way to list product characteristics that help customers narrow down their choices and purchase the option that they’re looking for. If your product doesn’t have different attributes, you may leave this tab blank. Attributes on a “Simple Product” will not alter the pricing of each option, so a Red shirt will cost the same as a Yellow shirt, or a Small shirt will cost the same as a Medium shirt.
  • Name – Name your Attribute. For example: Colour. This will only be visible if you clicked on Add new. Leave blank if not needed.
  • Value(s) – Here you will add all the different options/attributes of your product. For example: Red | Blue | Yellow | Green. Remember to separate each option with ” | “
  • Save attributes – If you have added attributes, remember to save them by clicking on “Save attributes” prior to moving to a new tab.

6.8 Advanced:

  • Purchase Note – If there is a special note you would like your customer to receive after they have successfully won an auction and paid for it, you may enter this message here.

7. Remember to click on “Send Product for Review” or to “Save as Draft” at the top of the form before leaving the page. If you do not save the form, the data you just entered will be lost. 

1. Go to your Listing Dashboard. Select the Products tab on the left menu.

2. If you would like to edit an existing Product, you can search for the Product Name or find it in the list shown. To edit the Product, click on the 3 dots (…) on the right-hand side of the Product in question. From the Menu that opens, select “Edit Product”.

3. If you are adding a new Product, you will see a button in the top right corner, “Add Product”. Click this button

4. On the Product page, we will be working on the “Product Data”. This is where we set the Pricing for the Product/Listing.

5. The first thing we will need to consider is what type of Product we are adding. There are a few options to consider:

  • Simple Product (Local Products, Second Hand Products, and Events with no ticket availability confirmation required)
  • Variable Product (Local Products, Second Hand Products, and Events with no ticket availability confirmation required, all with more than 1 option available per product)
  • Grouped Product (multiple Products grouped together and sold as a bundle)
  • Bookable Product (Activities and Events where the ticket availability needs to be confirmed before the customer pays for the tickets)
  • Auction Product (Auction Products)
  • Accommodation Product ( Accommodation Products)


6. Accommodation product
 – This selection is only suitable for Accommodation listings.

6.1 Initial settings:

  • Product Data – Select Accommodation product
  • Virtual – Tick this box
  • Has persons – If your accommodation is charged by person, tick this box.
  • Has resources – If your accommodation requires that your client choose an option that will affect the pricing of the booking, like for example, a room type, tick this box.

6.2 General:

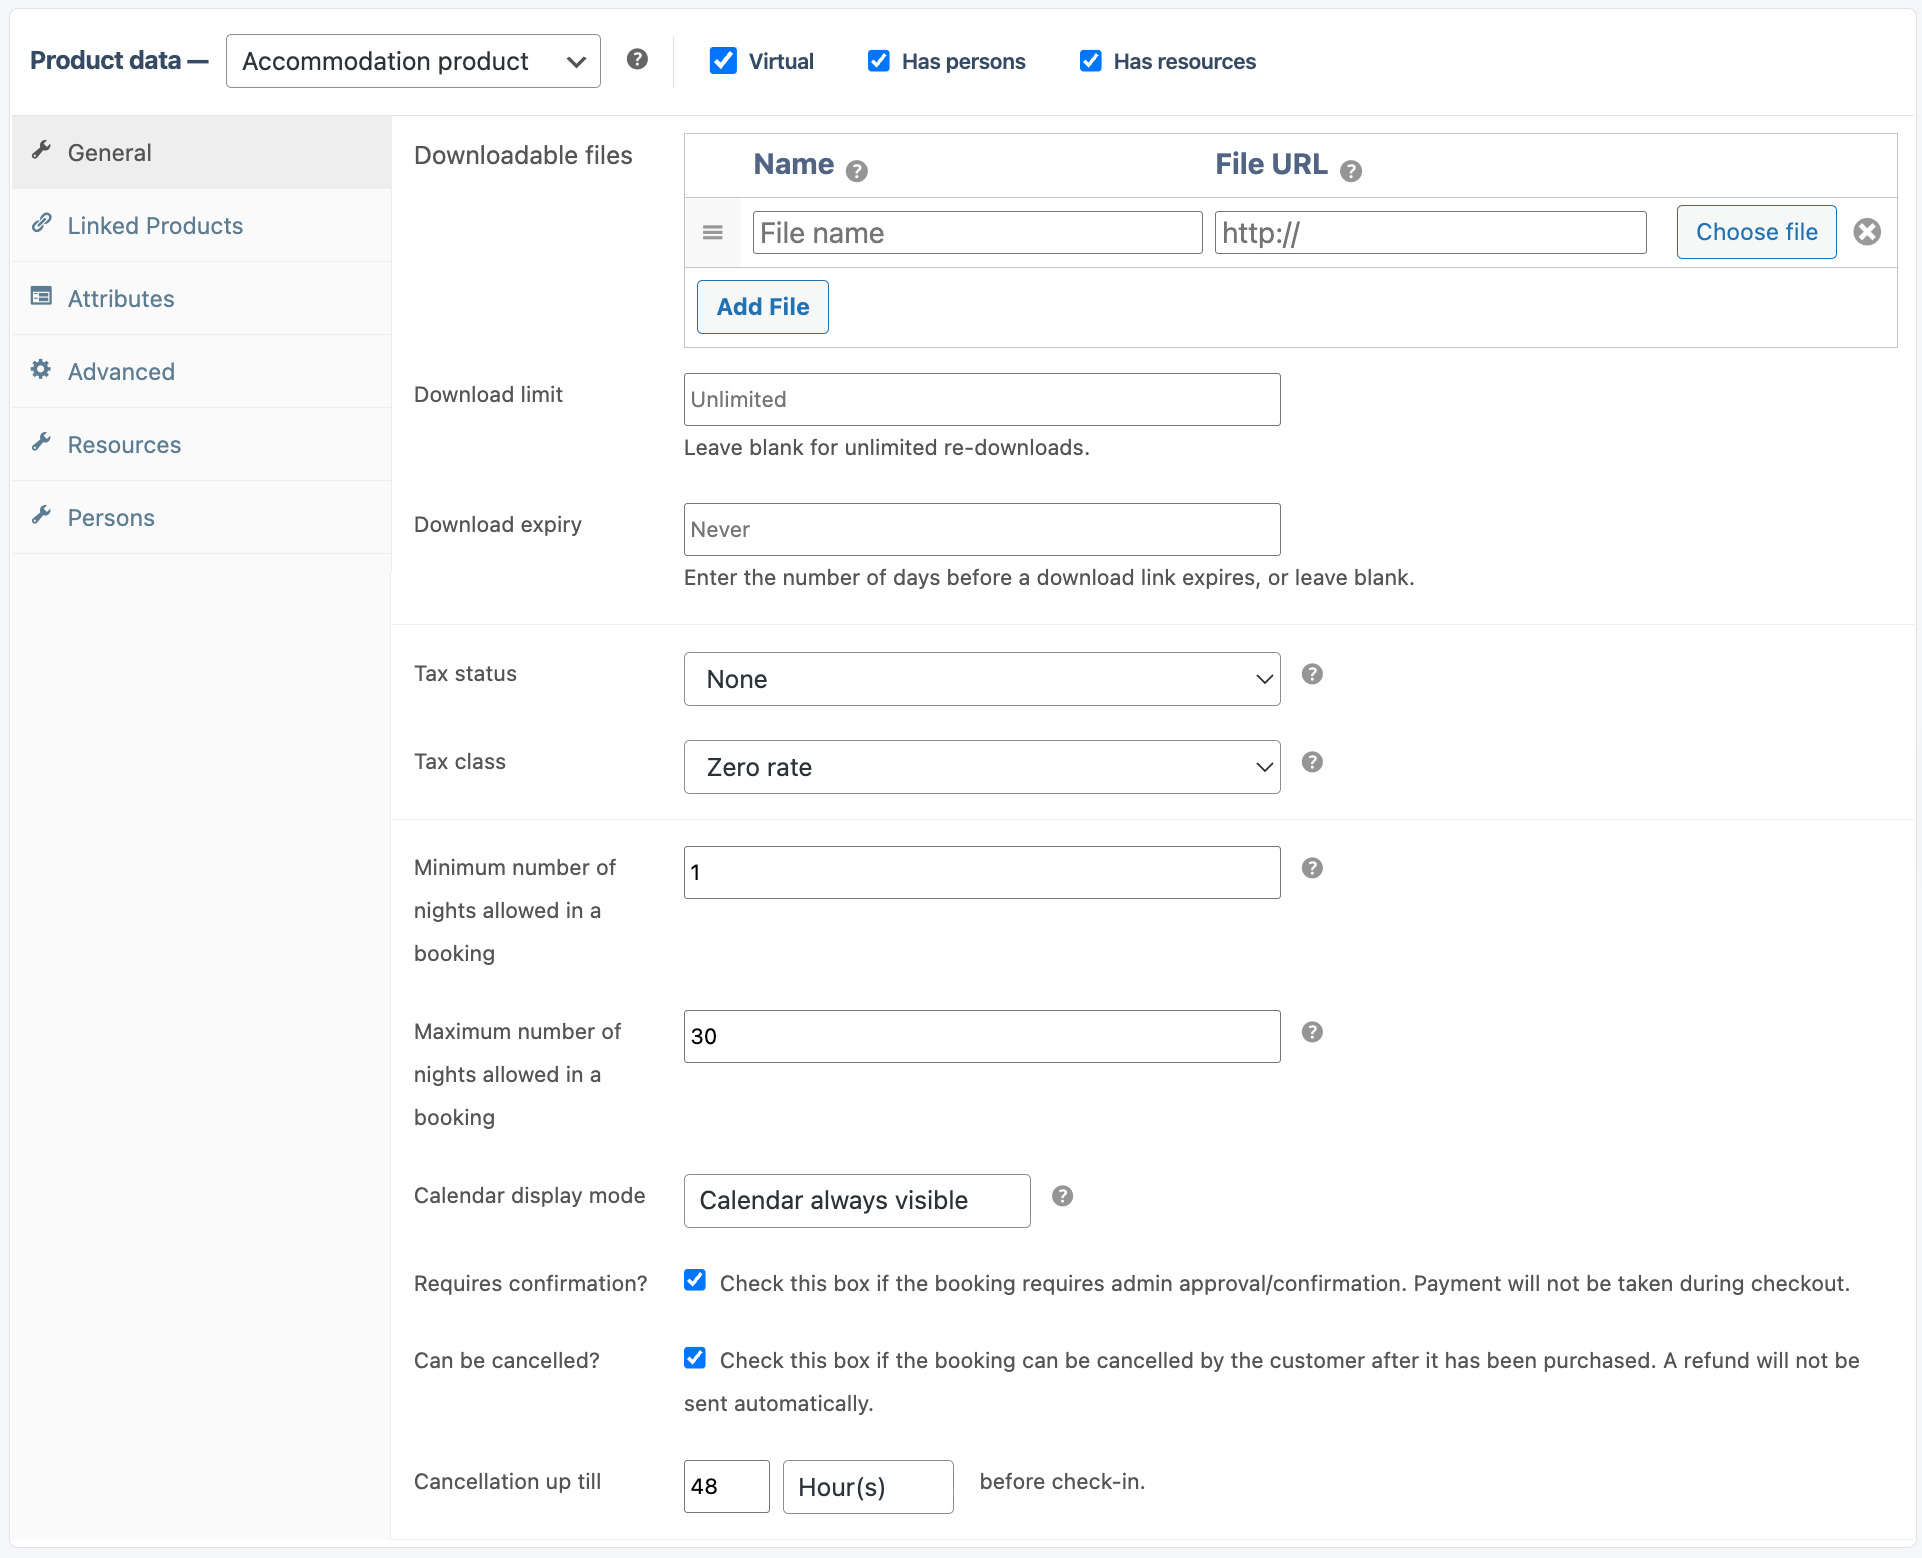
  • Downloadable files – Leave empty
  • Download limit – Leave empty
  • Download expiry – Leave empty
  • Tax status – If you are tax-registered and you would like to add tax to your product and/or shipping, you can set this here. 
  • Tax class – If you are tax-registered, you can set the type of Tax you would like to add to your product here.
  • Minimum number of nights allowed in booking – What is the minimum number of nights needed to make the booking.
  • Maximum number of nights allowed per booking – How many nights is the absolute maximum you would allow per booking?
  • Calendar display mode – Select “Calendar always visible”.
  • Requires confirmation – If you accept bookings outside of Townzie as well, we would advise ticking this box, which will ensure that you don’t get double bookings. If you only use Townzie for bookings, you could leave this unticked should you not feel the need to confirm booking availibility before accepting a booking. 
  • Can be cancelled – If you allow cancellations (refunds), be sure to tick this box. It is advised to add a “Cancellation Policy” to the field lower down in the “Add Product Form” so that customers can be sure to read what cancellation policy you offer. 
  • Cancellation up till – Add here the cancellation period before check-in, where the customer could still get a refund. If you have a tiered cancellation policy where a percentage is offered back at set times before check-in, choose the period where a percentage of the fee is still possible to claim back. For example, you offer a 100% fee back if cancellation is received 7 days before check-in, and you offer 50% fee back where the cancellation is received 48hours before check in, and no cancellation fee is offered under 48 hours before check in. In this example you will enter 48 hours before check in.

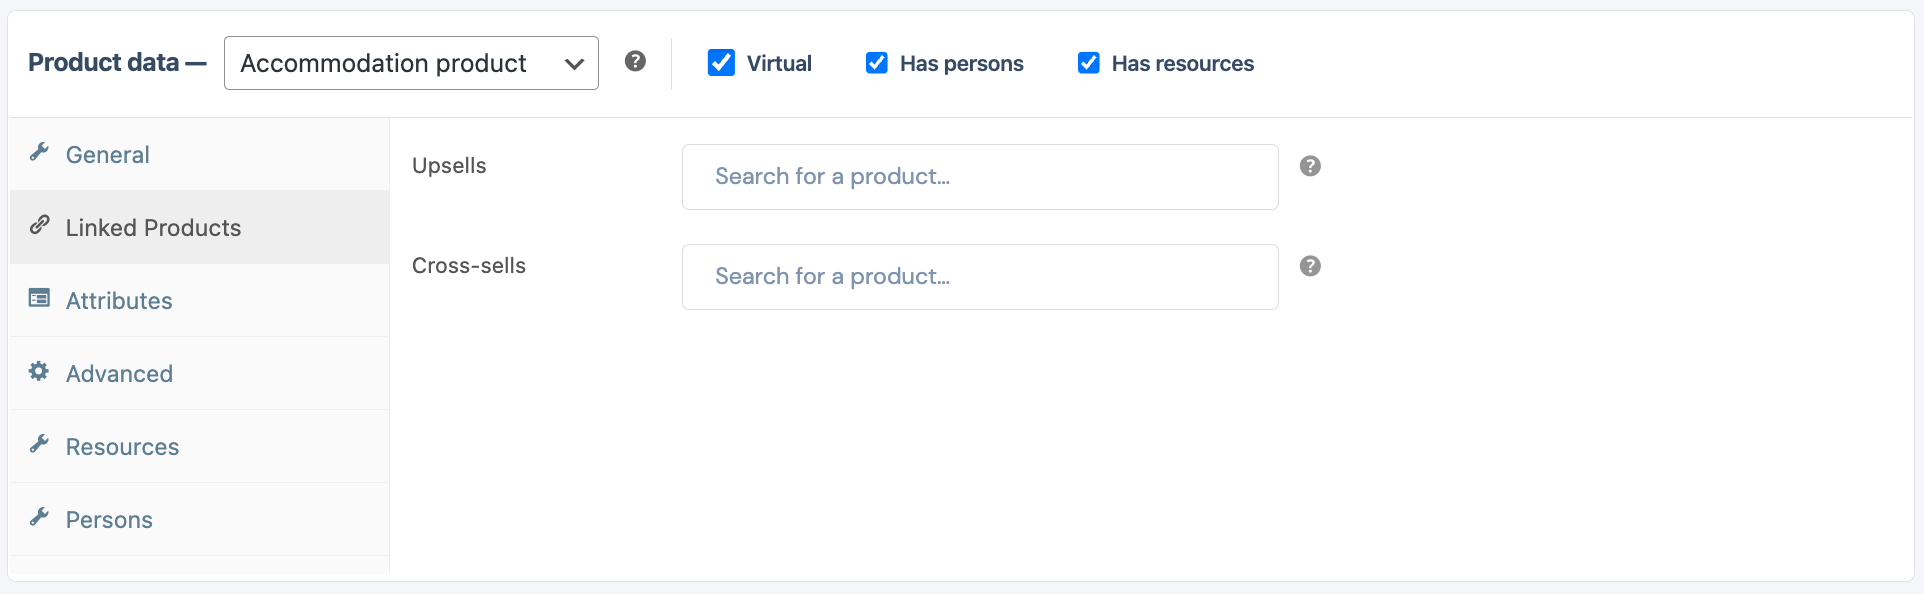
6.3 Linked Products:

  • Upsells and Cross-sells – If you have already added other products prior to adding this product, you can display these products to your clients during checkout. This could lead to more sales for your store/business. You can only add these products here if they have already been created. 

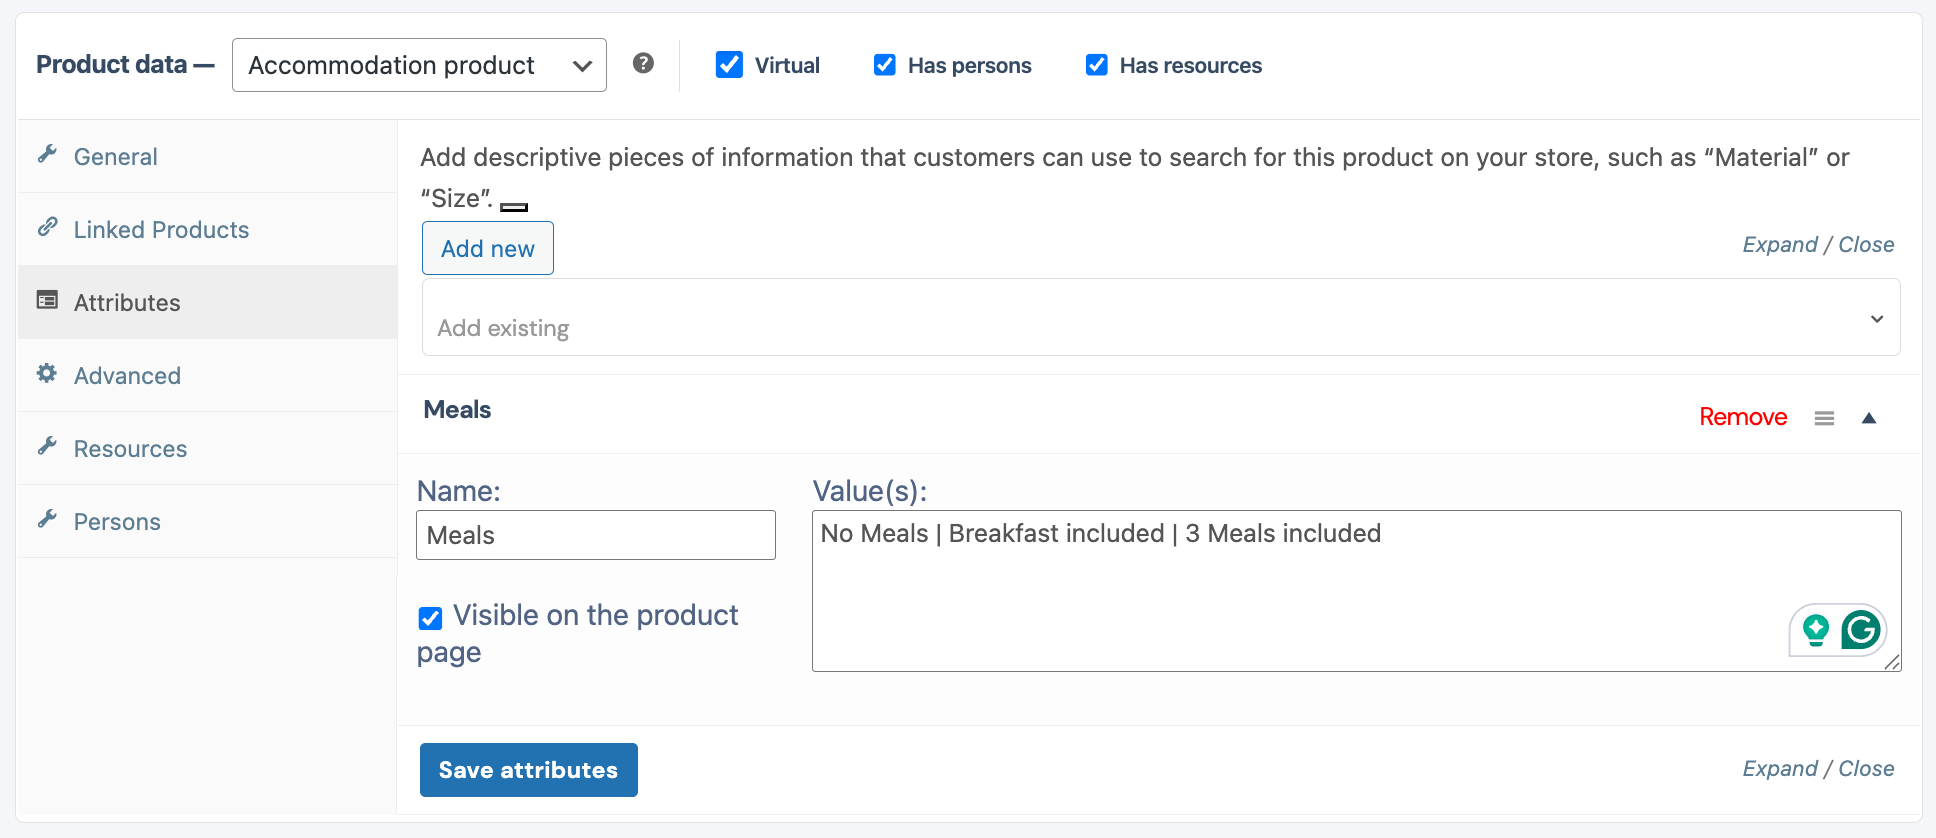
6.4 Attributes:

  • Add new – Use Attributes to create variable products with different options (like, for example, you offer different meals with your bookings). Attributes provide a way to list product characteristics that help customers narrow down their choices and purchase the option that they’re looking for. If your product doesn’t have different attributes, you may leave this tab blank.
  • Name – Name your Attribute. For example: meals. This will only be visible if you clicked on Add new. Leave blank if not needed.
  • Value(s) – Here you will add all the different options/attributes of your product. For example: No Meals | Breakfast included | 3 Meals included. Remember to separate each option with ” | “
  • Save attributes – If you have added attributes, remember to save them by clicking on “Save attributes” prior to moving to a new tab.

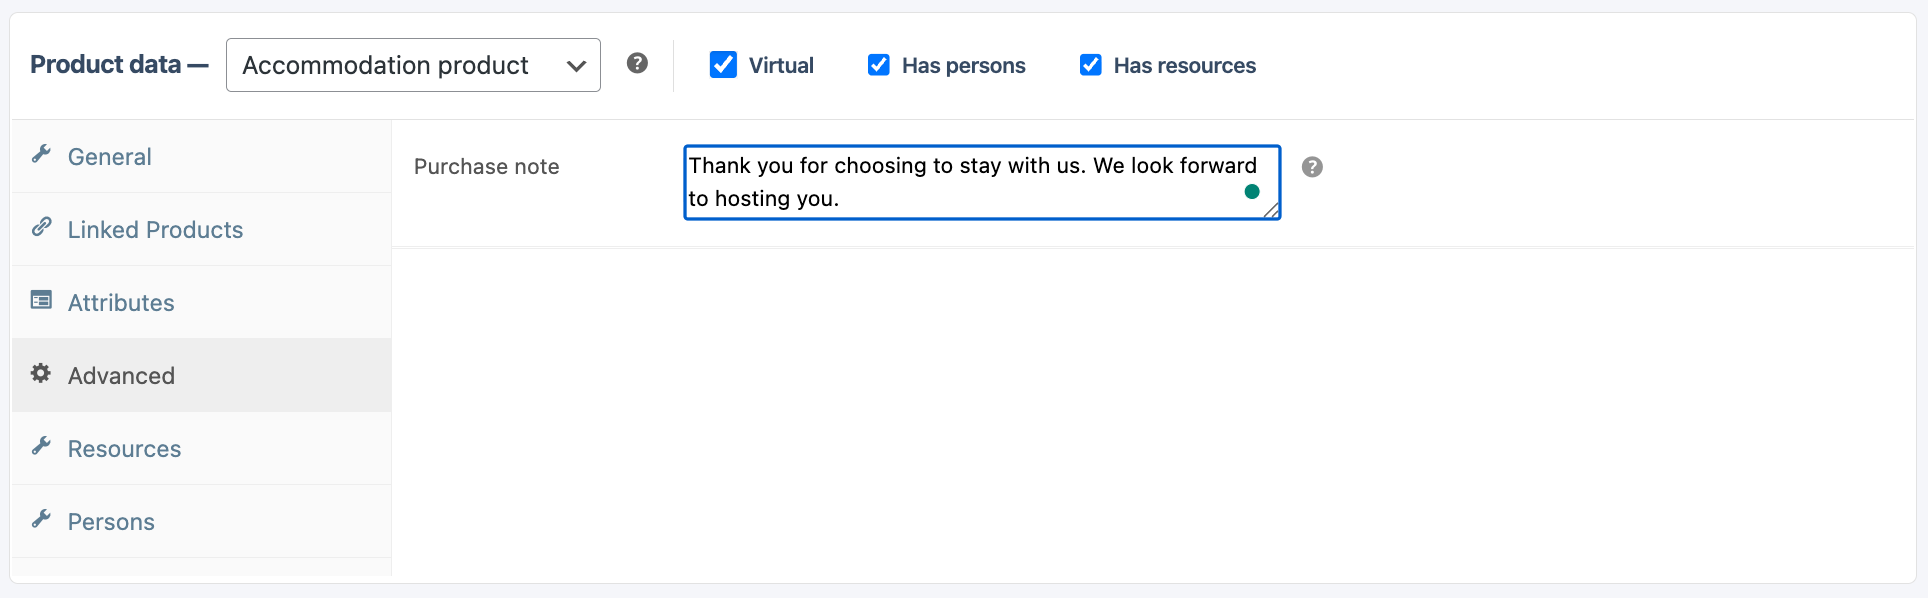
6.5 Advanced:

  • Purchase Note – If there is a special note you would like your customer to receive after they have successfully booked and paid for staying at your accommodation, you may enter this message here.


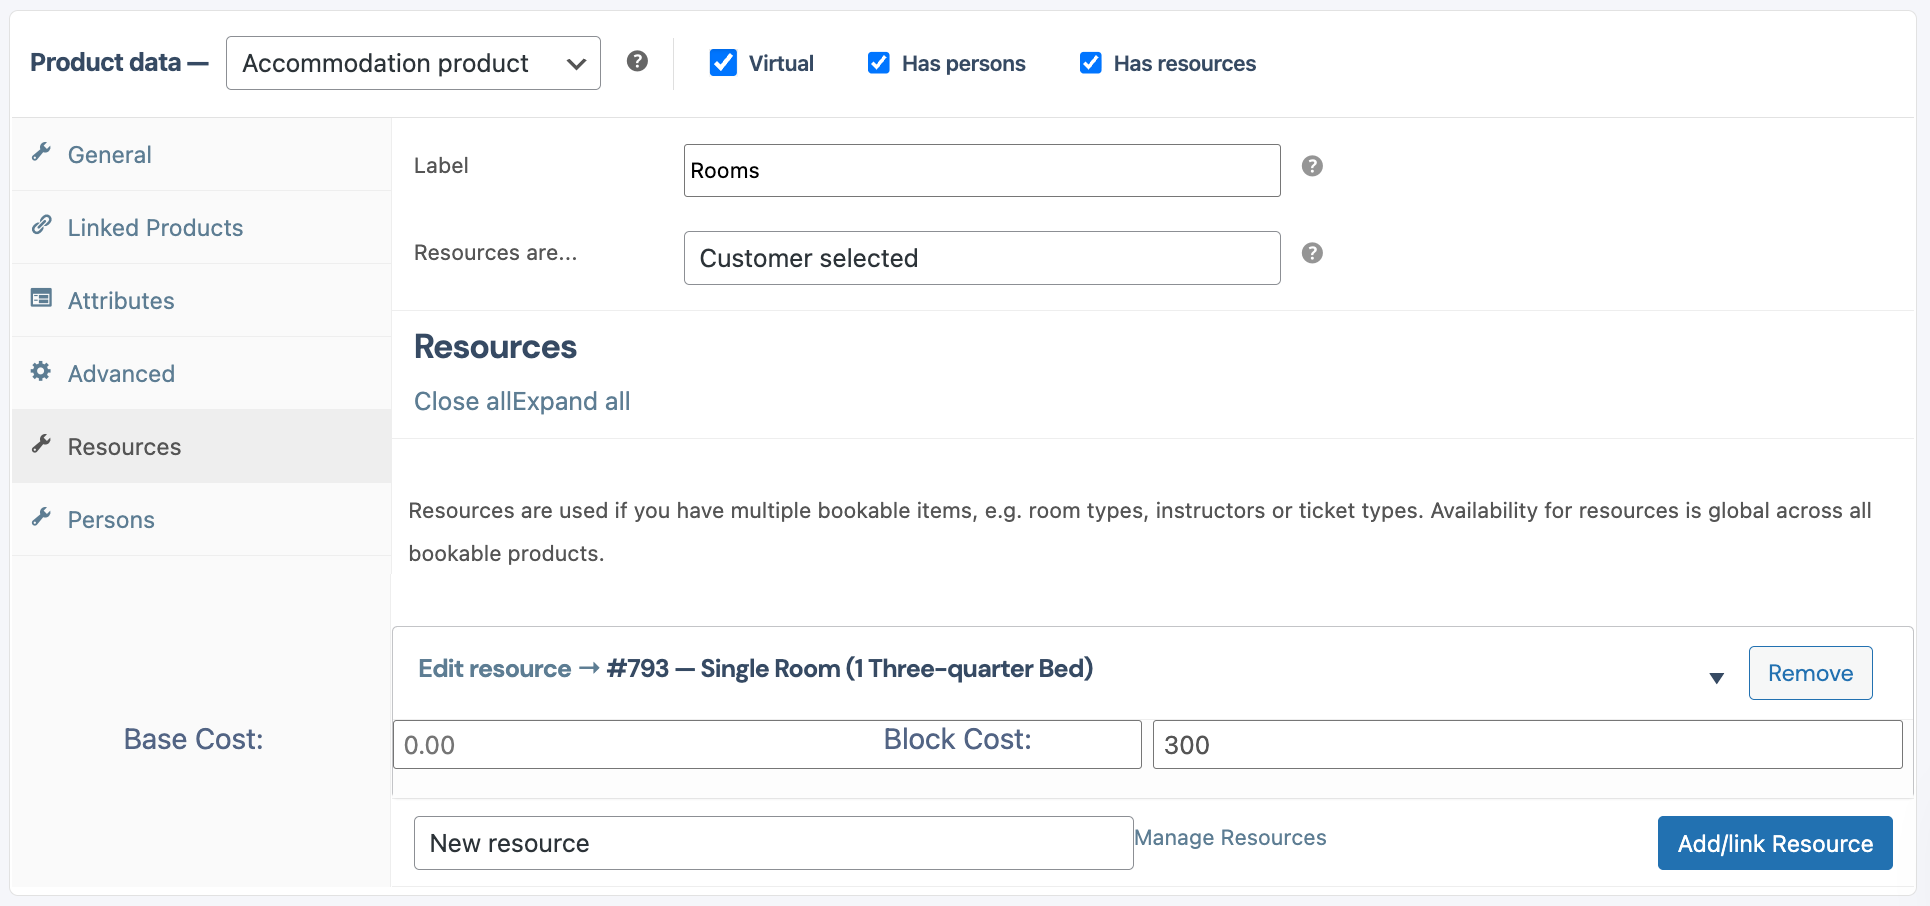
6.6 Resources:

  • With Resources you add any Options for your bookings that might have alternative prices. For example, different room types. If you charge only per night regardless of how many people you will also use Resources to set up this pricing, you may call your resource “Price per night” for example. It is good to note that if you don’t charge “per-room” but rather “per-person” that you can leave this blank and rather set your pricing under the “Persons” tab. It is also possible to do a combination of “per-room” plus “per-person” rate. 
  • Label – Name your Resources
  • Resources are – Here you select “Customer selected”
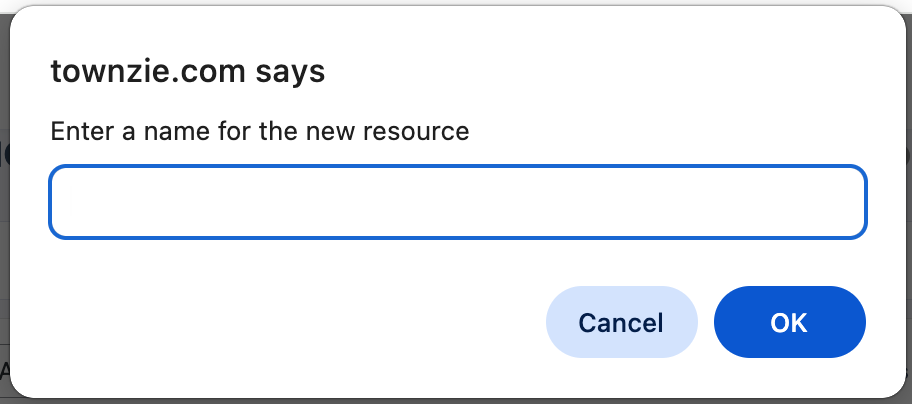
  • Add/link Resource – Click this button to add your first Resource

  • Enter a name for the new resource – Here you enter the first Resource option. For example, Single room.
  • Base Cost – The overall fee for the booking regardless of how many nights are booked. This is a once-off fee per booking. 
  • Block Cost – This is the “per-night” fee for the resource.
  • You will repeat the process untill all your Resources have been loaded, starting with clicking on “Add/link Resource”.

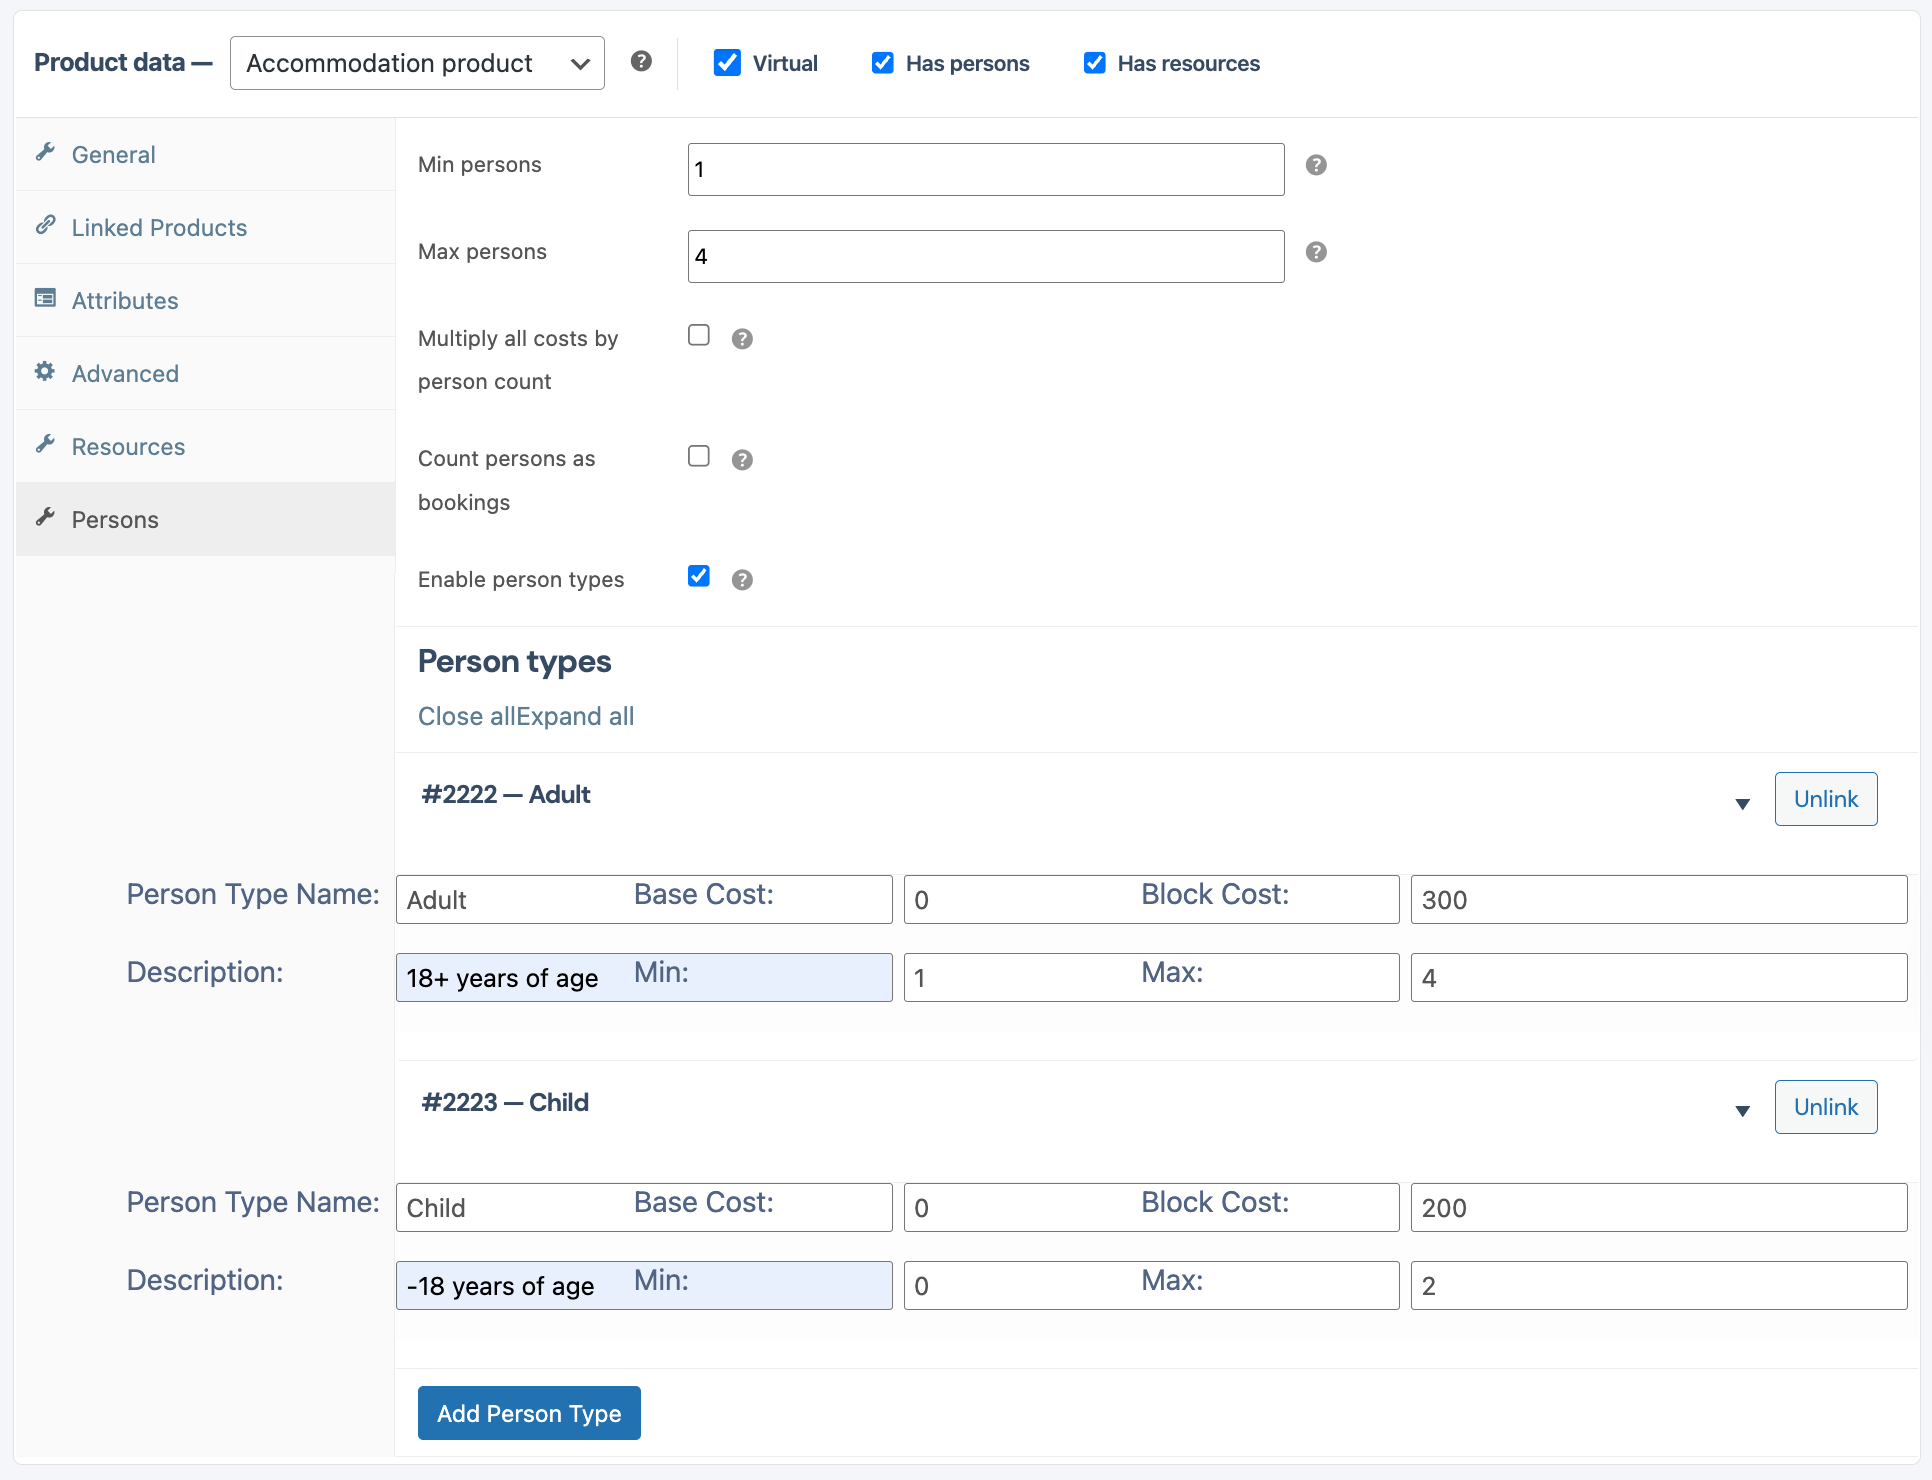
6.7 Persons:

  • If you have a “per-person” type of booking fee system, this tab needs to be completed. If you have a “per-night for the entire place” type of booking fee instead, it is advised to complete only the Resources tab. It is also possible to do a combination of “per-room” plus “per-person” rate. 
  • Min persons – What is the minimum amount of people needed to confirm the booking
  • Max persons – What is the maximum amount of people allowed per booking.
  • Multiply all costs by person count – If you will charge each person the base cost and block cost set up under a “Resource”, then tick this box. It is advised to leave this blank.
  • Count persons as bookings – If each person in a single booking will count towards the allowed bookings per block, then tick this block. It is advised to leave this blank.
  • Enable person types – If you have different charges for selected person types (adult, child, infant, student, retiree, etc.), you can tick this box to set it up. It is also helpful when you would like to specify how many of each person type is allowed.
  • Add person types (will only display when “Enable person types” is ticked) – Person type name: Adult/Child/Infant. Base Cost is the Fee for the entire booking for that person type. Block Cost is the fee per block booked for that person type. Description of your person type. Min of the person type needed per booking. Max number of person types allowed per booking. You may add as many different person types as your listing requires. 

7. Remember to click on “Send Product for Review” or to “Save as Draft” at the top of the form before leaving the page. If you do not save the form, the data you just entered will be lost. 

1. Go to your Listing Dashboard. Select the Products tab on the left menu.

2. If you would like to edit an existing Product, you can search for the Product Name or find it in the list shown. To edit the Product, click on the 3 dots (…) on the right-hand side of the Product in question. From the Menu that opens, select “Edit Product”.

3. If you are adding a new Product, you will see a button in the top right corner, “Add Product”. Click this button

4. On the Product page, we will be working on the “Product Data”. This is where we set the Pricing for the Product/Listing.

5. Depending on the type of Product you are working with you will follow the following steps:

5.1 Simple Product (Local Product / Second Hand / Event). Go to General – Add Sale Price and schedule the dates for when the sale will run.
5.2 Bookable Product (Activities / Events). Go to Costs – Add a range with your sale price.
 

6. Remember to click on “Send Product for Review” or to “Save as Draft” at the top of the form before leaving the page. If you do not save the form, the data you just entered will be lost. 

Fees and Payments

What are the Townzie Fees?

Townzie charges Listing Owners / Vendors a flat fee of 10% commission on any successful sales. There are no upfront fees for adding a Listing to the website. 

Townzie doesn’t charge Visitors / Customers to the website any fees for using the website.

For more information on our Fees please visit out Payments Policy.

To request a payout, you can follow these steps:
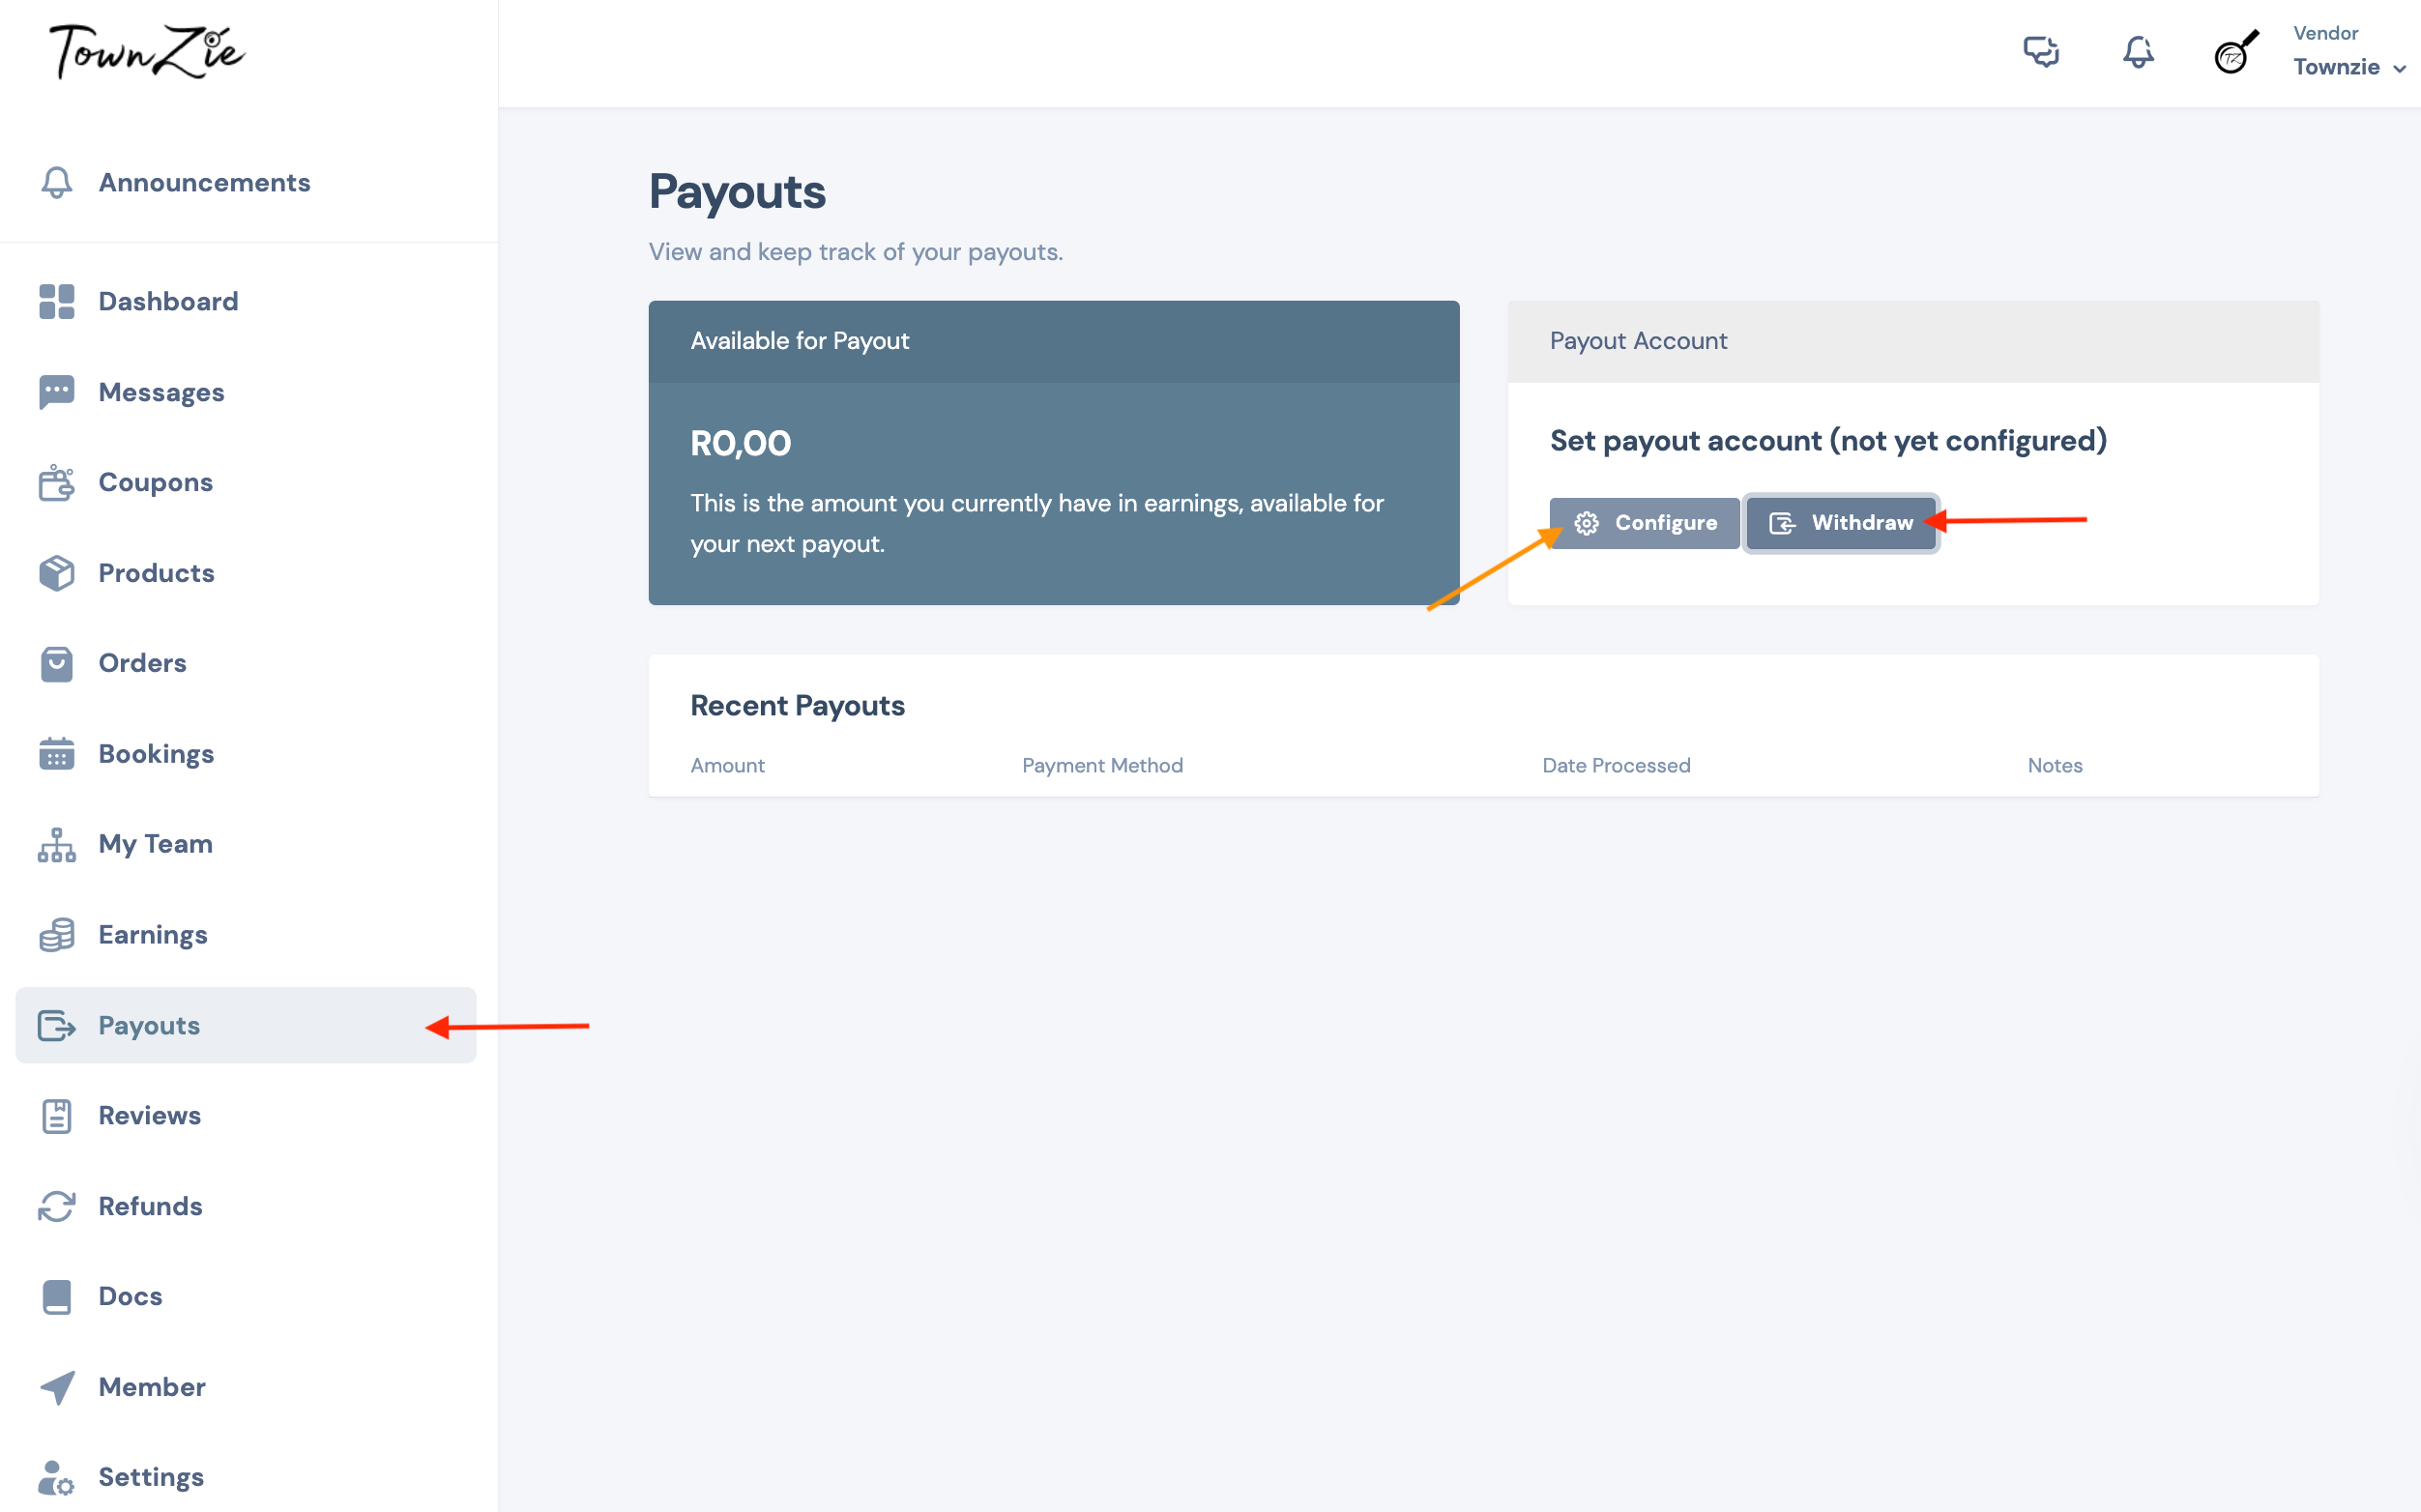
  1. Go to your Listing Dashboard. Select the Payout tab on the left.
  2. On the page that opens on the right, you will see what amount is available for payout. 
  3. To action the payout, make sure that your payout details have been configured correctly and then click on “Withdraw”.
  4. We will action your payout within 48 working hours of receiving your payout request, and your funds should clear into your account within another 48 working hours after the payment is actioned.


* Payments are made from South Africa, so if your bank account is located outside of South Africa, these payments may take longer to clear. You should be able to confirm the timeline directly with your Bank.

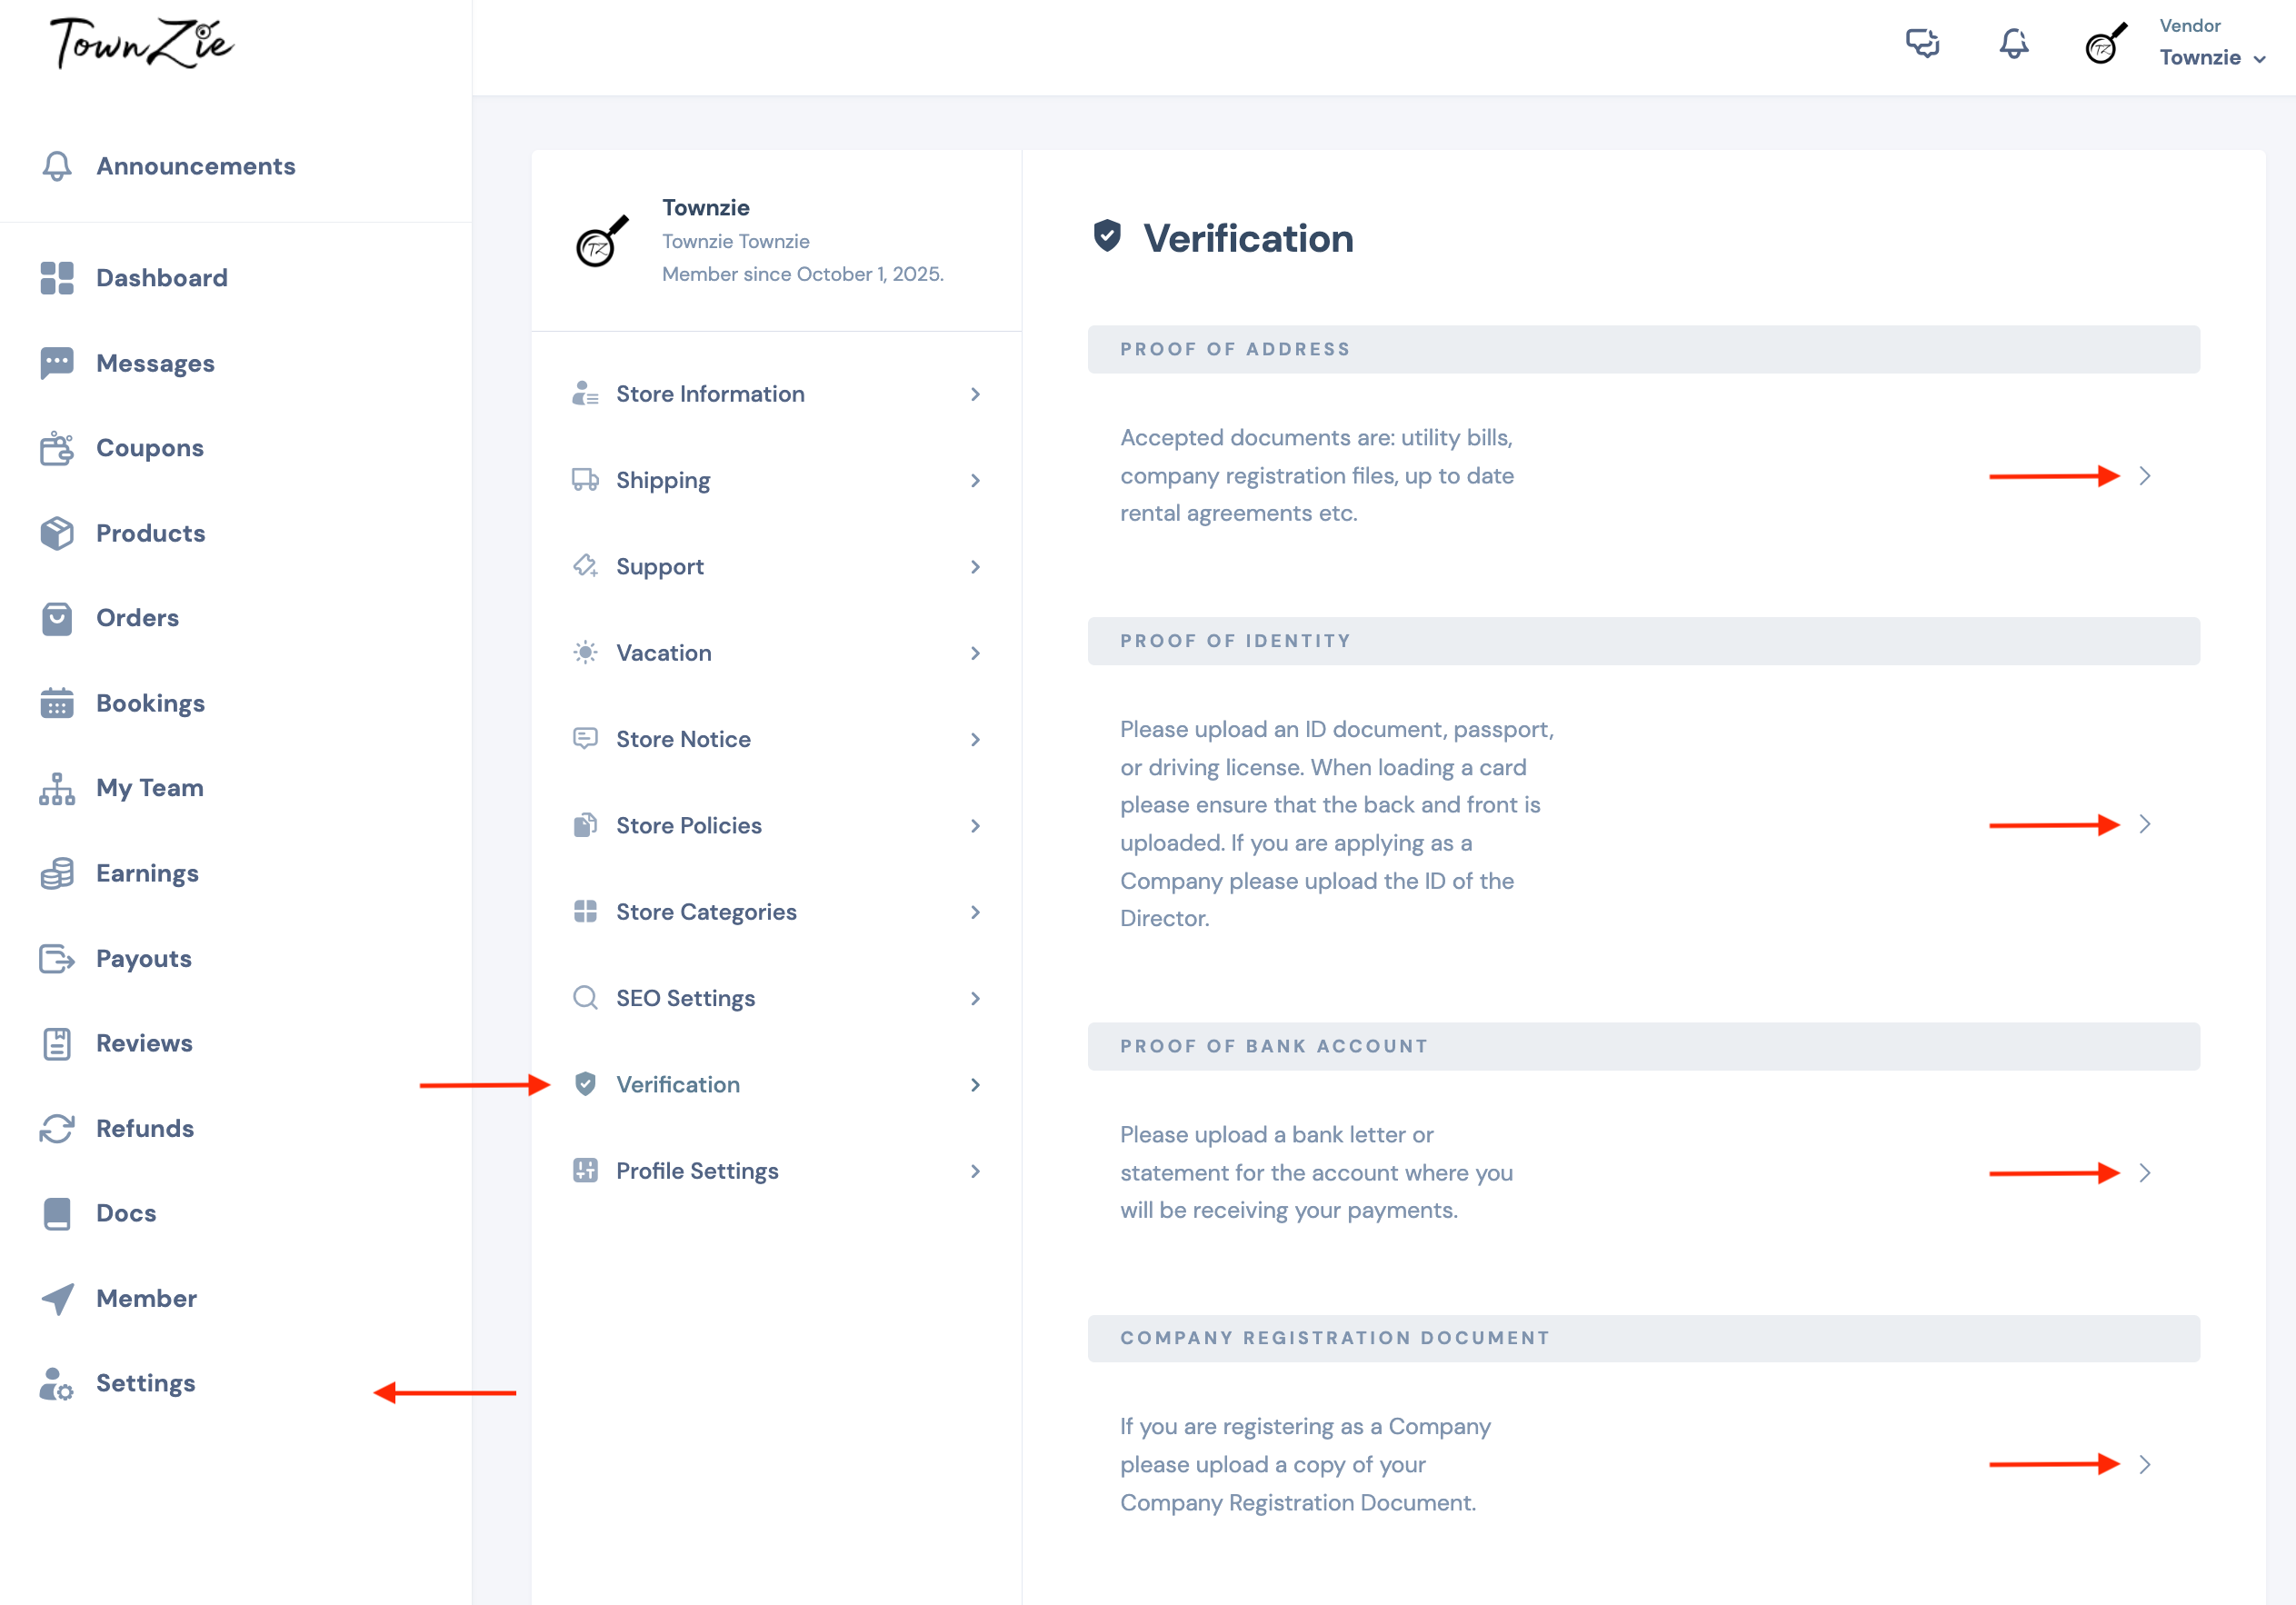
** Payments will only be made once a Vendor has successfully submitted their Verification documents. This is not only to protect the website visitors/customers but also to protect our Vendors from false/fake accounts posing to be a legitimate business that is, in essence, not the real business owner. To become an approved Vendor and to receive your payouts, you can upload your verification documents by going to: Listing Dashboard > Settings > Verification > and then uploading the requested Documents for review.
 

If you have any questions that were not answered by the FAQs above, you may reach out to us on the Contact Us page.